What is cloud NDI® and how to use it
More live video workflow notes and product updates.
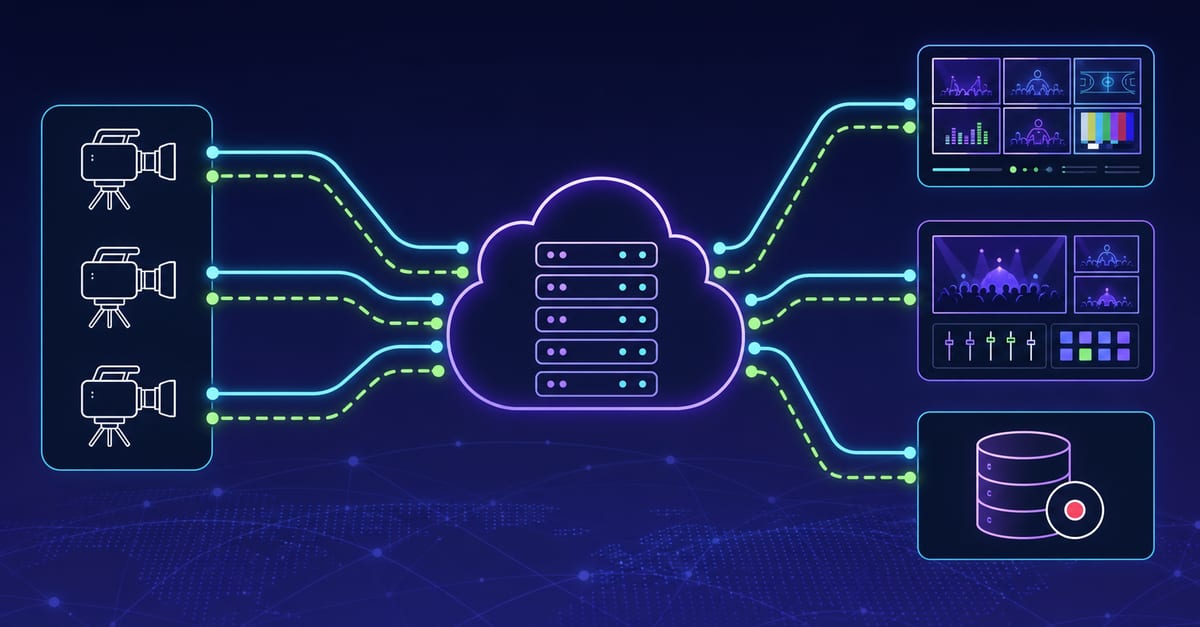
Cloud NDI is useful when production tools need to discover and exchange NDI sources inside a controlled cloud network while SRT carries contribution across less predictable links. Callaba combines the NDI adapter, discovery view and network configuration UI with SRT routing, Multiview, recording and delivery. See the Callaba NDI product for the product decision, then follow this guide for the cloud workflow.
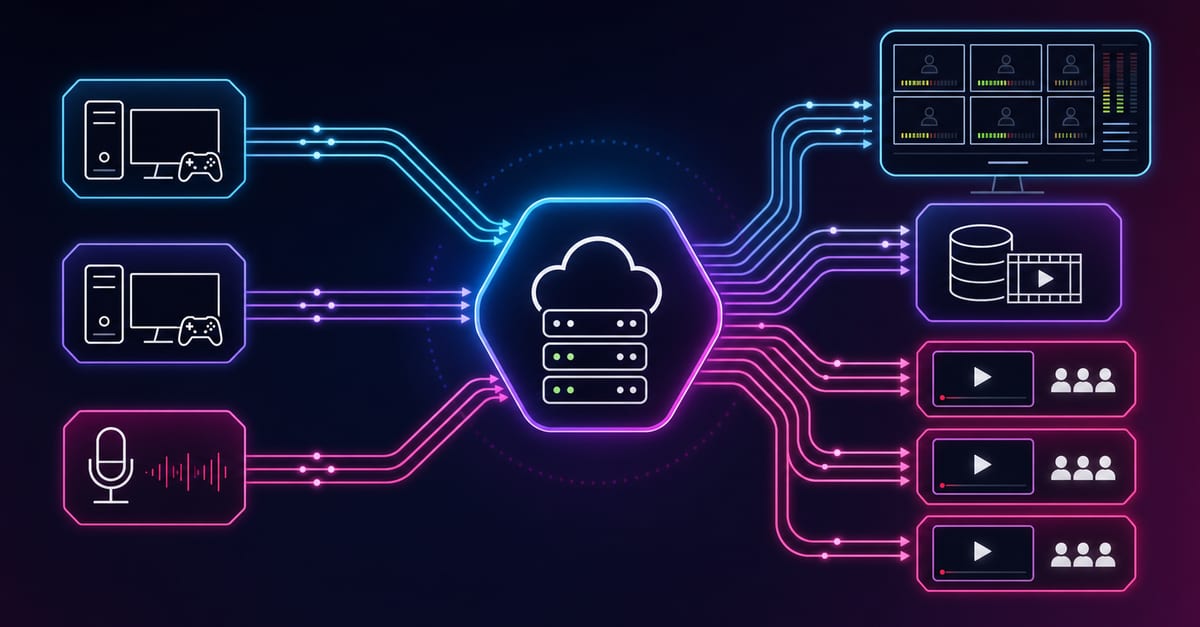
Combining cloud-based NDI® with SRT allows you to move your entire video production workflow to the cloud while still using the familiar software and tools you’re already comfortable with. With less equipment to juggle, you can focus on what really matters — delivering an incredible event.

Why move to the Cloud?
Less gear to manage
No more hauling around bulky and complicated equipment. Cloud production means fewer physical devices and less setup time.
Reliable low-latency SRT H.265/H.264 transport to the cloud
Callaba uses SRT (Secure Reliable Transport) to deliver HEVC/H.264 video with low latency and high reliability. SRT’s built-in packet recovery ensures smooth streaming, even over unstable networks, making it a trusted standard in the broadcasting industry for secure video delivery.
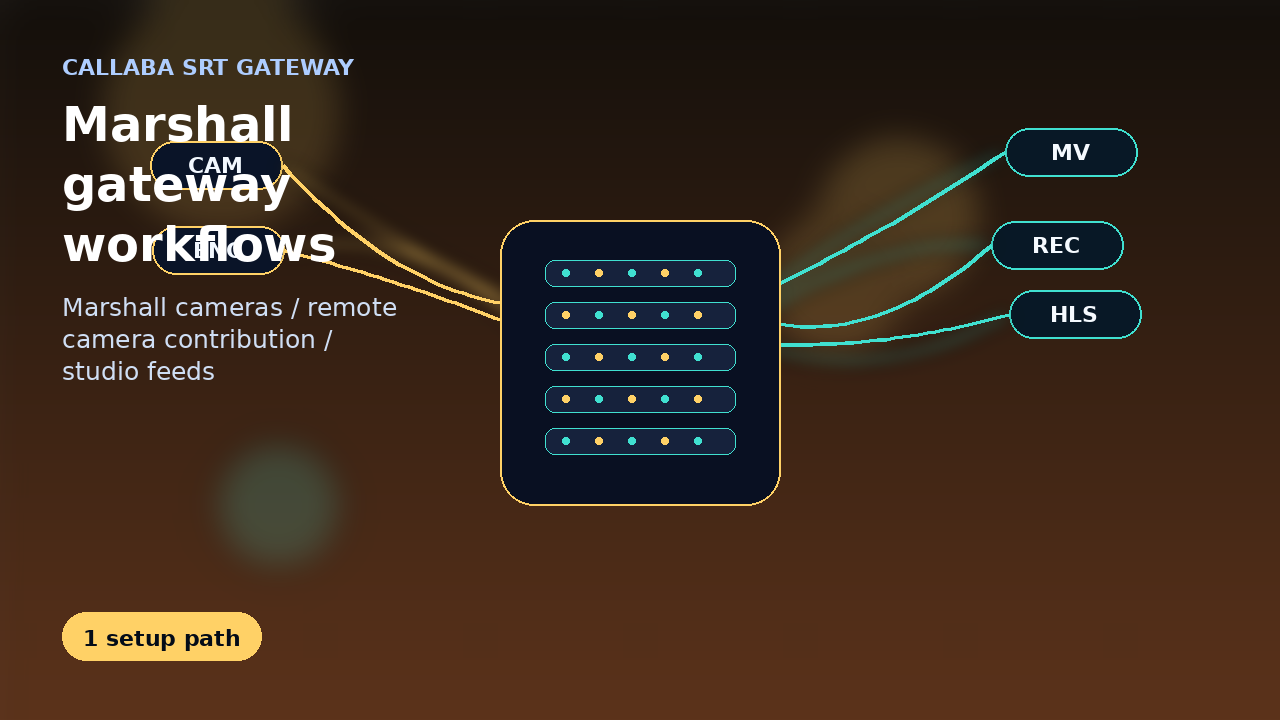
Double-enhanced SRT link using Callaba Main/Backup bonding
For added reliability, Callaba’s SRT bonding allows you to set up primary and backup internet connections. If your main connection fails, SRT bonding automatically switches to the backup stream in real-time, with no visible interruption to the viewer and no manual intervention from your side.
Guide: Set up SRT backup stream in case of main stream interruption
Use any camera or encoder without sync issues
With Callaba, you’re not locked into specific hardware (like HX or HX3 cameras). Any standard device you already have works, and everything stays in perfect sync.
Real-time SRT stats for live event monitoring
Callaba provides real-time, detailed SRT statistics, giving you crucial insights into stream health, including latency, packet loss, and bitrate. This live monitoring allows you to detect and resolve issues before they impact your audience.
What is SRT statistics?
Advanced real-time statistics via API
No extra transcoding
Callaba's NDI® adapter eliminates the need for additional transcoding. What you send is exactly what gets streamed.
Prerequisites
The setup we are about to explore in this tutorial requires you to have some technical knowledge of cloud services. Specifically, you should be comfortable with setting up a VPC (Virtual Private Cloud) and launching multiple servers within the same network. If you’re unfamiliar with these concepts, you may want to review basic cloud networking before proceeding.
In this example, we’ll be using three separate cloud instances, each running a different service:
- Callaba — This machine handles several functions, including the NDI® adapter, SRT gateway, multi-streaming, recording, VOD and more, all in one convenient software package.
- NDI® Discovery Server — A machine with NDI® Tools installed, responsible for discovering and managing NDI® streams in the cloud.
- Mixer — For this example, we’ll be using vMix as the mixer, but you can substitute it with any other mixer software that supports NDI®.
To keep things simple and focused on the cloud NDI® workflow, we won’t dive into the details of setting up the VPC here. This guide assumes you’ve already got your cloud networking in place.
Before you begin
For this tutorial, you’ll need Callaba — the software.
You can launch Callaba on AWS or you can install the self-hosted version on any hosting provider of your choice.
1. Launch Callaba on AWS. Subscribing to Callaba on AWS will take no more than 5 minutes.
2. Get a license and install Callaba Self-Hosted.
Let's begin!
Setup NDI® Discovery Server
1. Launch a Windows EC2 instance.
2. Download and install NDI® Tools from the official NDI® website.
You'll need NDI® Discovery Service, NDI® Studio Monitor) and other utilities essential for NDI® streaming.
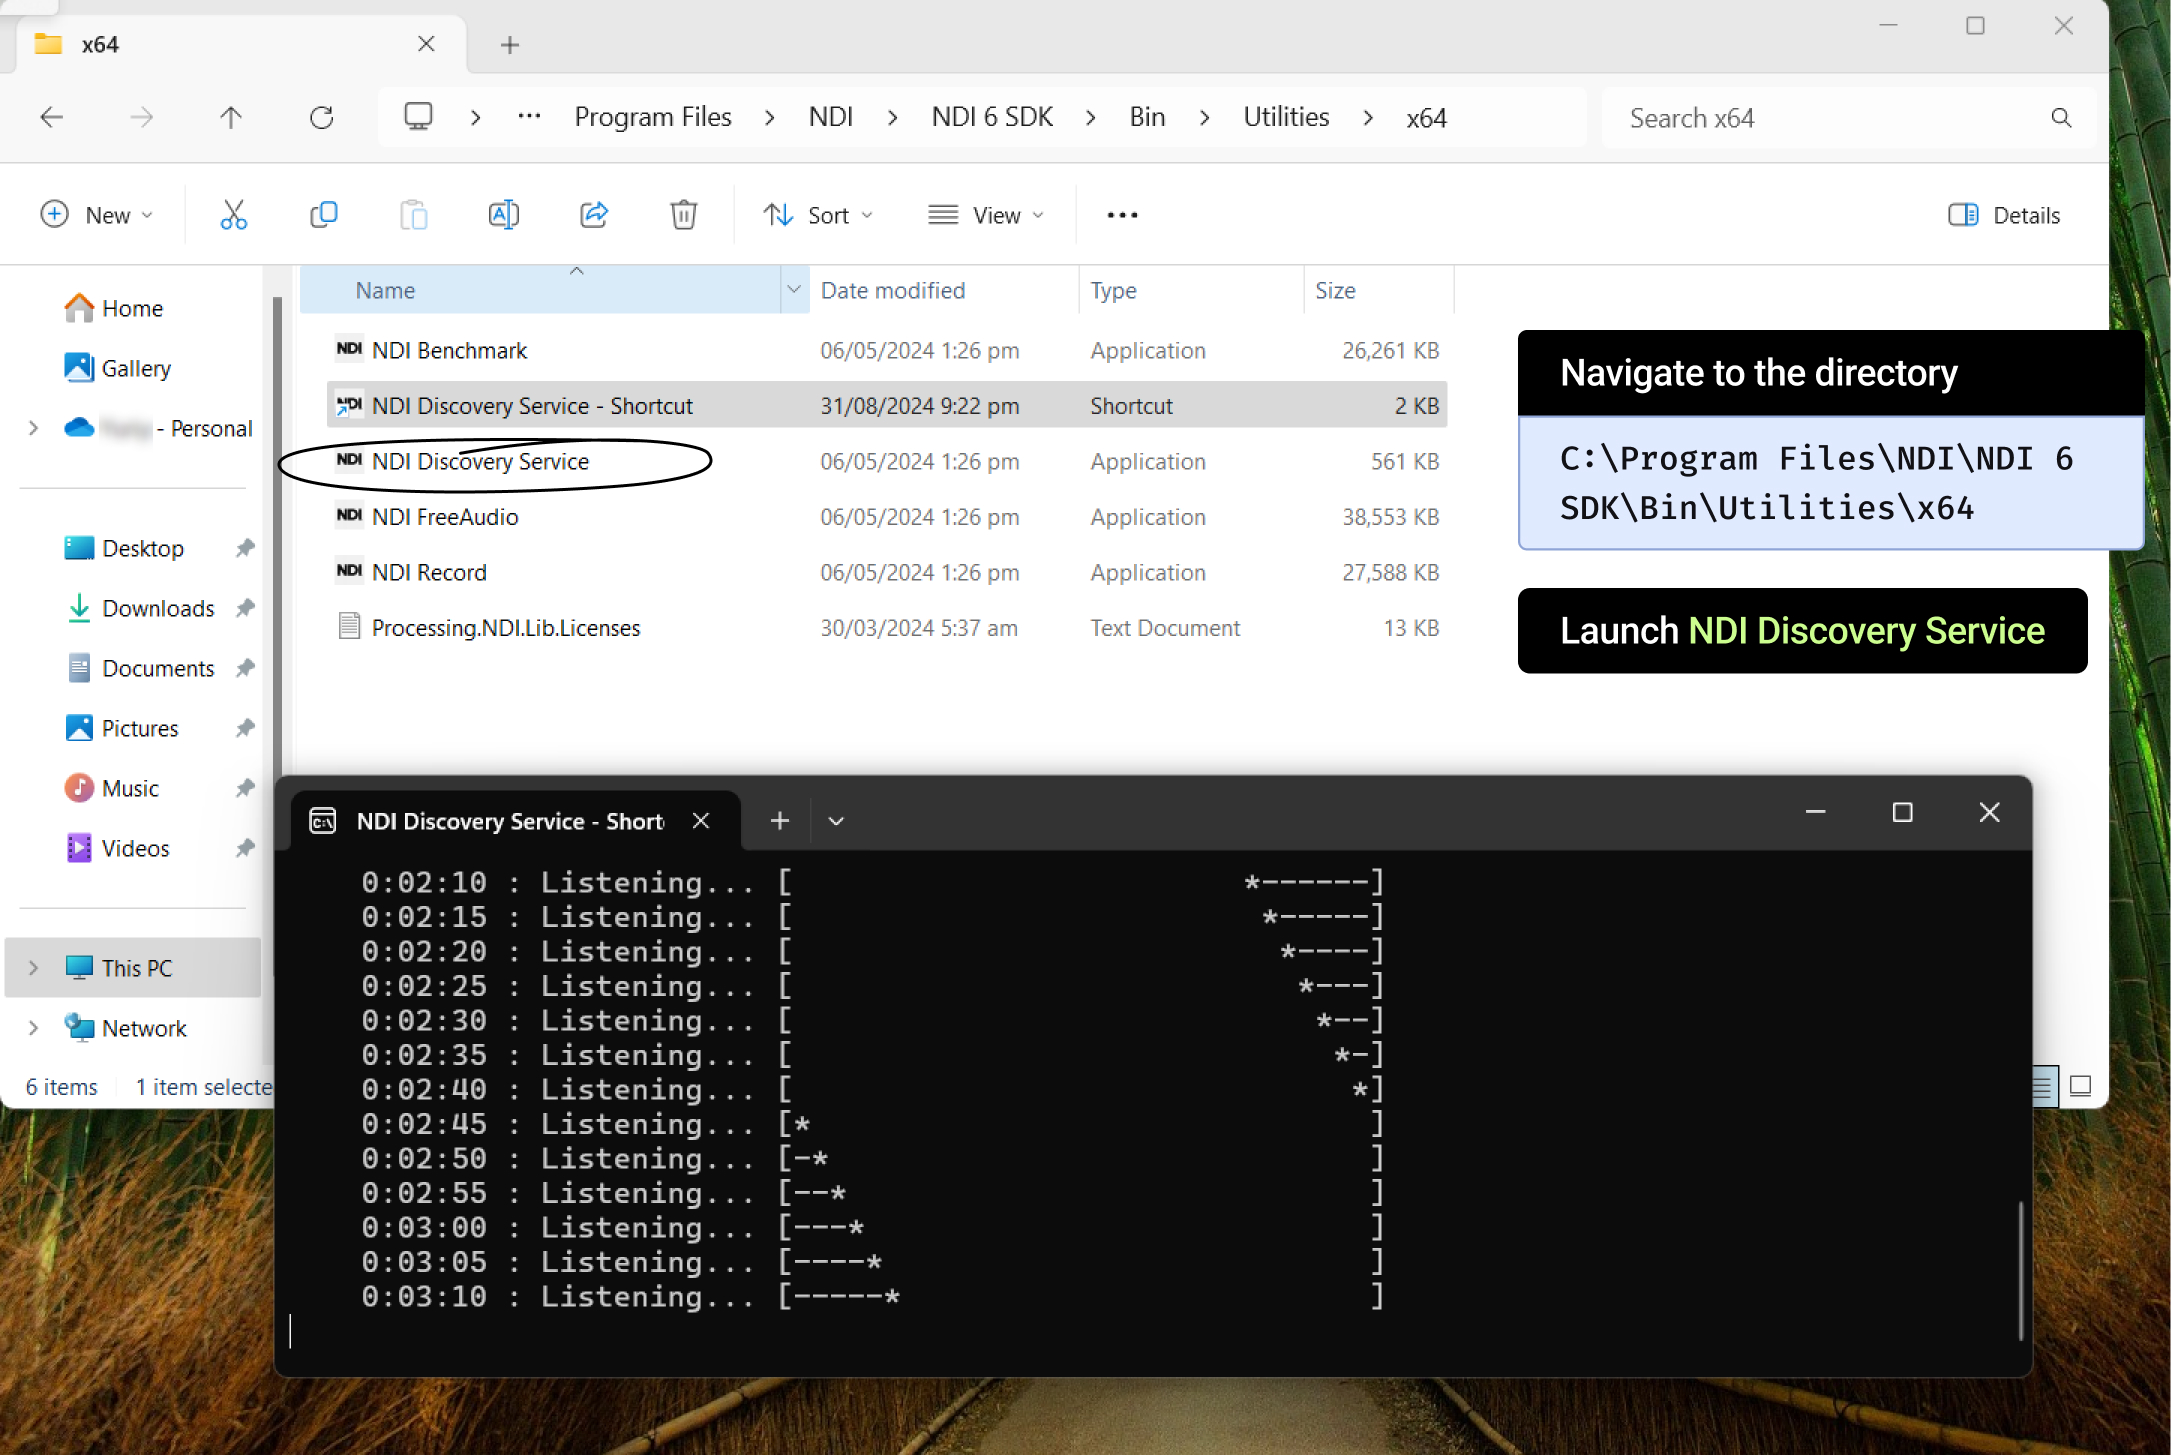
3. Once NDI® Tools is installed, navigate to the directory where the NDI® Discovery Service is located. The path to the file usually looks like this:
C:\Program Files\NDI\NDI 6 SDK\Bin\Utilities\x64
4.In this folder, find the executable named NDI® Discovery Service.
Double-click to launch the service. It will run in the background, continuously listening for any NDI® streams within the network.
Find Public IP address of your NDI® Discovery Server
5. Now we need to get the public IP address of the NDI® Discovery Server.
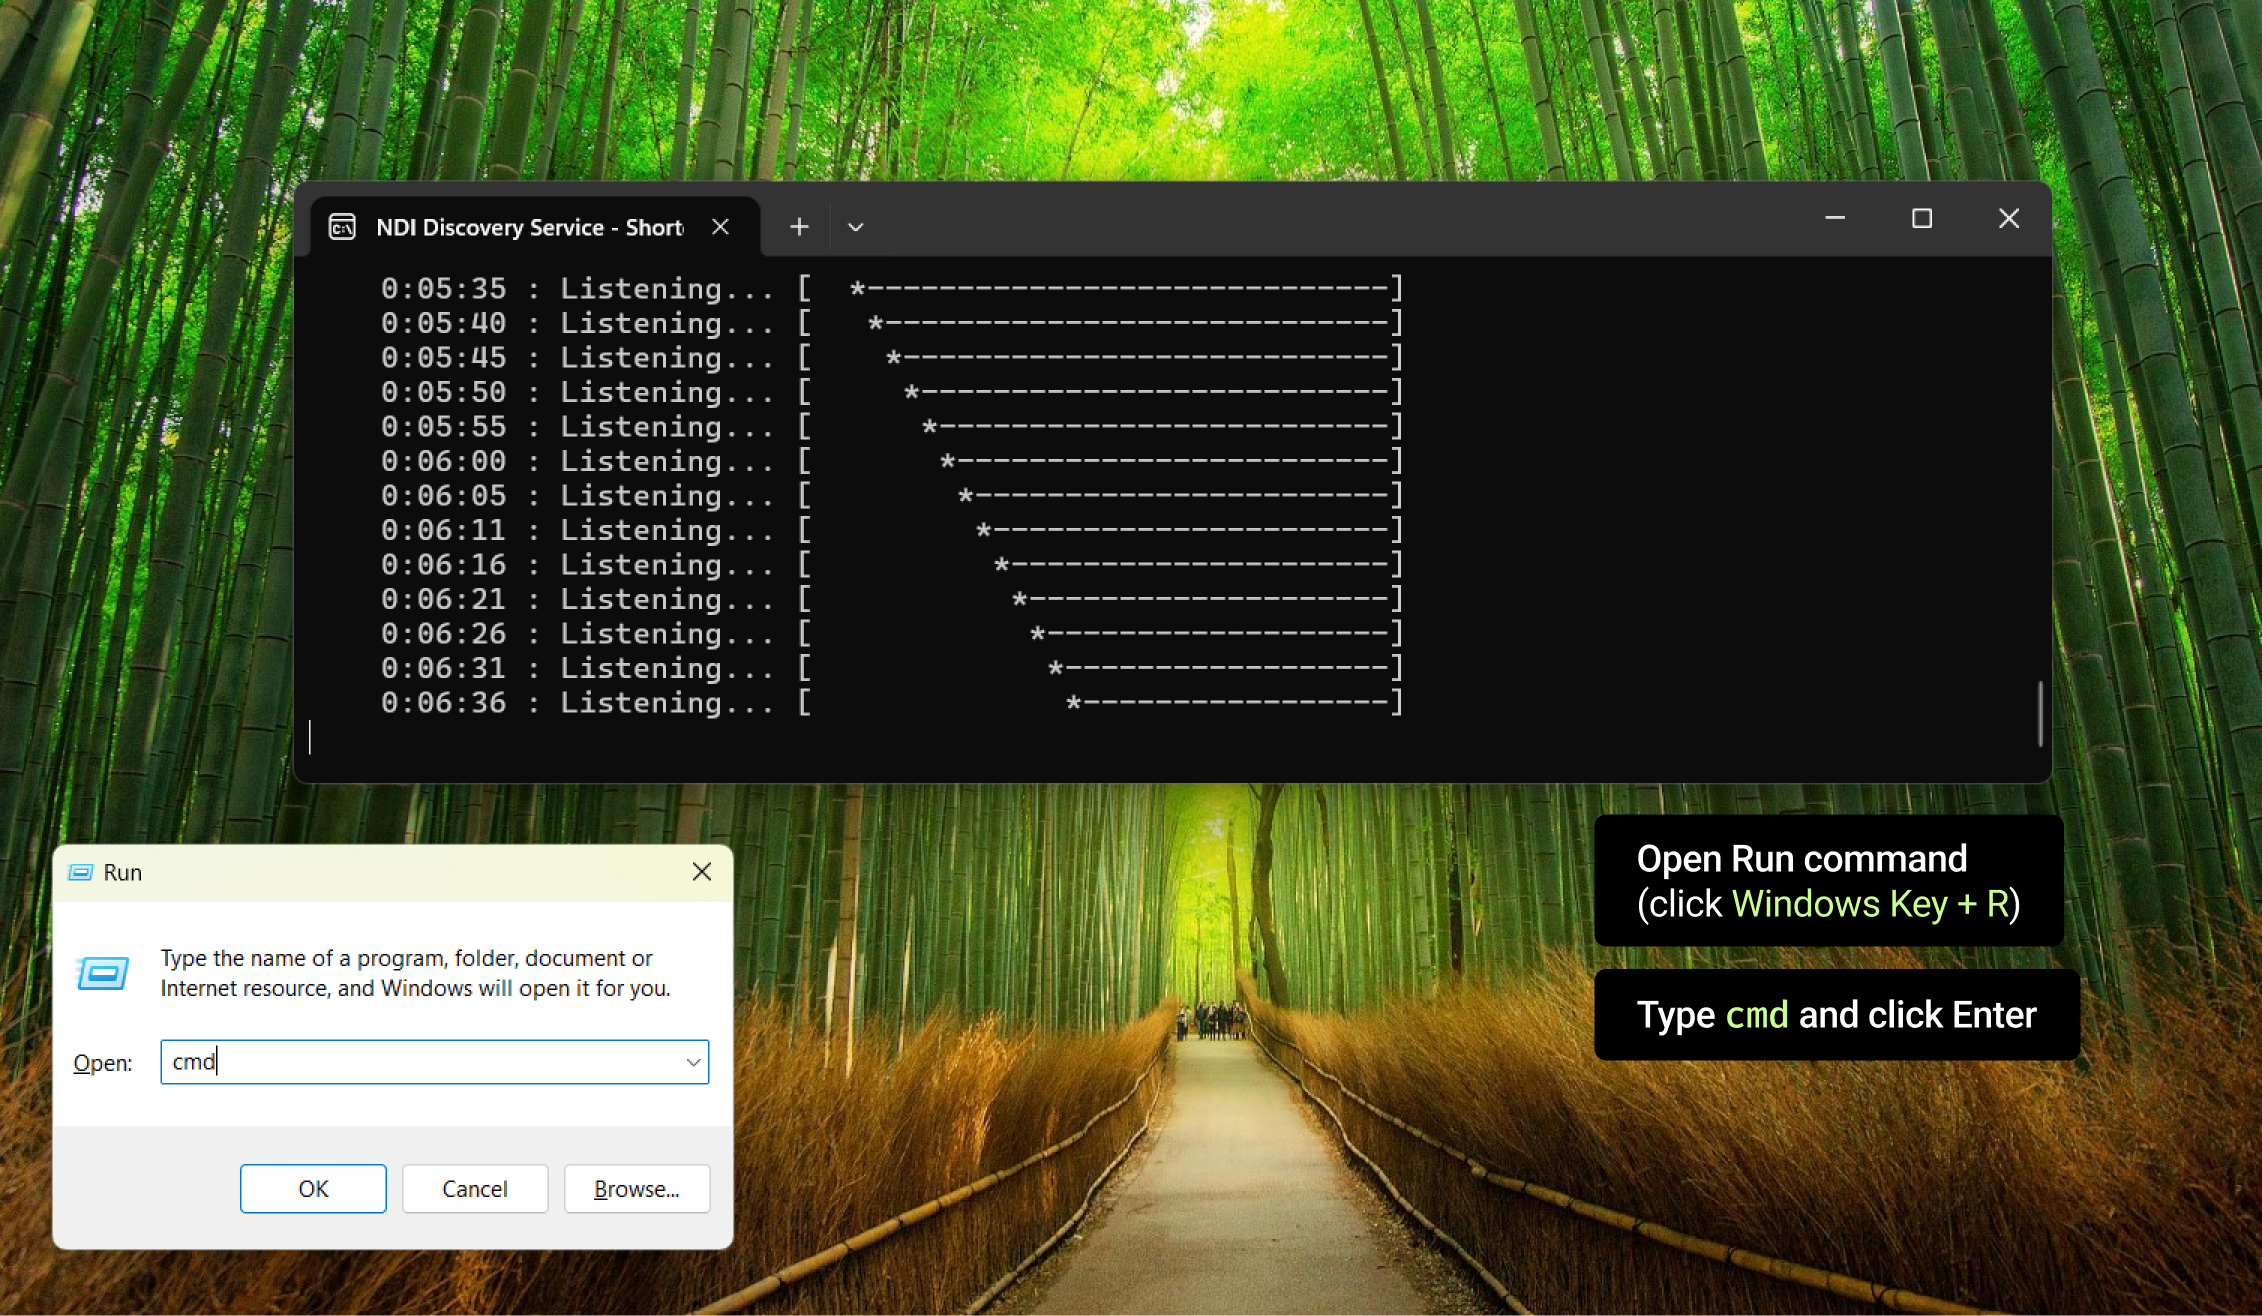
To find the IP, press Windows Key + R to open the Run dialog box.
Type cmd and press Enter to open the Command Prompt.
6. In the command prompt window, type:
ipconfig
7. Look for the IPv4 Address. This will be your machine’s IP address on the local network.
Copy the address or write it down somewhere. We’ll use it for Callaba’s NDI® configuration later.
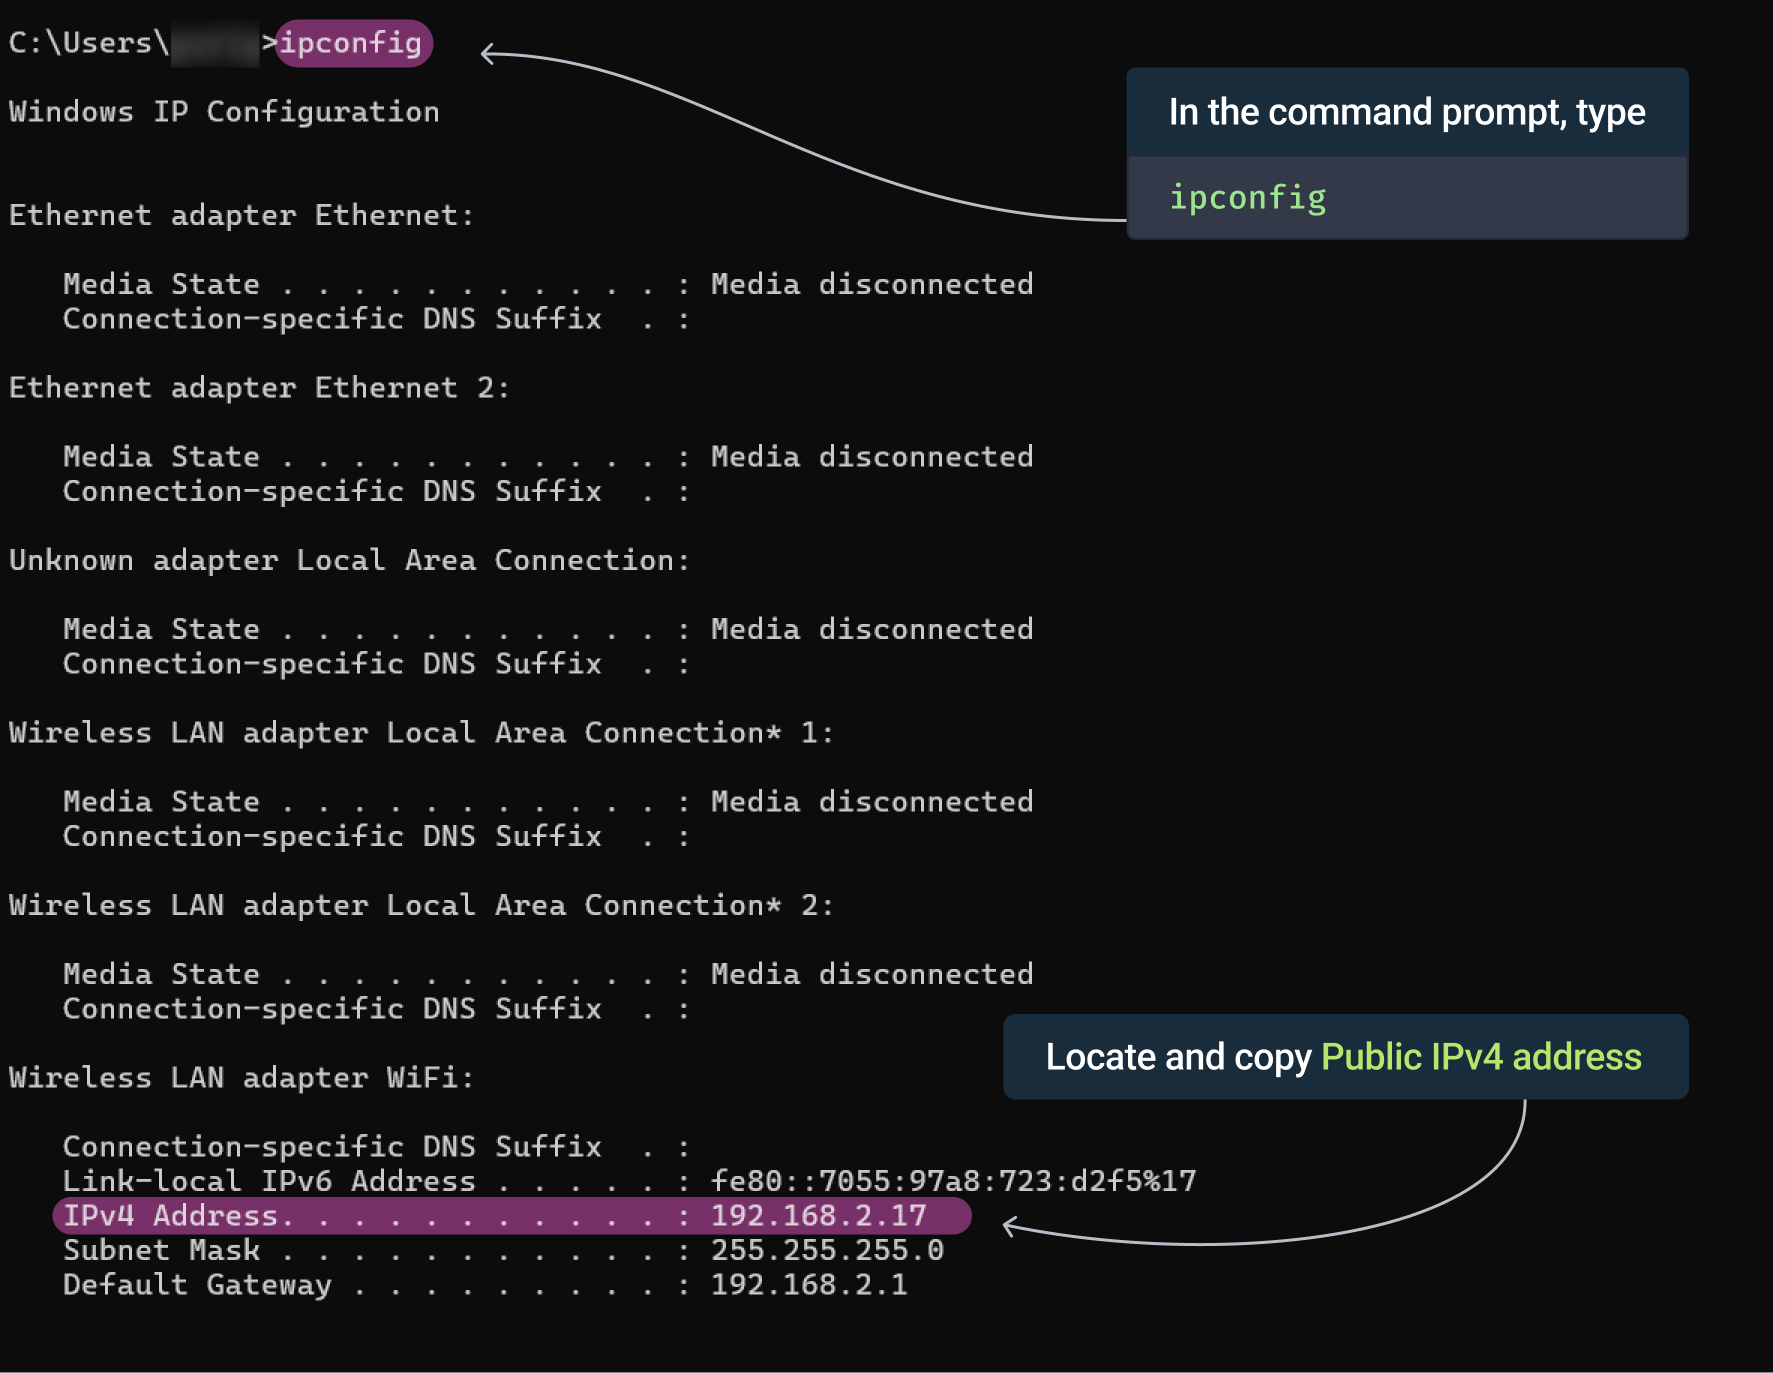
In our example, we have this result:
IPv4 Address: 192.168.2.17
This is the IP address that Callaba will use to communicate with the NDI® Discovery Server.
IMPORTANT: Ensure that the NDI® Discovery Service remains running at all times while you’re using the workflow.
Configure NDI® in Callaba
1. Open Callaba Dashboard.
2. Navigate to the NDI® configuration section in Callaba.
Use the basic fields for machine name, Discovery Server addresses and explicit source IPs. For advanced settings, import a JSON or TXT configuration or edit the JSON in the same UI; this covers NDI groups, allowed adapters, multicast and transport options without requiring terminal access.
Callaba dashboard authentication and application roles control who can change this configuration. NDI receive and send groups scope discovery visibility only; they do not replace user authentication, encryption, firewall rules or network segmentation.
Machine name: name your machine
Discovery: enter the IP address of the NDI® Discovery Server that you obtained (in our example, it is 192.168.2.17).
This IP is how Callaba will register the NDI® streams with the NDI® Discovery Server, making them available for the mixers (like vMix) and other machines to find.
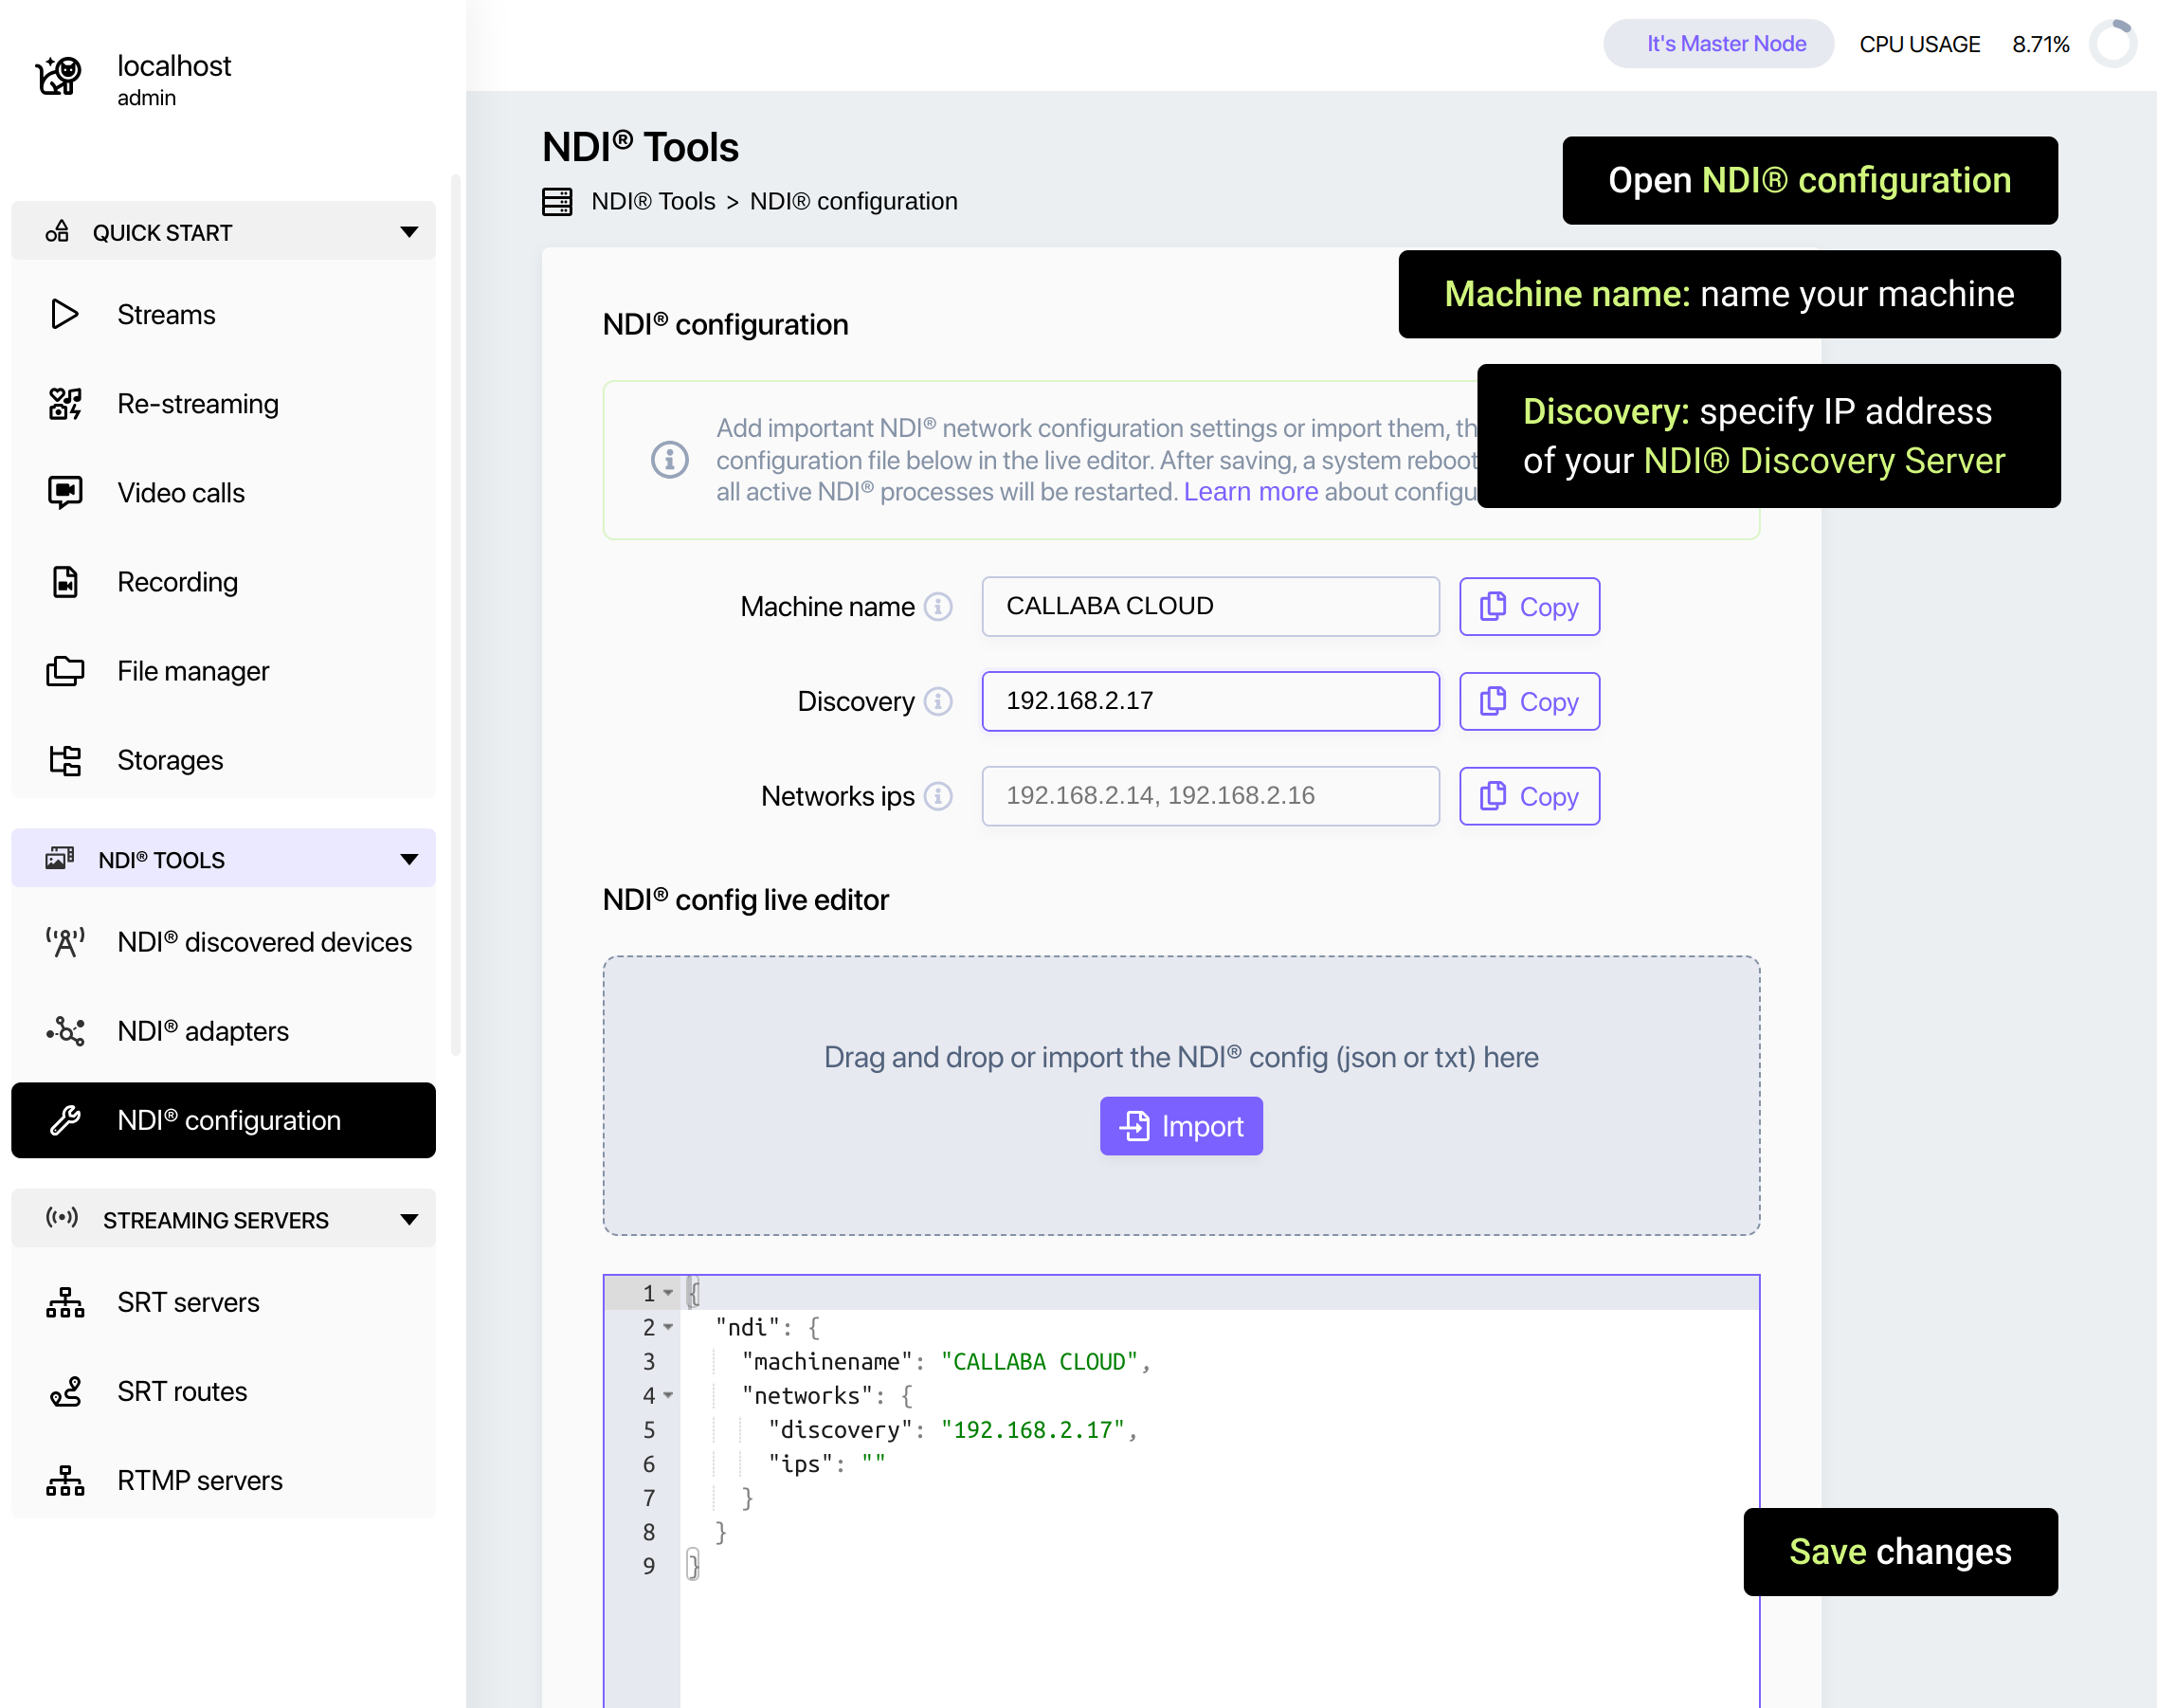
Save the configuration. Callaba will now start sending the NDI® stream details to the Discovery Server.
A full host reboot is not required. Saving the configuration restarts active NDI processes so the new settings can take effect; schedule the change outside an active production window.
Set up NDI® Adapter for your incoming stream
Let’s move on to setting up the conversion from SRT to NDI® streams.
0. Before proceeding, it’s best to have your input stream already set up, as this will make it easier to see if everything’s working correctly.
It can be any stream, such as SRT or a generated test video.
Guide: Sending and receiving SRT stream via vMix
Guide: Sending SRT stream via OBS
Guide: How to generate test videos
Once the stream is coming in, you can go ahead and configure the NDI® output for it.
Let's go!
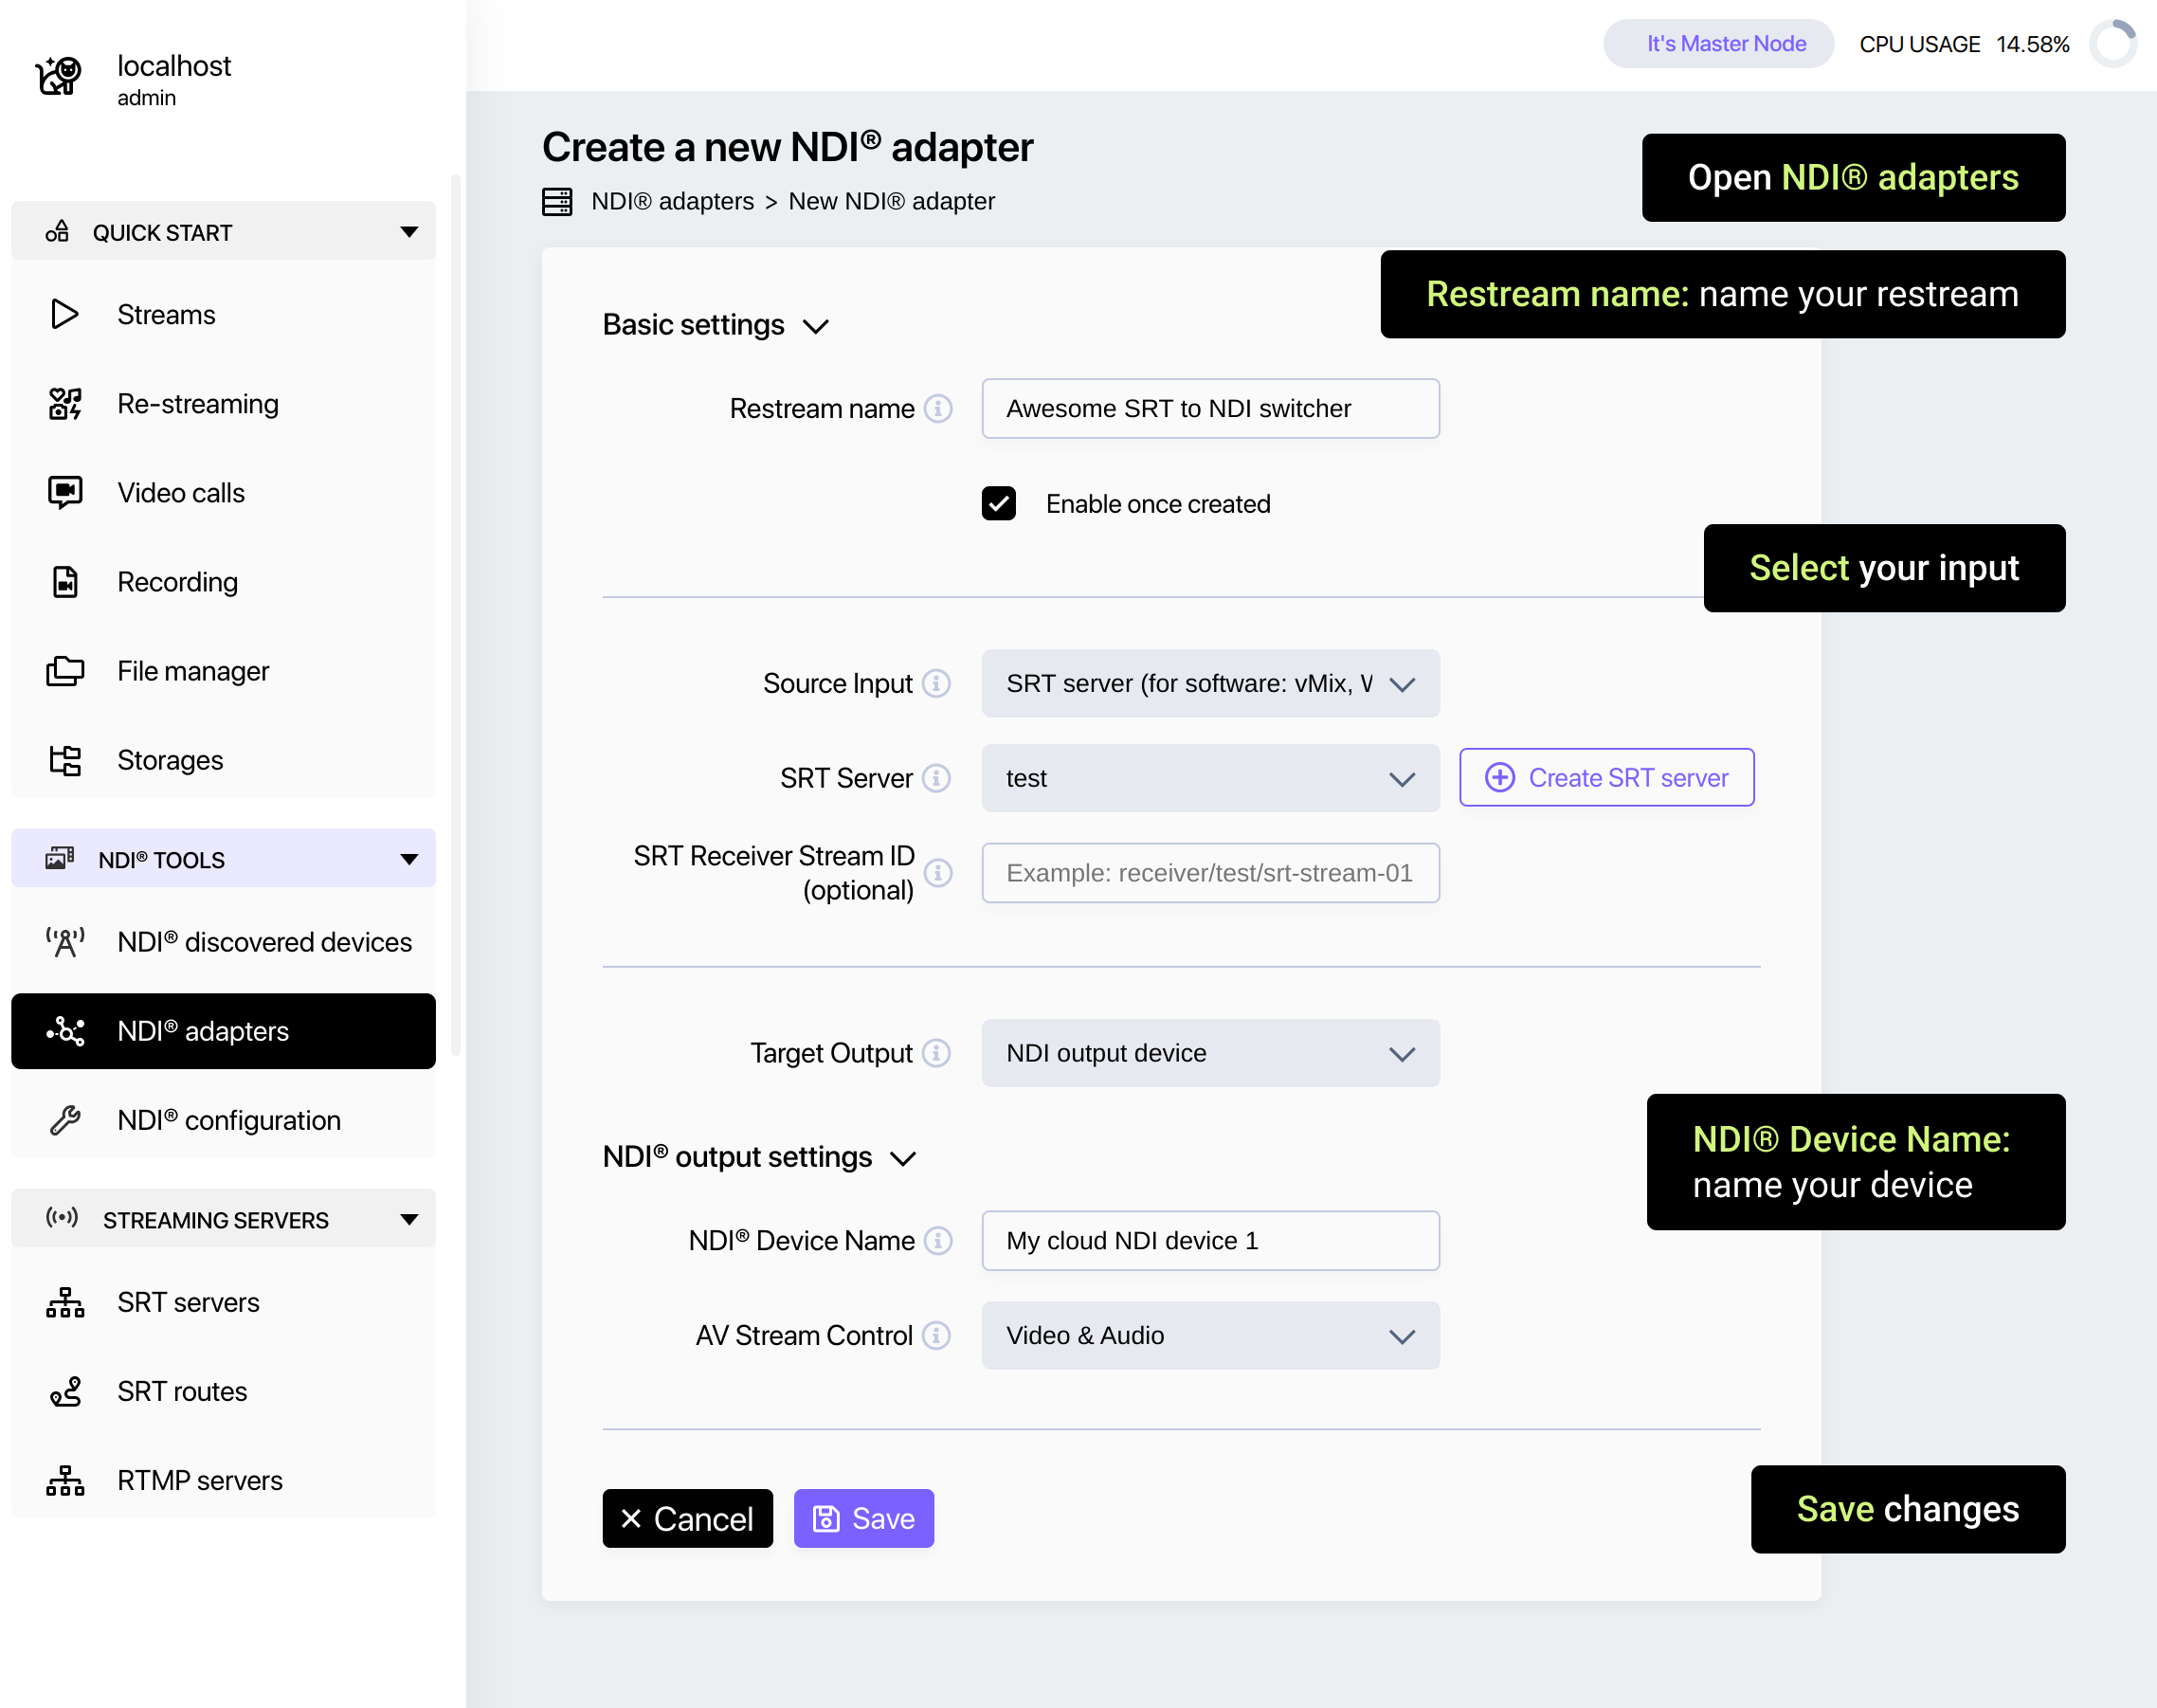
1. Go to the NDI® adapters section. Click "Add New".
Restream name: name your restream
Source input: select your input
Target output: NDI® output device
NDI® Device Name: name your device
Save changes.
Callaba will now handle the conversion of SRT streams into NDI® streams.
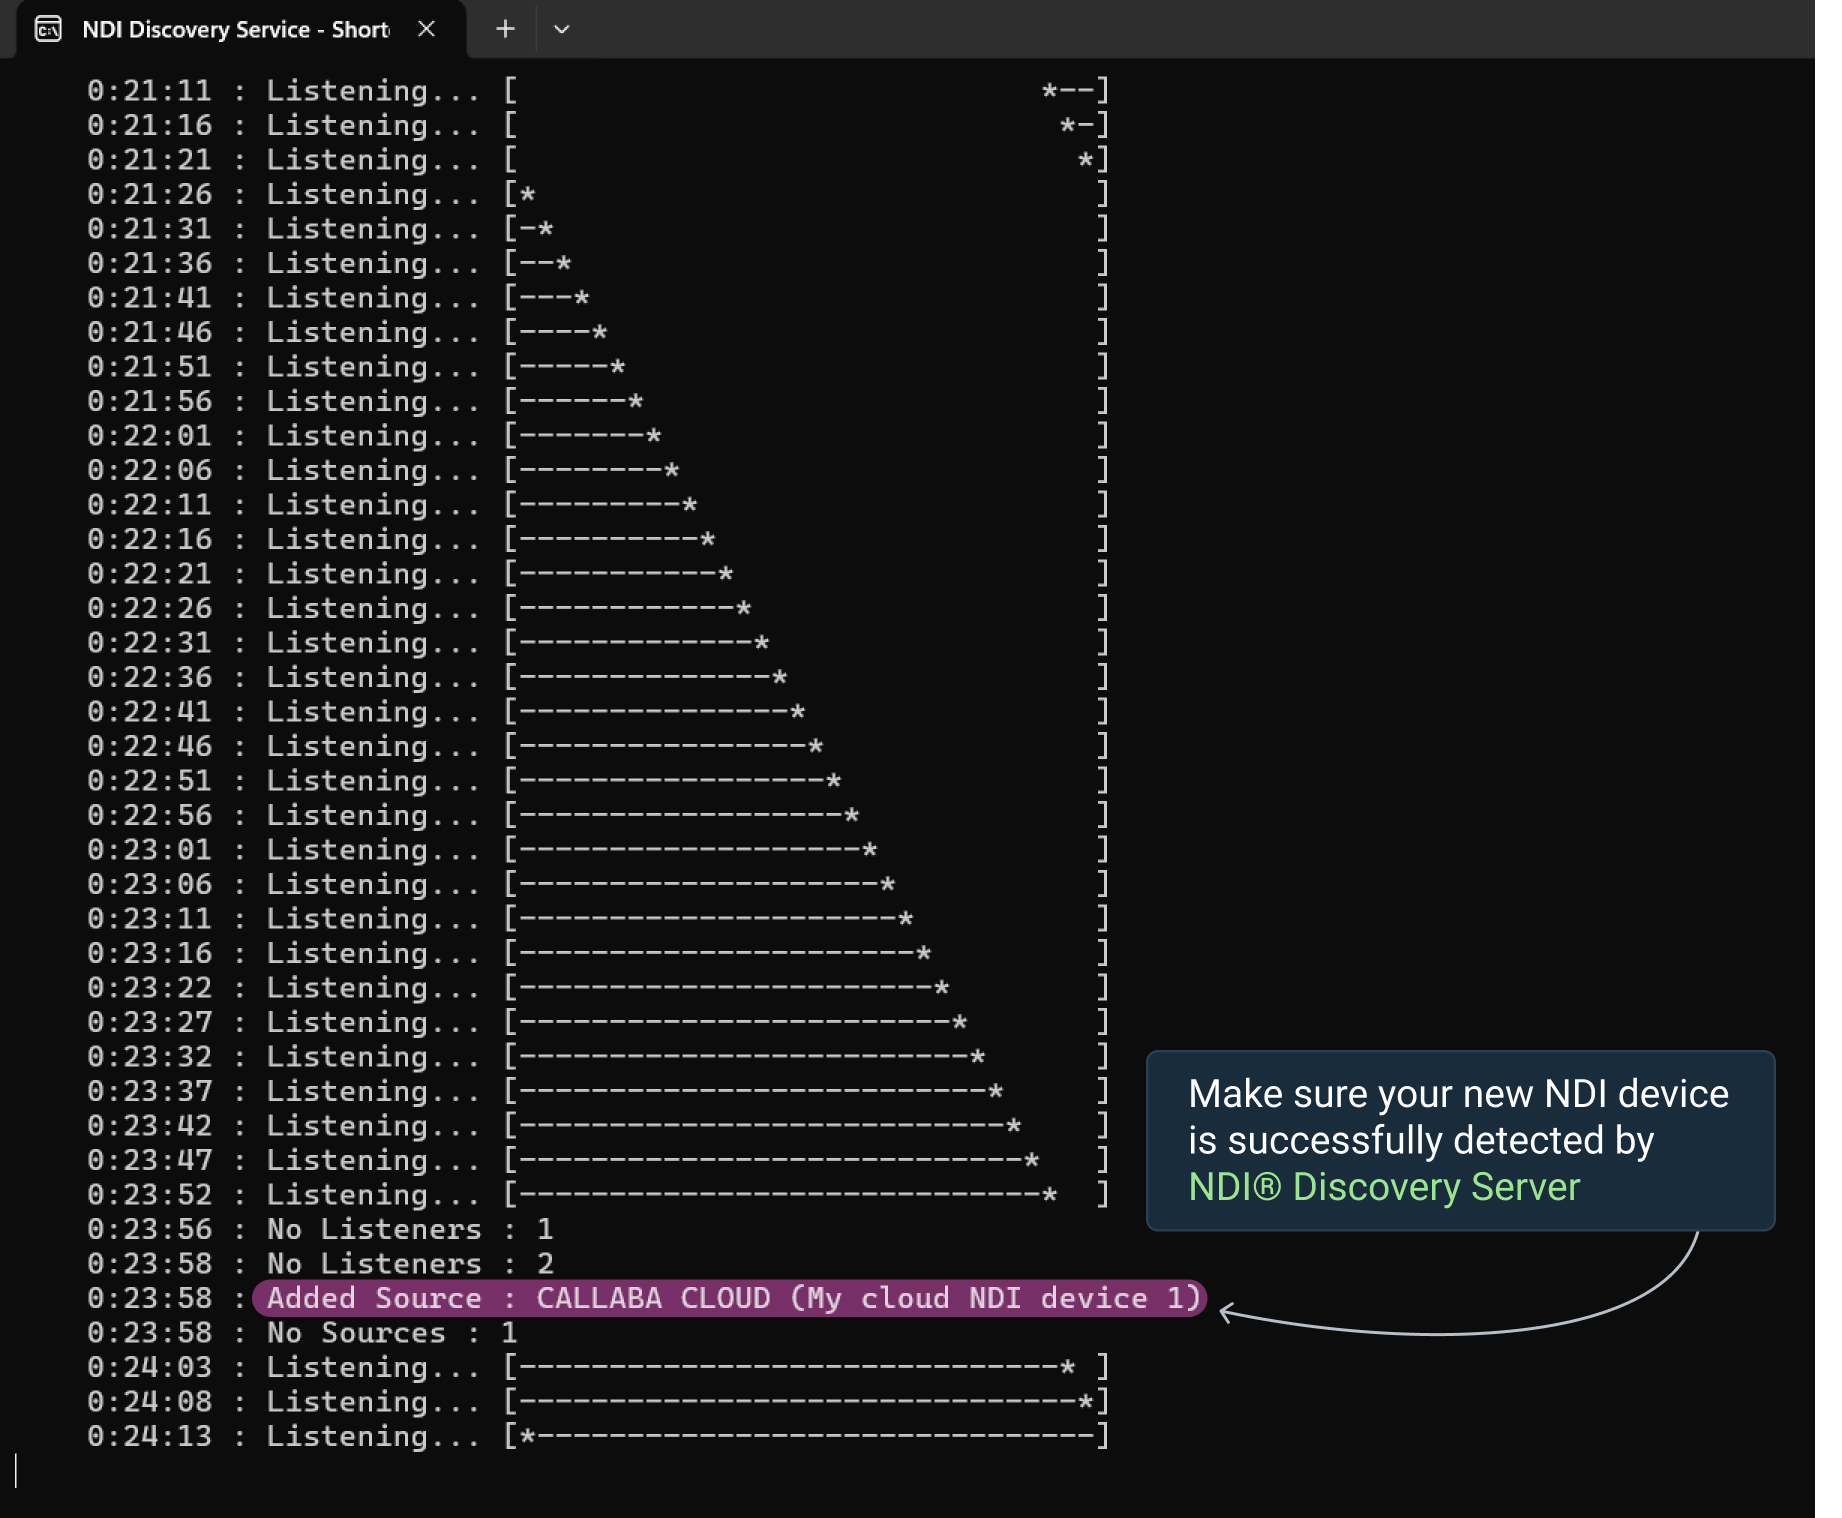
Find your new NDI® device in NDI® Discovery Server's log
Go to NDI® Discovery Server.
You should see your new NDI® source added in the listener activity log.
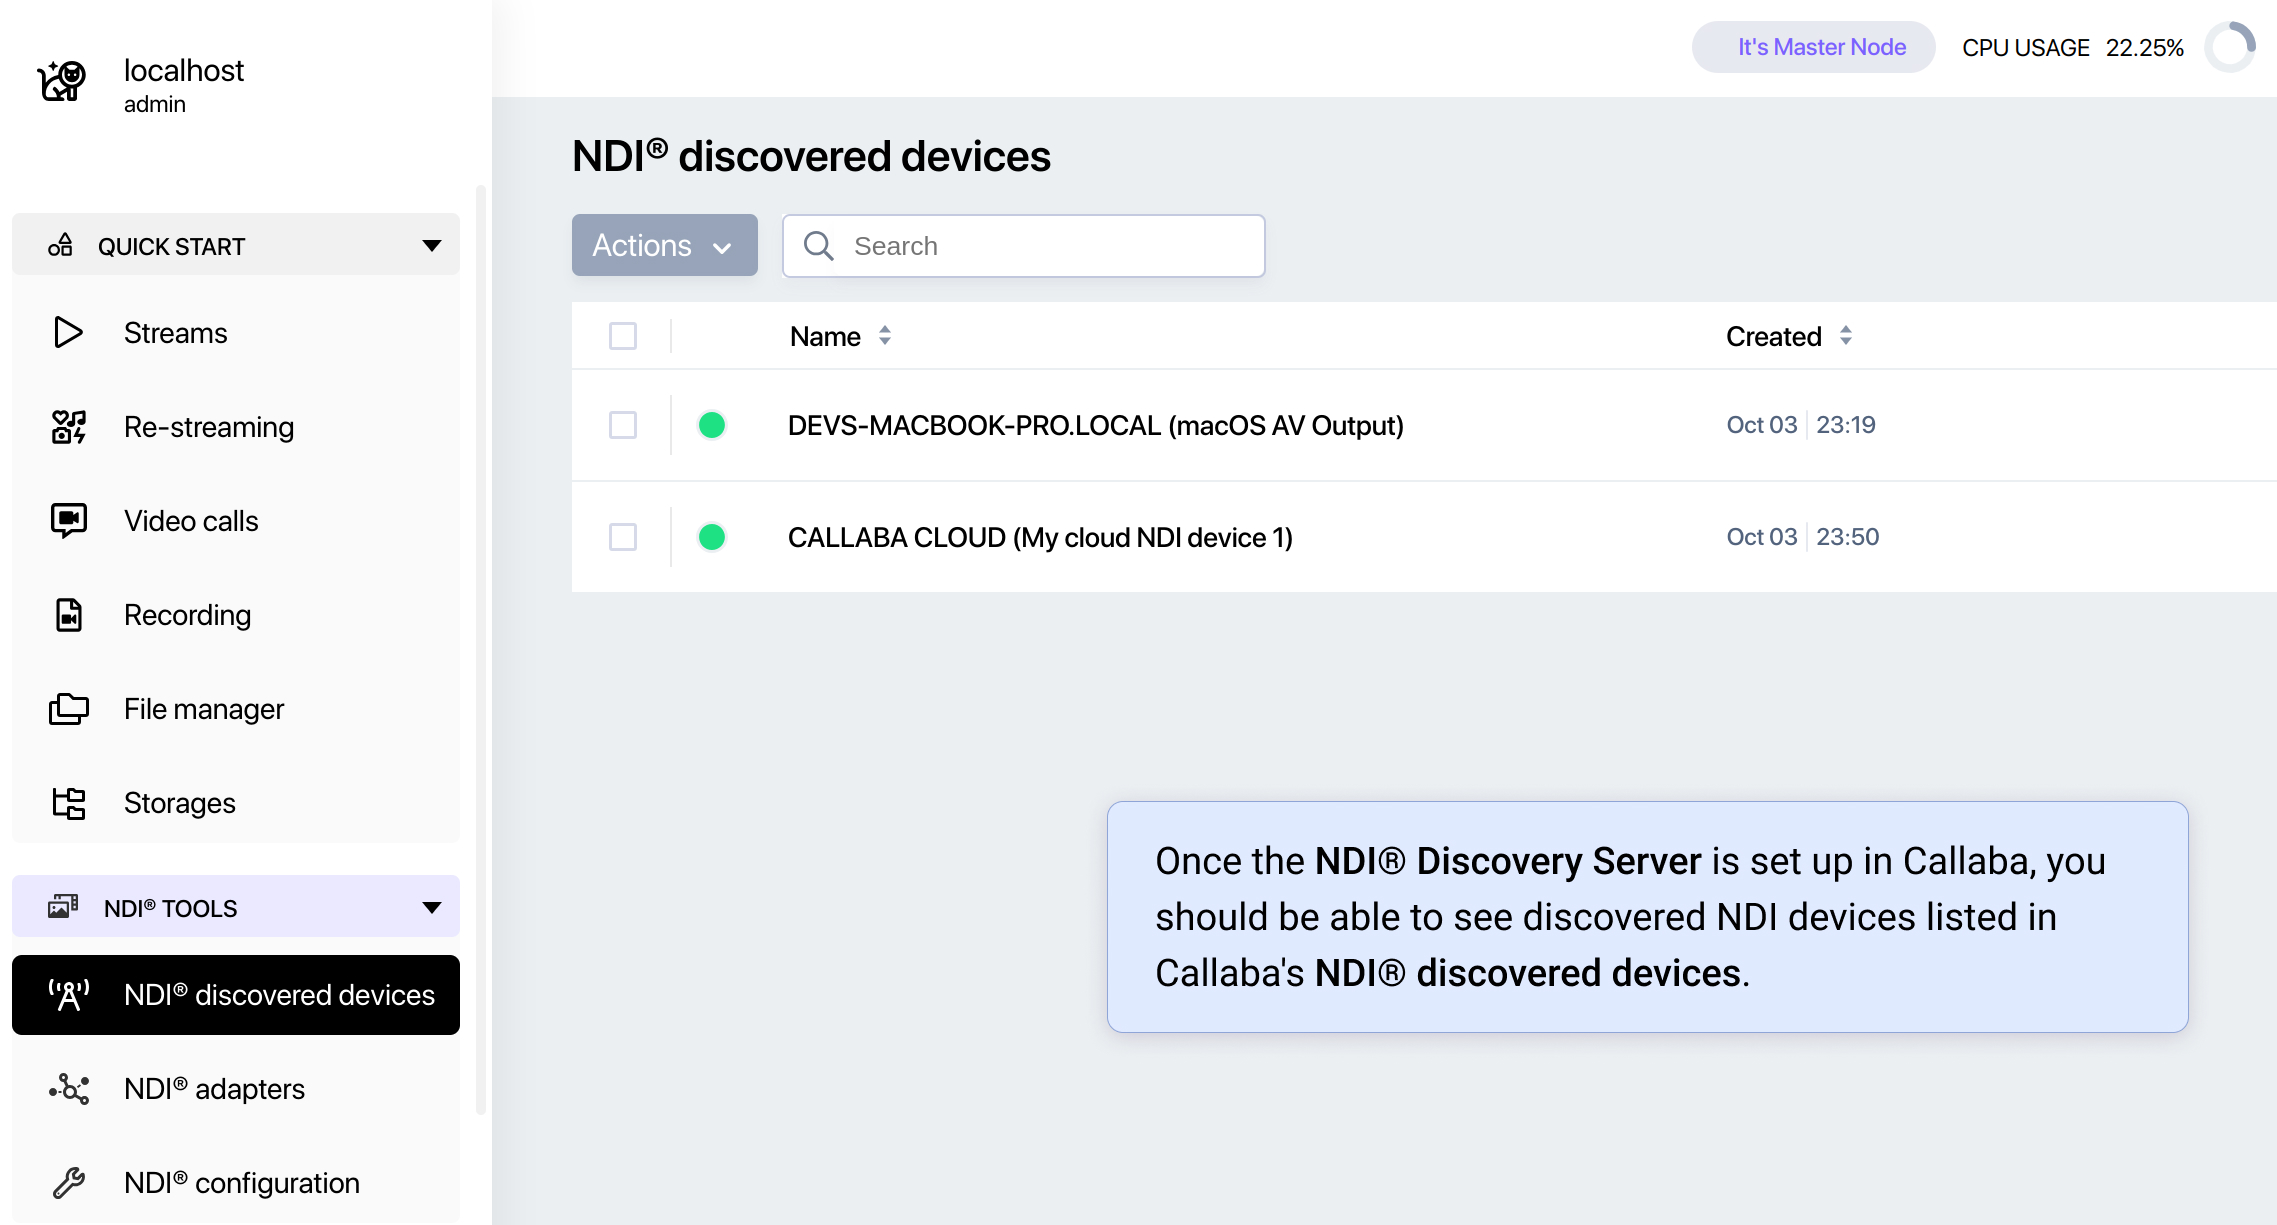
Make sure Callaba uses your NDI® Discovery Server
Go to NDI® discovered devices in the Callaba UI.
Once the NDI® Discovery Server is set up in Callaba, you should be able to see discovered NDI® devices listed there.
These devices should correspond to the SRT inputs you have converted to NDI®.
Use NDI® Studio Monitor
To further verify that the streams are being broadcast correctly, open NDI® Studio Monitor (which was installed as part of the NDI® Tools package).
Open NDI® Studio Monitor and search for available NDI® sources.
You should see the NDI® devices corresponding to the Callaba streams.
Select any NDI® device to verify that the stream is coming through correctly.

By following these steps, you will have successfully set up a cloud-based video production workflow on AWS, using NDI® and SRT to handle video streams efficiently.
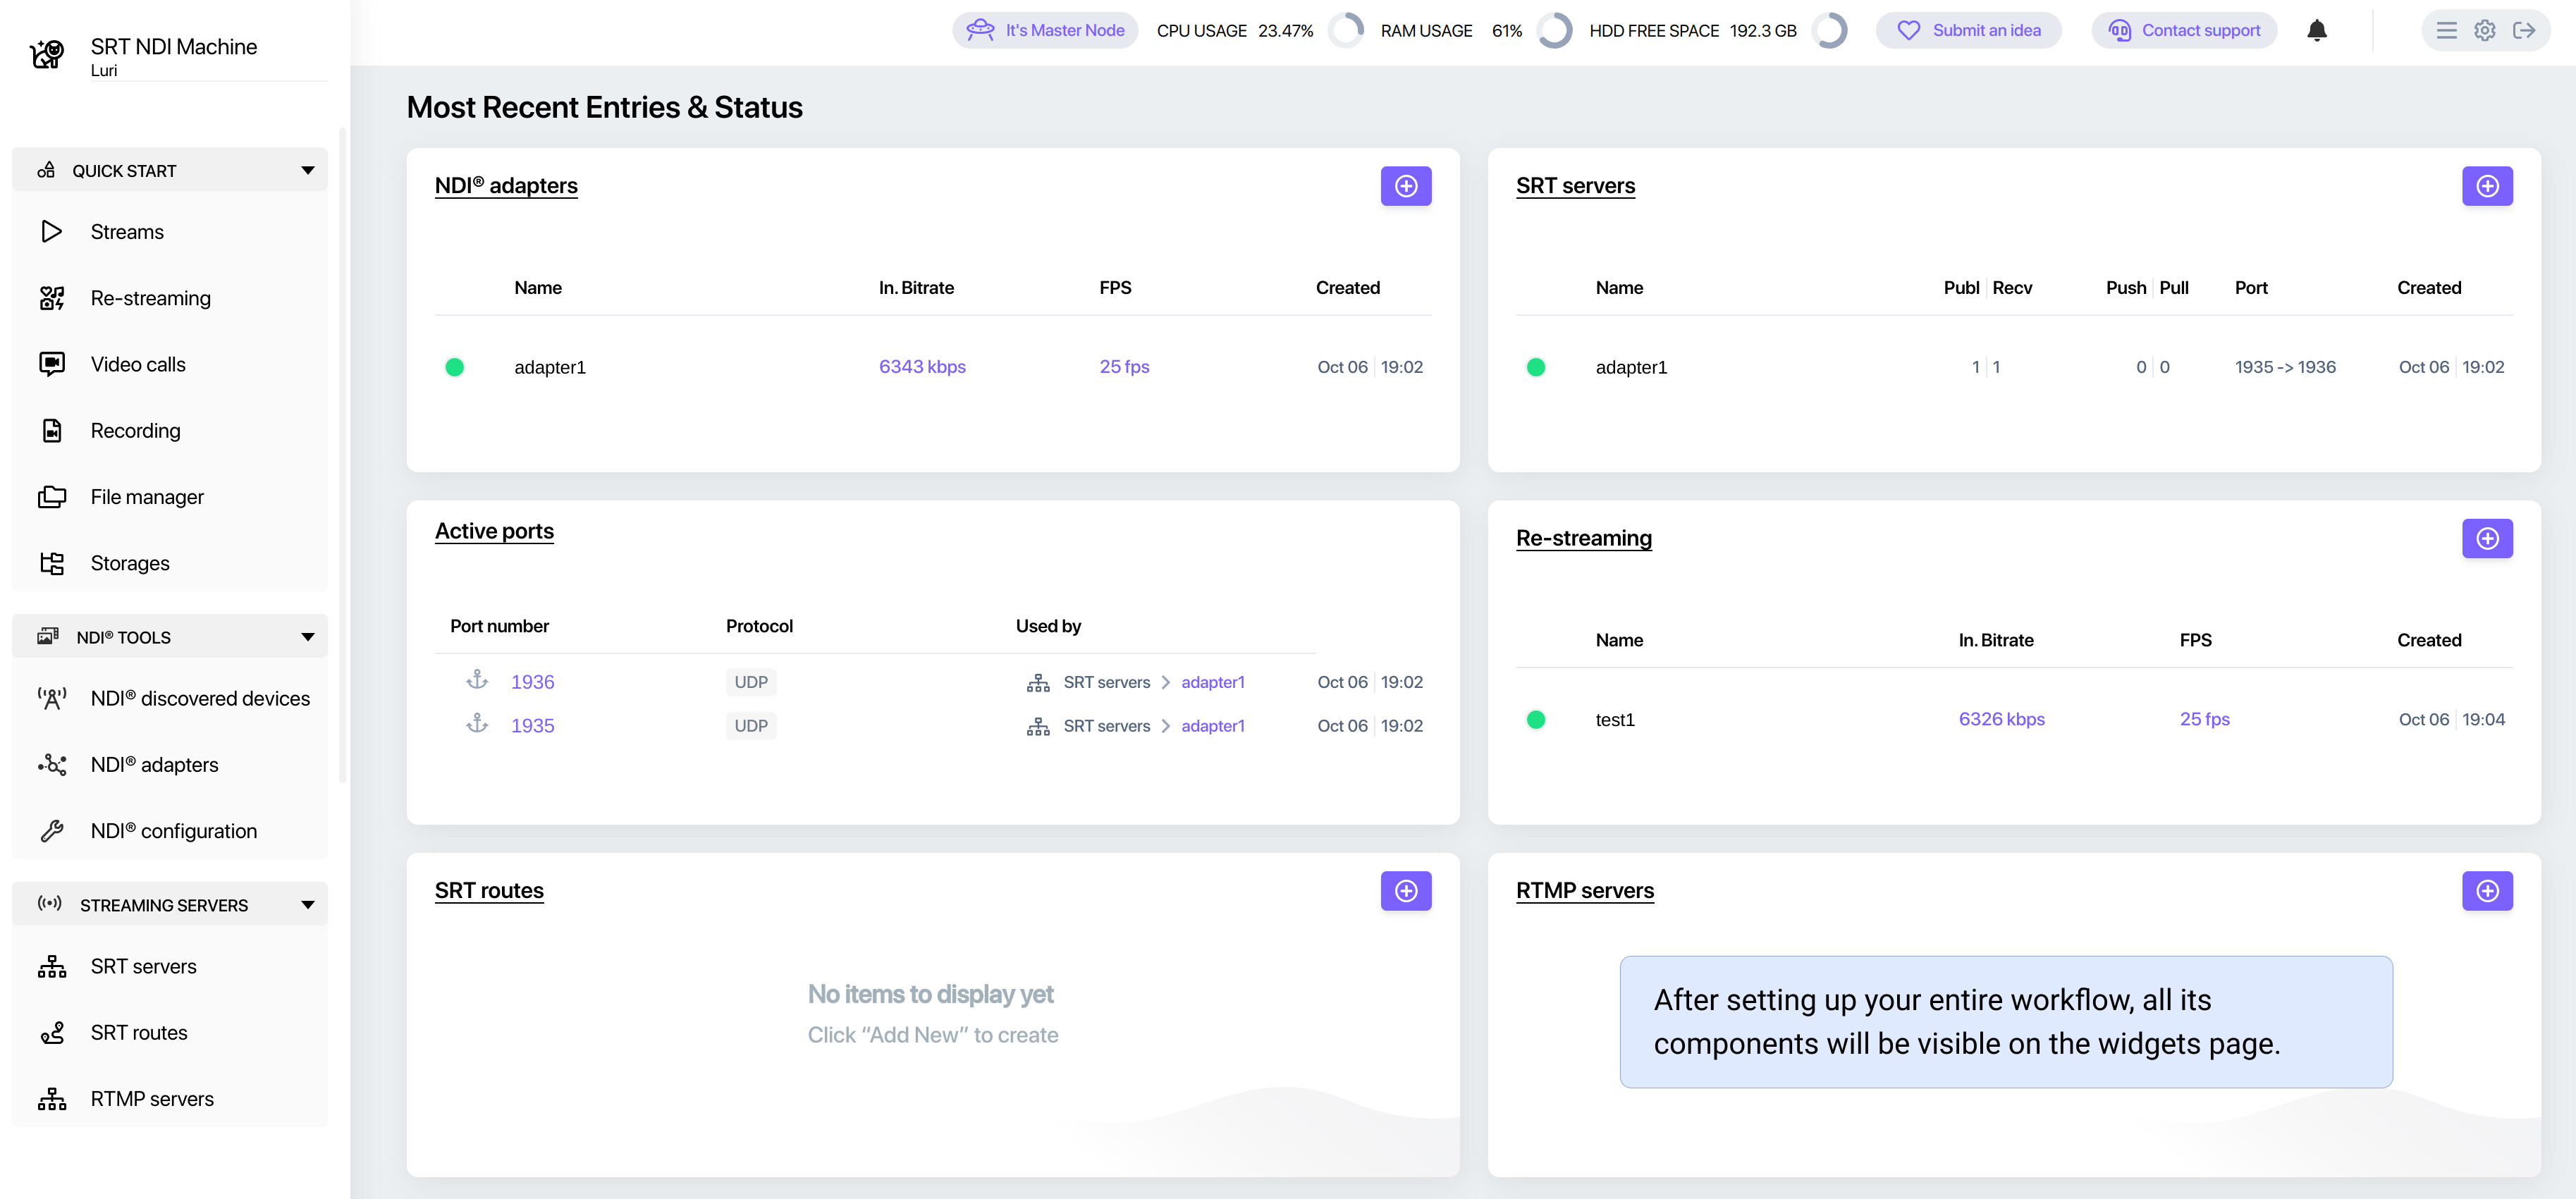
After setting up your entire workflow, all its components will be visible on the widgets page.
Now you can move on to setting your NDI® as input in your mixer software of choice.
Receive master stream in the cloud
Once you've set up your mixer and you have your master stream, you can now send it back to Callaba to then stream it to your destinations.
In this tutorial we'll use vMix as our mixer.
1 . Once you're ready to configure your output, click the “Settings” window in the upper right corner.
Select “output / NDI/ SRT”.
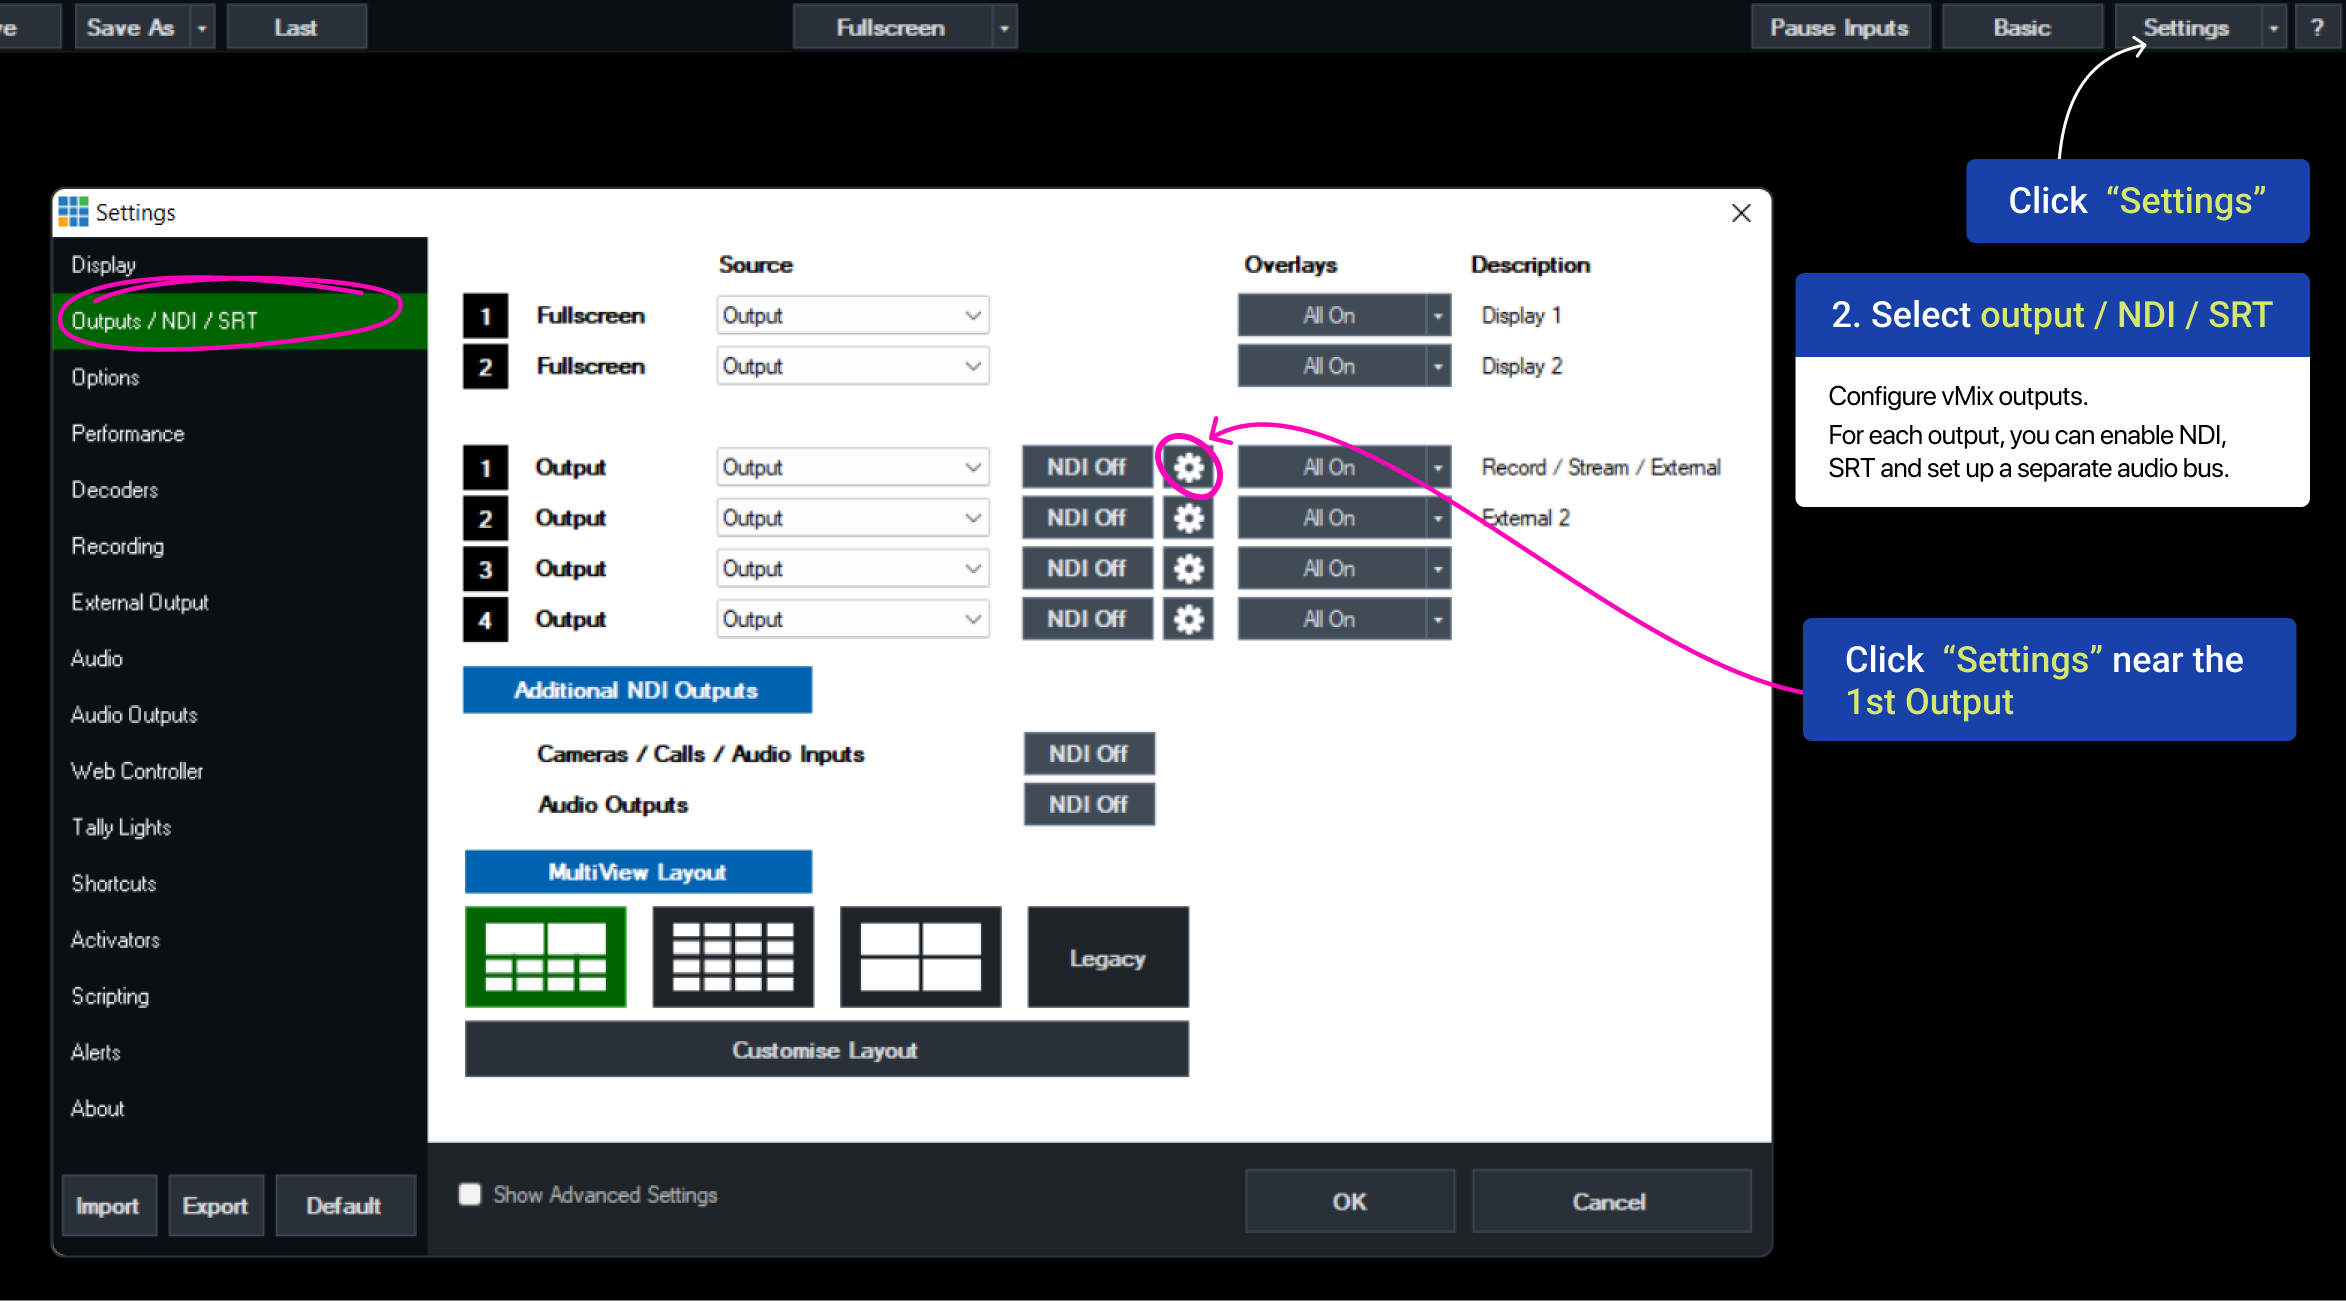
2. Click on the gear icon ("Settings") next to the first output to go to the SRT setup.
Don’t close this window, we’ll leave it for now, but we’ll get back to it later to set up our SRT stream.
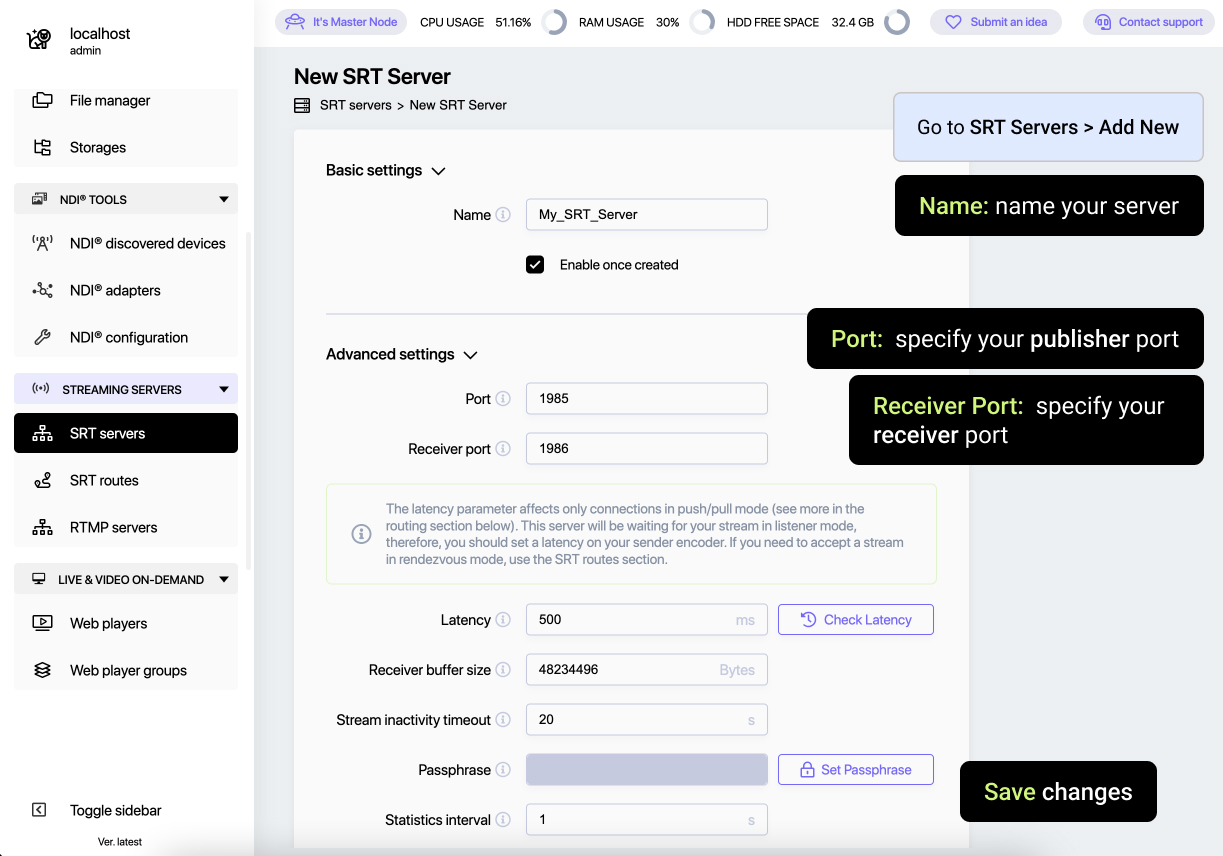
3. Go back to Callaba. Open "SRT Servers" section. Click “Add New”.
Name: name your server
Port: specify publisher (sender) port
Receiver port: specify receiver port
Click “Save”
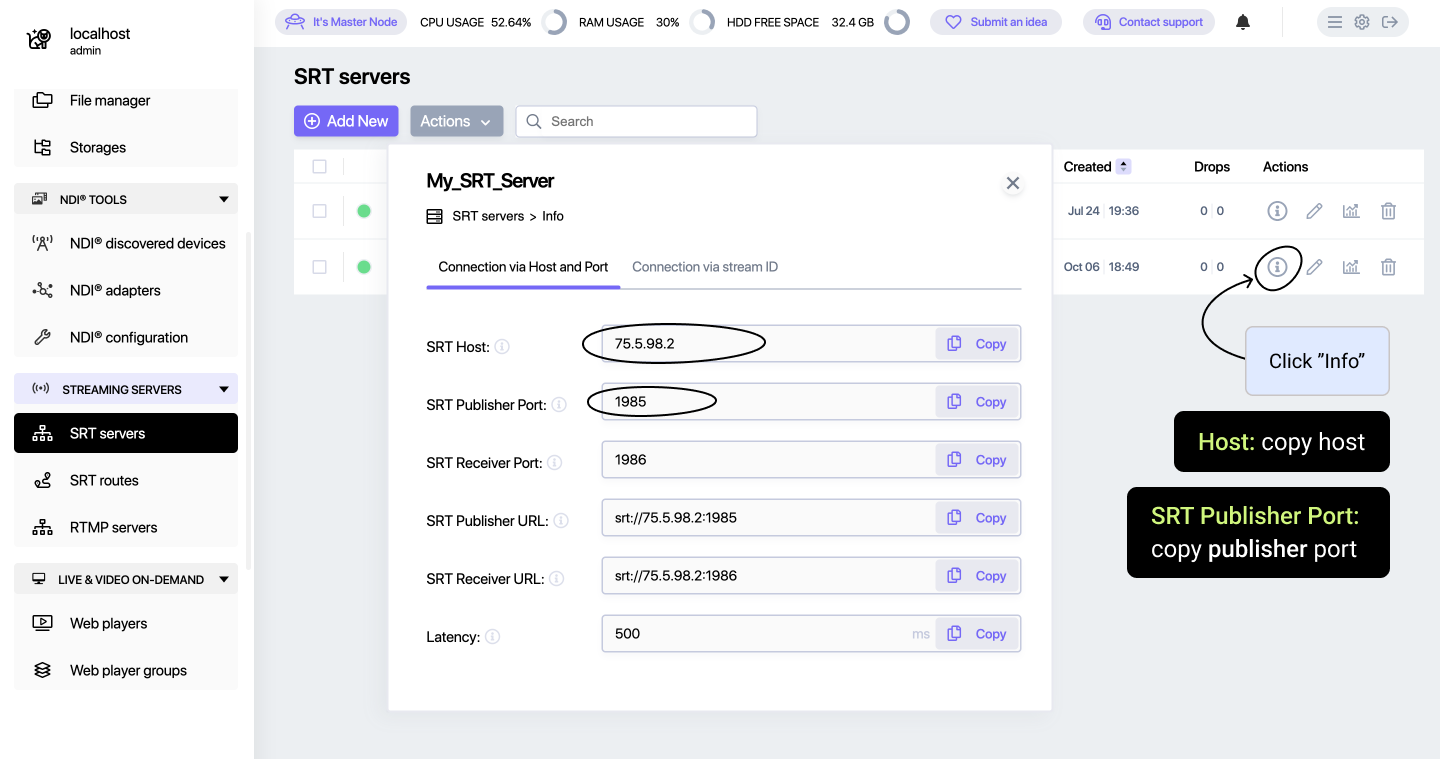
4. Click the “Info” button
You will see parameters for sending and receiving your stream
To send your stream to Callaba from vMix, you'll need to copy SRT Host and SRT Publisher Port
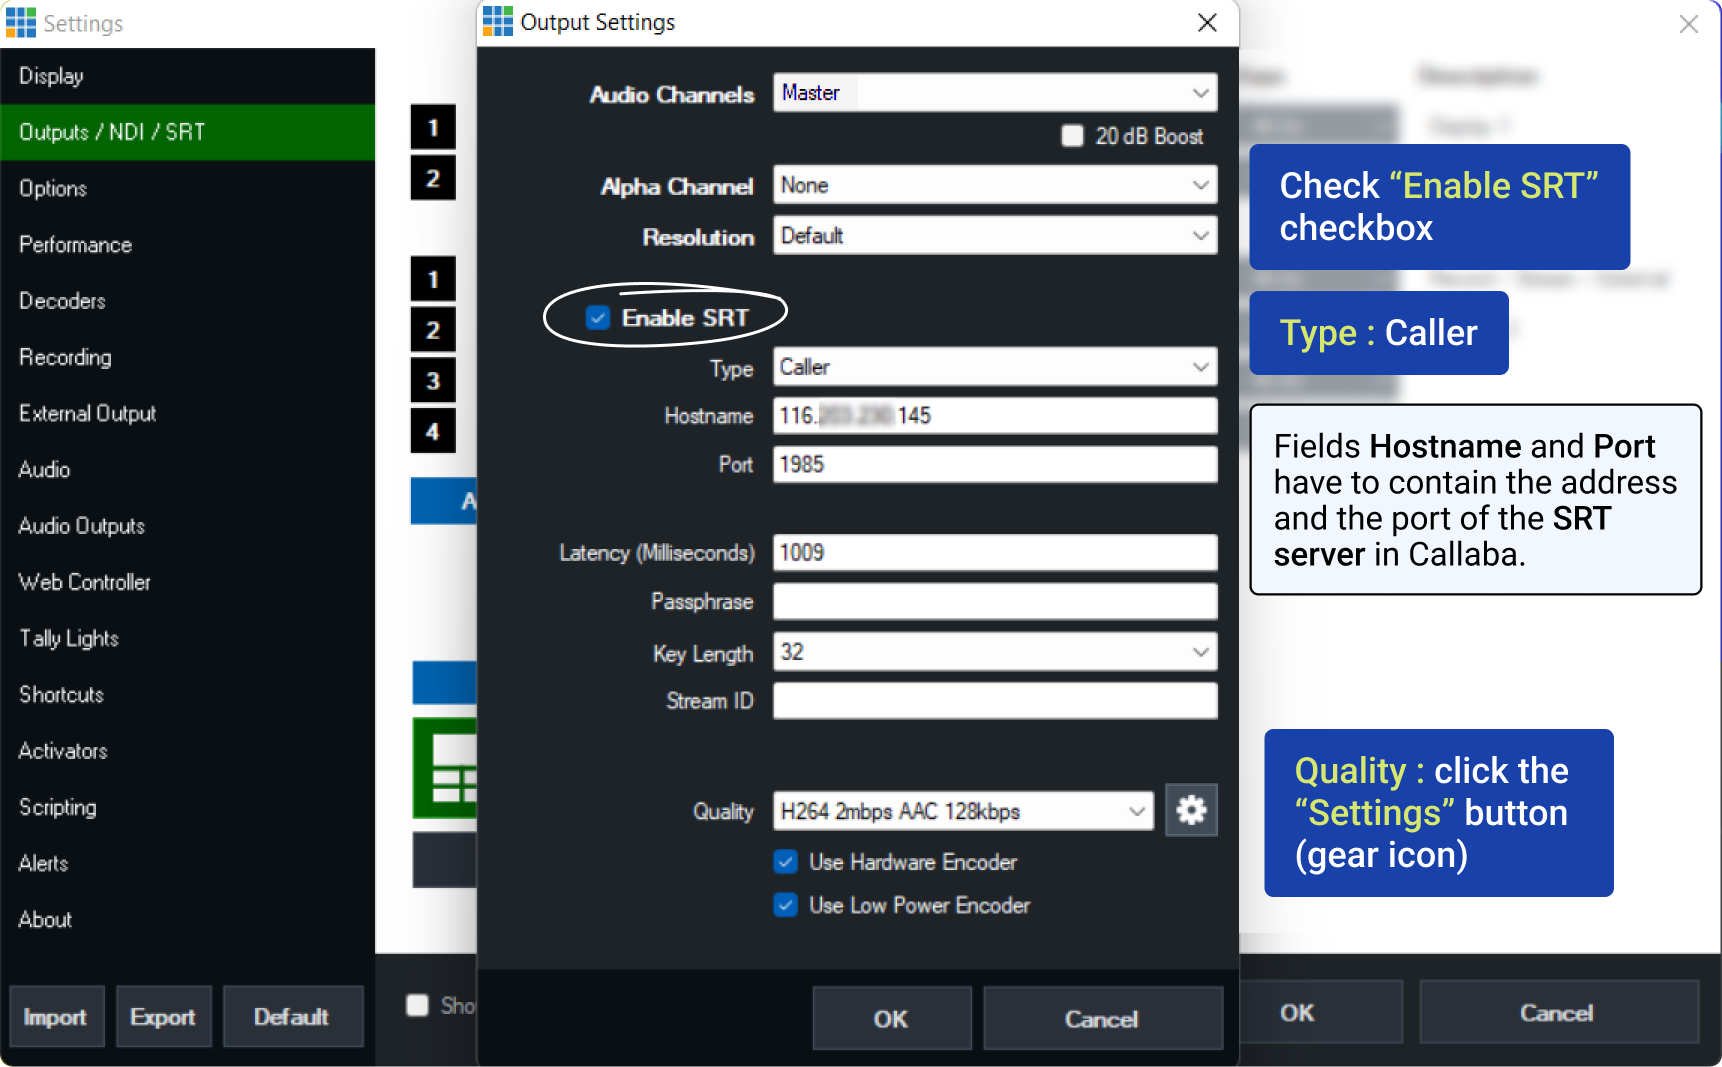
5. Back to vMix
In Audio Channels, you can specify the audio bus, by default there is “Master” there. You can also specify the resolution.
Tick "Enable SRT" checkbox
Type: Caller
Hostname: copy and paste SRT Host from Callaba
Port: paste SRT Publisher Port from Callaba
Quality: click the "Settings" icon to set your quality
Save changes.
Your SRT stream will now be directed to the Callaba server. From there, you can easily set up re-streams to multiple destinations, including:
- Custom platforms
- Social media channels (YouTube, Facebook, Twitch, etc.)
- Create an HLS web player in Callaba and embed it on your website.
You can also configure a CDN for broad video distribution and set up a Pay-Per-View paywall.
Helpful links to detailed guides are provided below: