How to multi-stream from Zoom to Twitch, Youtube and Facebook
In this tutorial we are going to explain how to stream from Zoom to multiple destinations at the same time. In our case, the destinations are Twitch, Youtube and Facebook, but you can apply the same logic to any other social network or custom RTMP destination.
Please make sure that you have :
1. Zoom meetings installed and a licensed account.
Host account has to have Pro, Business, Education, or Enterprise license.
2. Callaba Cloud Live Streaming: a server that can receive RTMP and SRT streams and re-stream them to social platforms.
Subscribing to Callaba Cloud will take no more than 5 minutes.
Read our step-by-step manual: How to Launch Callaba Cloud.
3. Accounts on social platforms, where you want to stream. You’ll have to generate streaming keys in order to stream your Zoom meeting there.
Twitch : https://dashboard.twitch.tv/
Youtube : http://studio.youtube.com
Facebook : https://www.facebook.com/live/create
For the sake of this tutorial, we assume, that you have already installed Zoom, and subscribed to Callaba Cloud Live Streaming.
Enable Live Streaming in Zoom
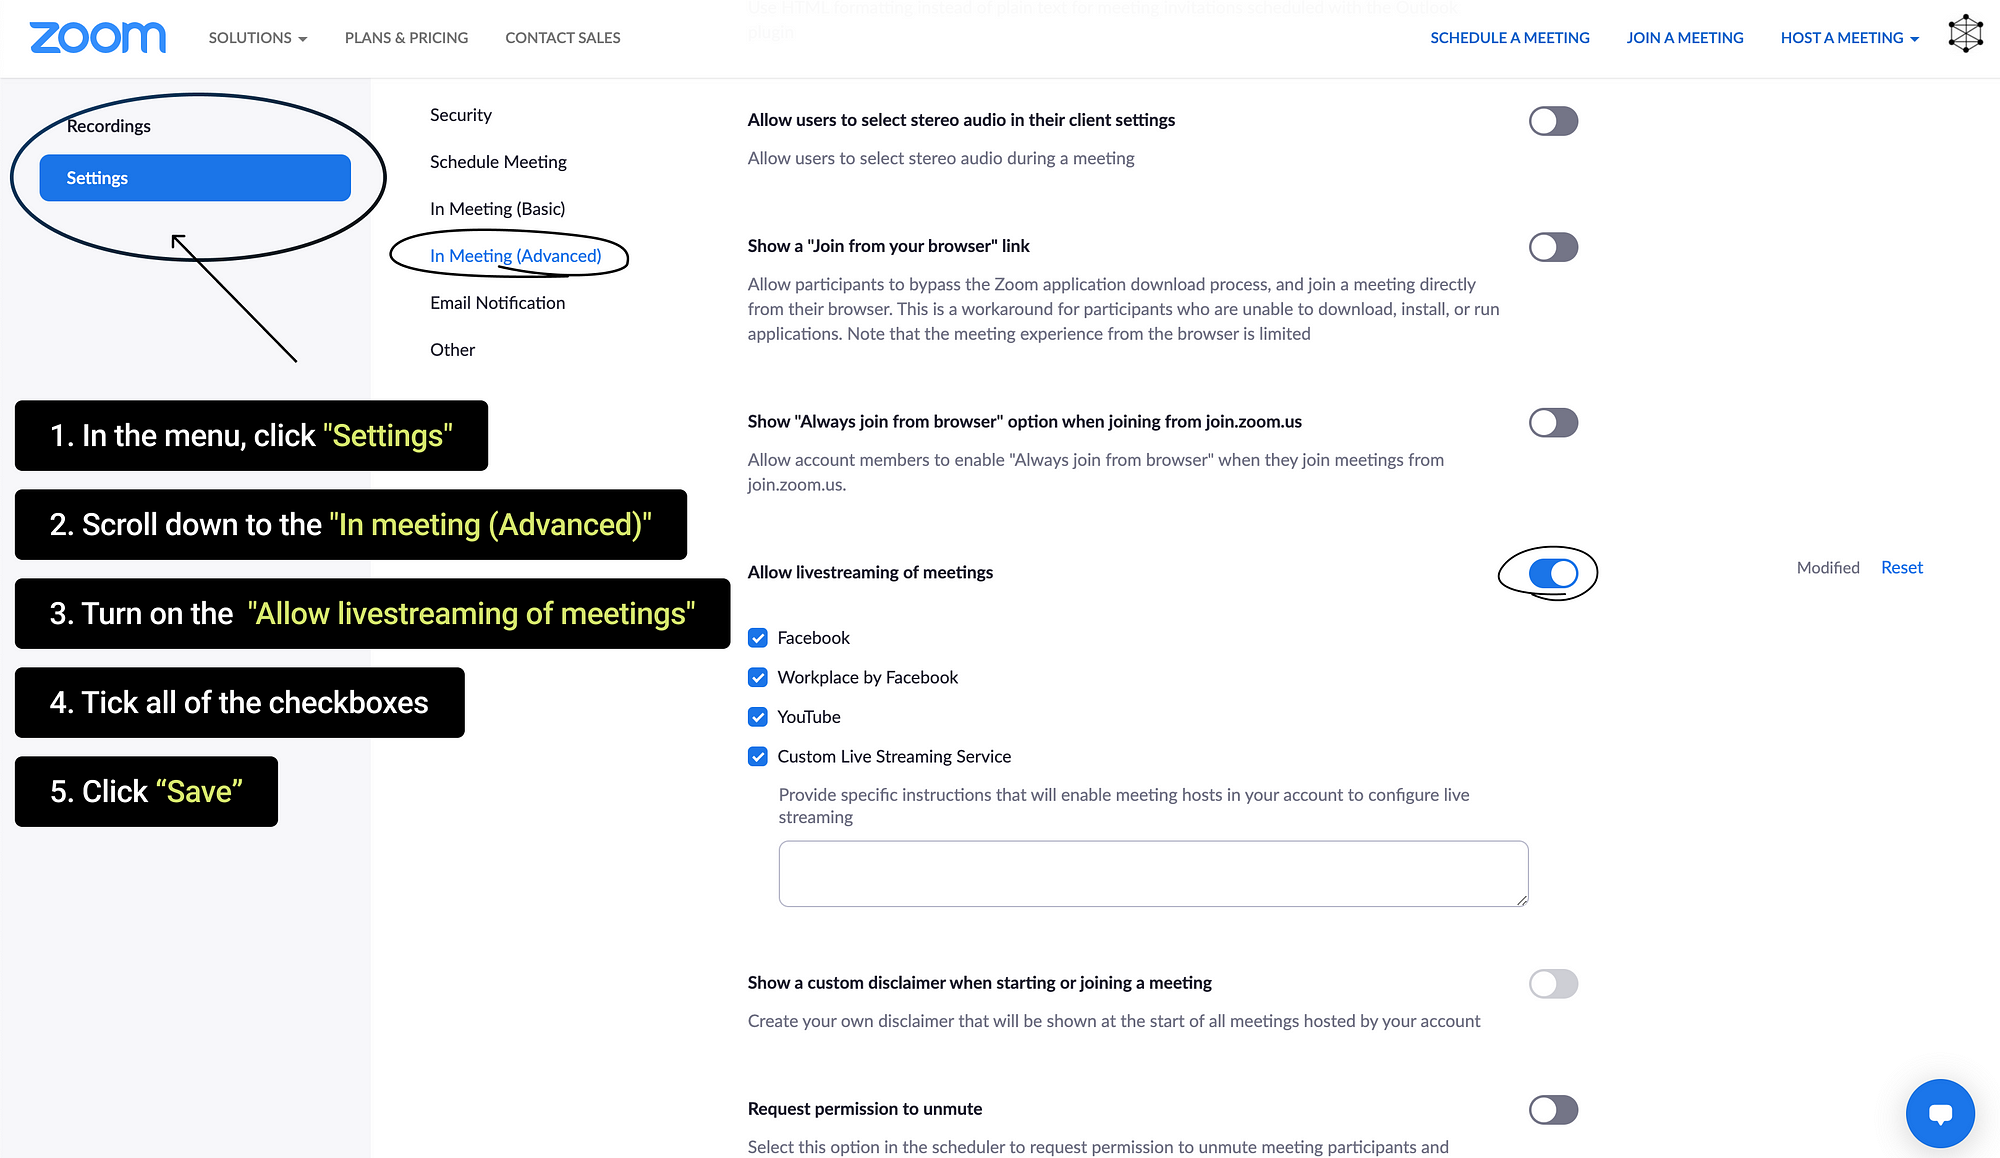
1. Log into Zoom web platform using your licensed account
Go to Profile > Settings
Click “In meeting (Advanced)”and scroll down
Turn Allow livestreaming of meetings” settings
Tick all the checkboxes
Click “Save”
If you need details regarding using Zoom in conjunction with custom services, please refer to this Zoom documentation.
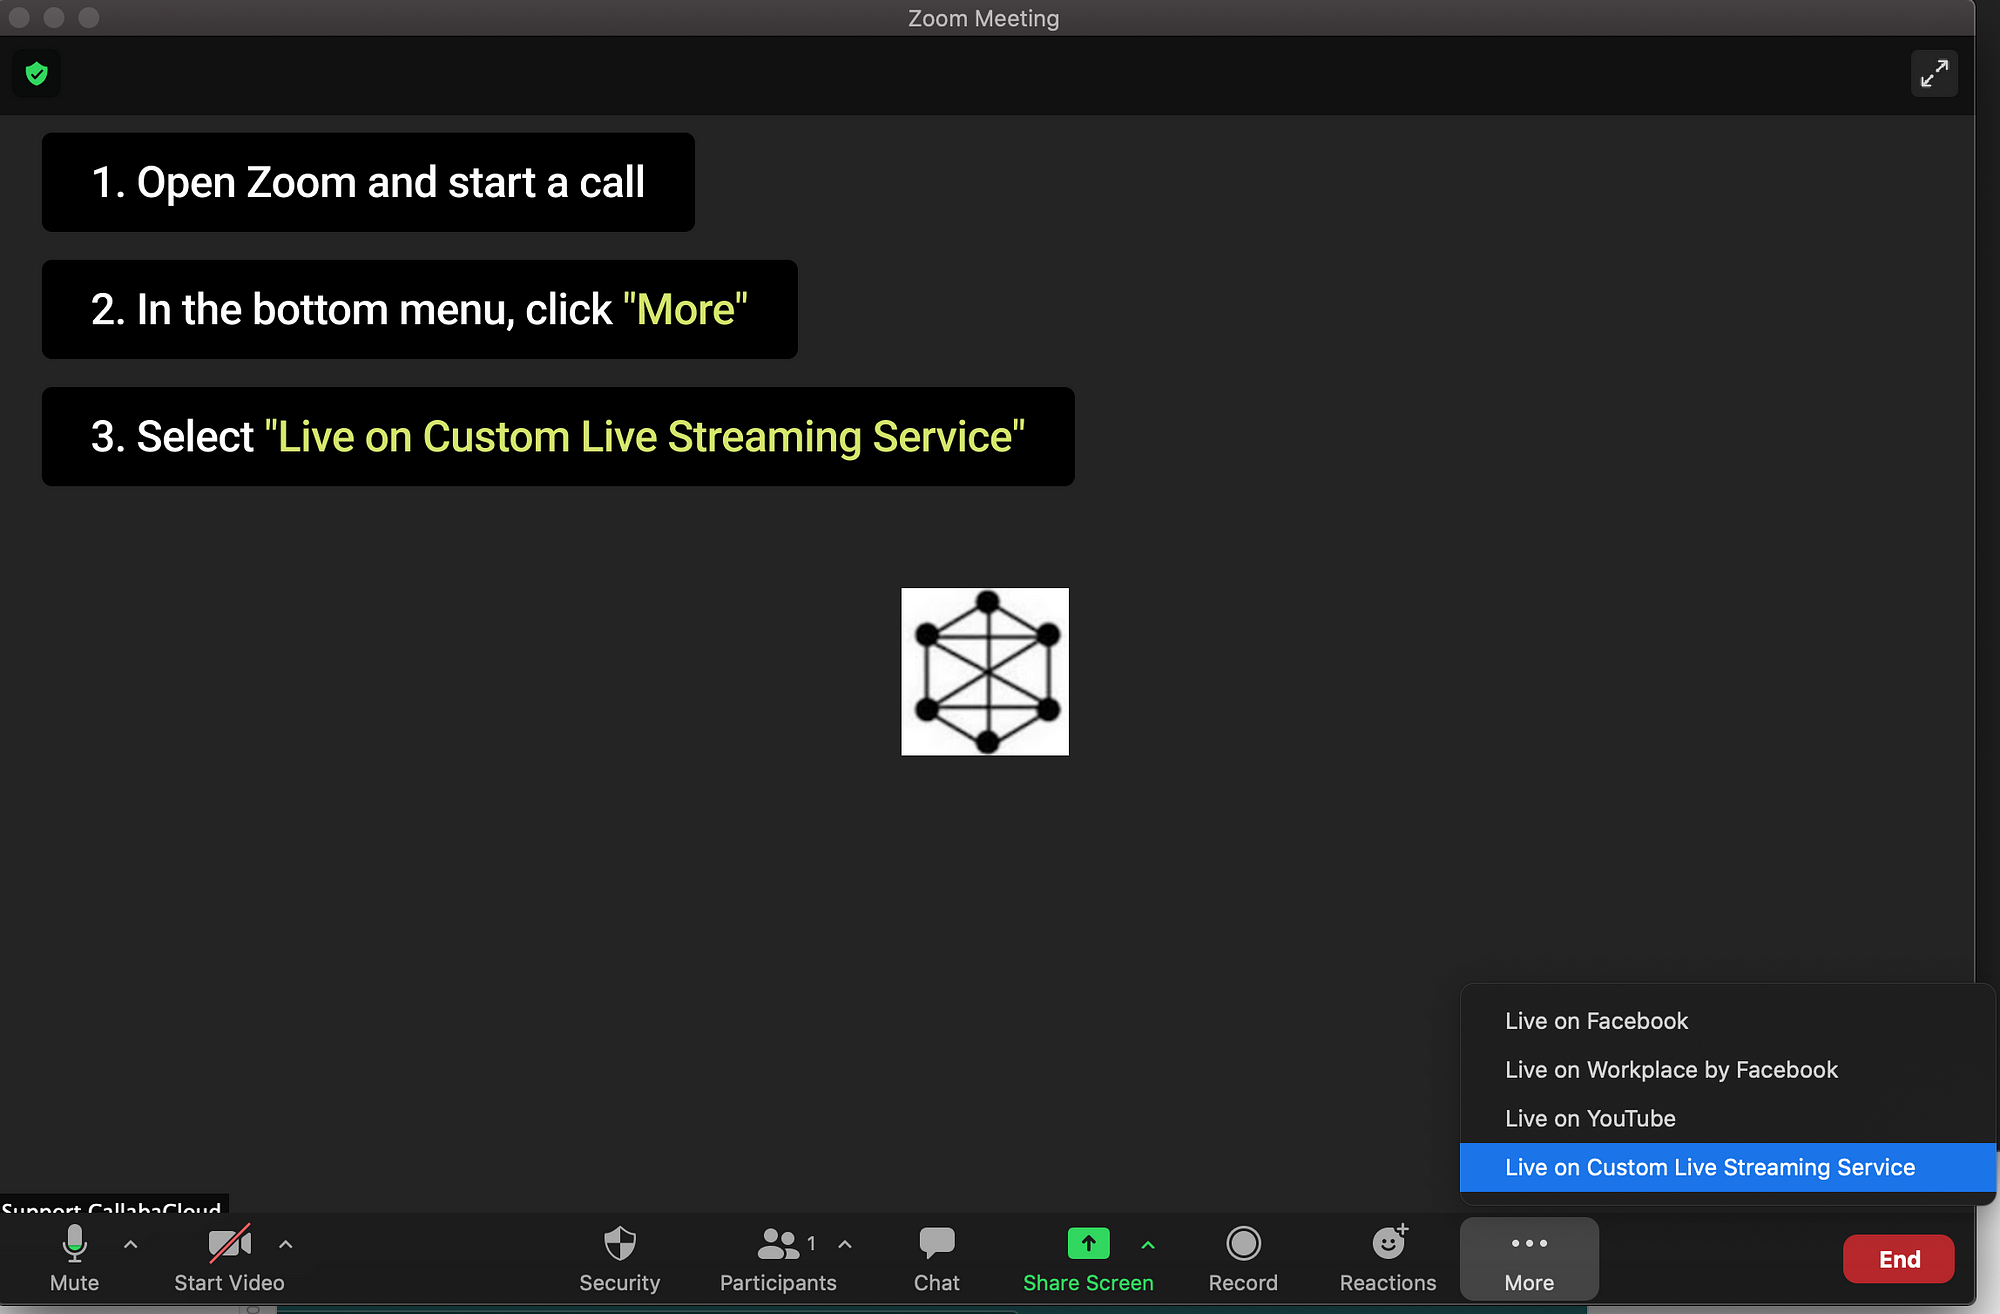
2. Launch Zoom and start a new meeting
In the bottom right menu, click More (…)
Select Live on Custom live streaming Service
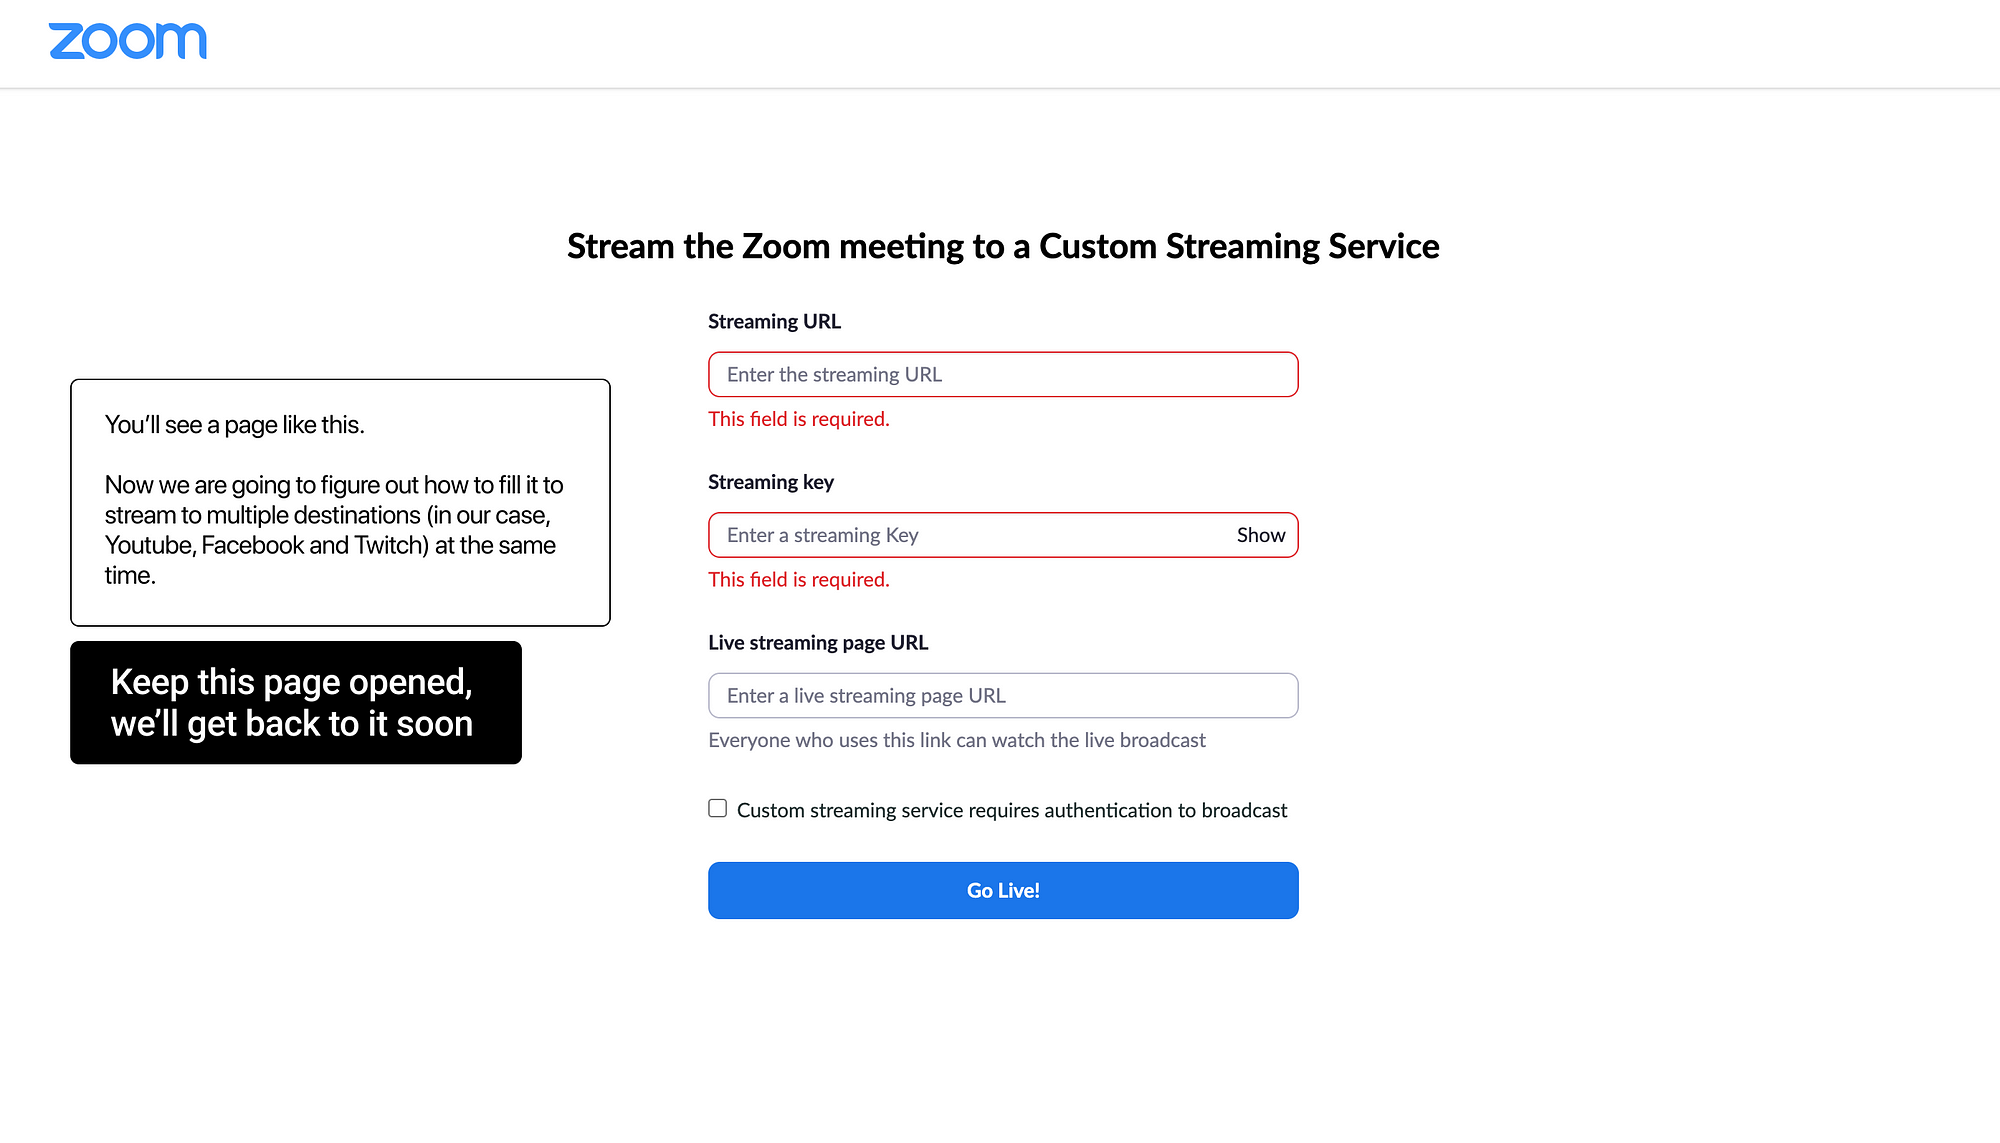
A new page will open in your browser that would prompt you to set up your live streaming destination. You can set up a re-stream to a single destination by using the RTMP url and a stream key.
This tutorial, however, is about re-streaming to multiple destinations and we’ll keep this page open for now. We’ll get back to it really soon.
Create an RTMP Server
3. Log into Callaba Cloud Live Streaming dashboard
To open it, go to http://YOUR PUBLIC IPV4.
By default, the dashboard address is the Public IPv4 address of your Amazon Web Services instance.
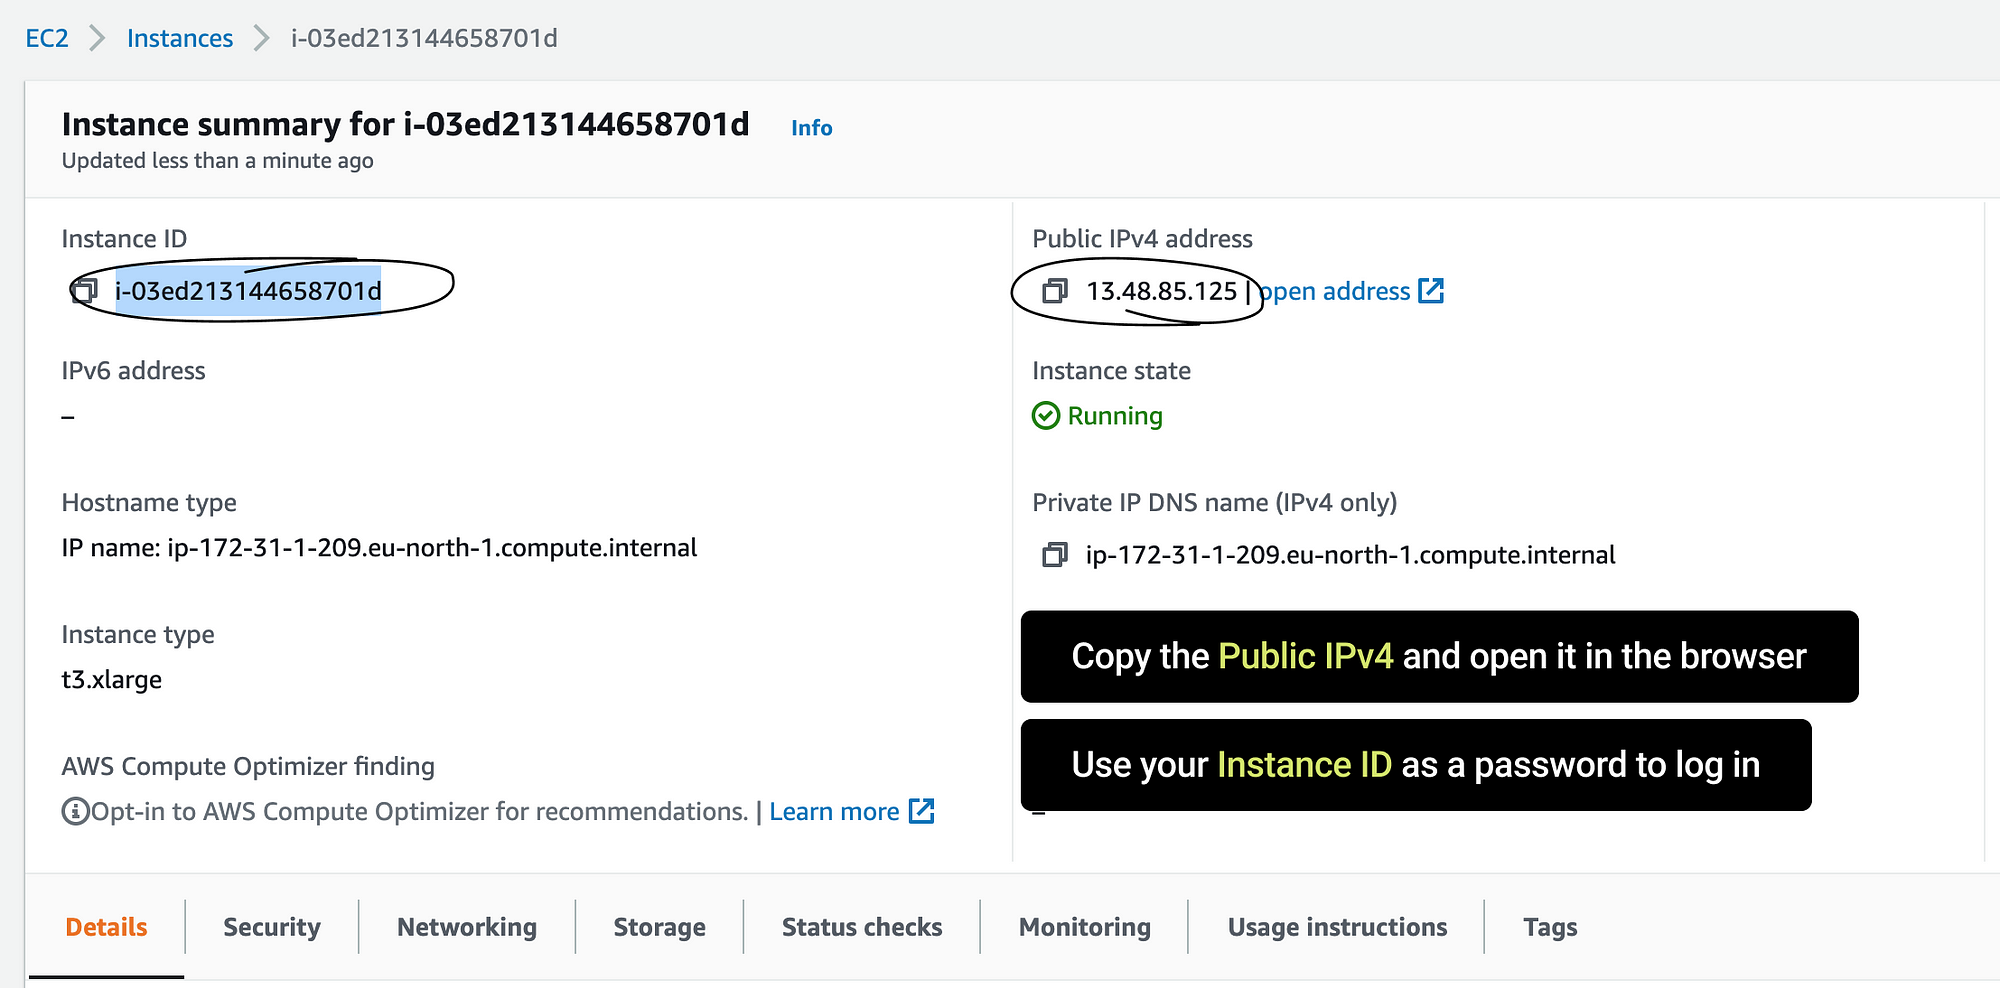
Login : admin
Password : your unique Instance ID
If you are having difficulties with this step, check out our step-by-step manual: How to launch Callaba Cloud Live Streaming.
Pro tip : please make sure that you read launching tutorial to the end, so that you know how to stop your instance when your work is finished.
4. Create your RTMP server
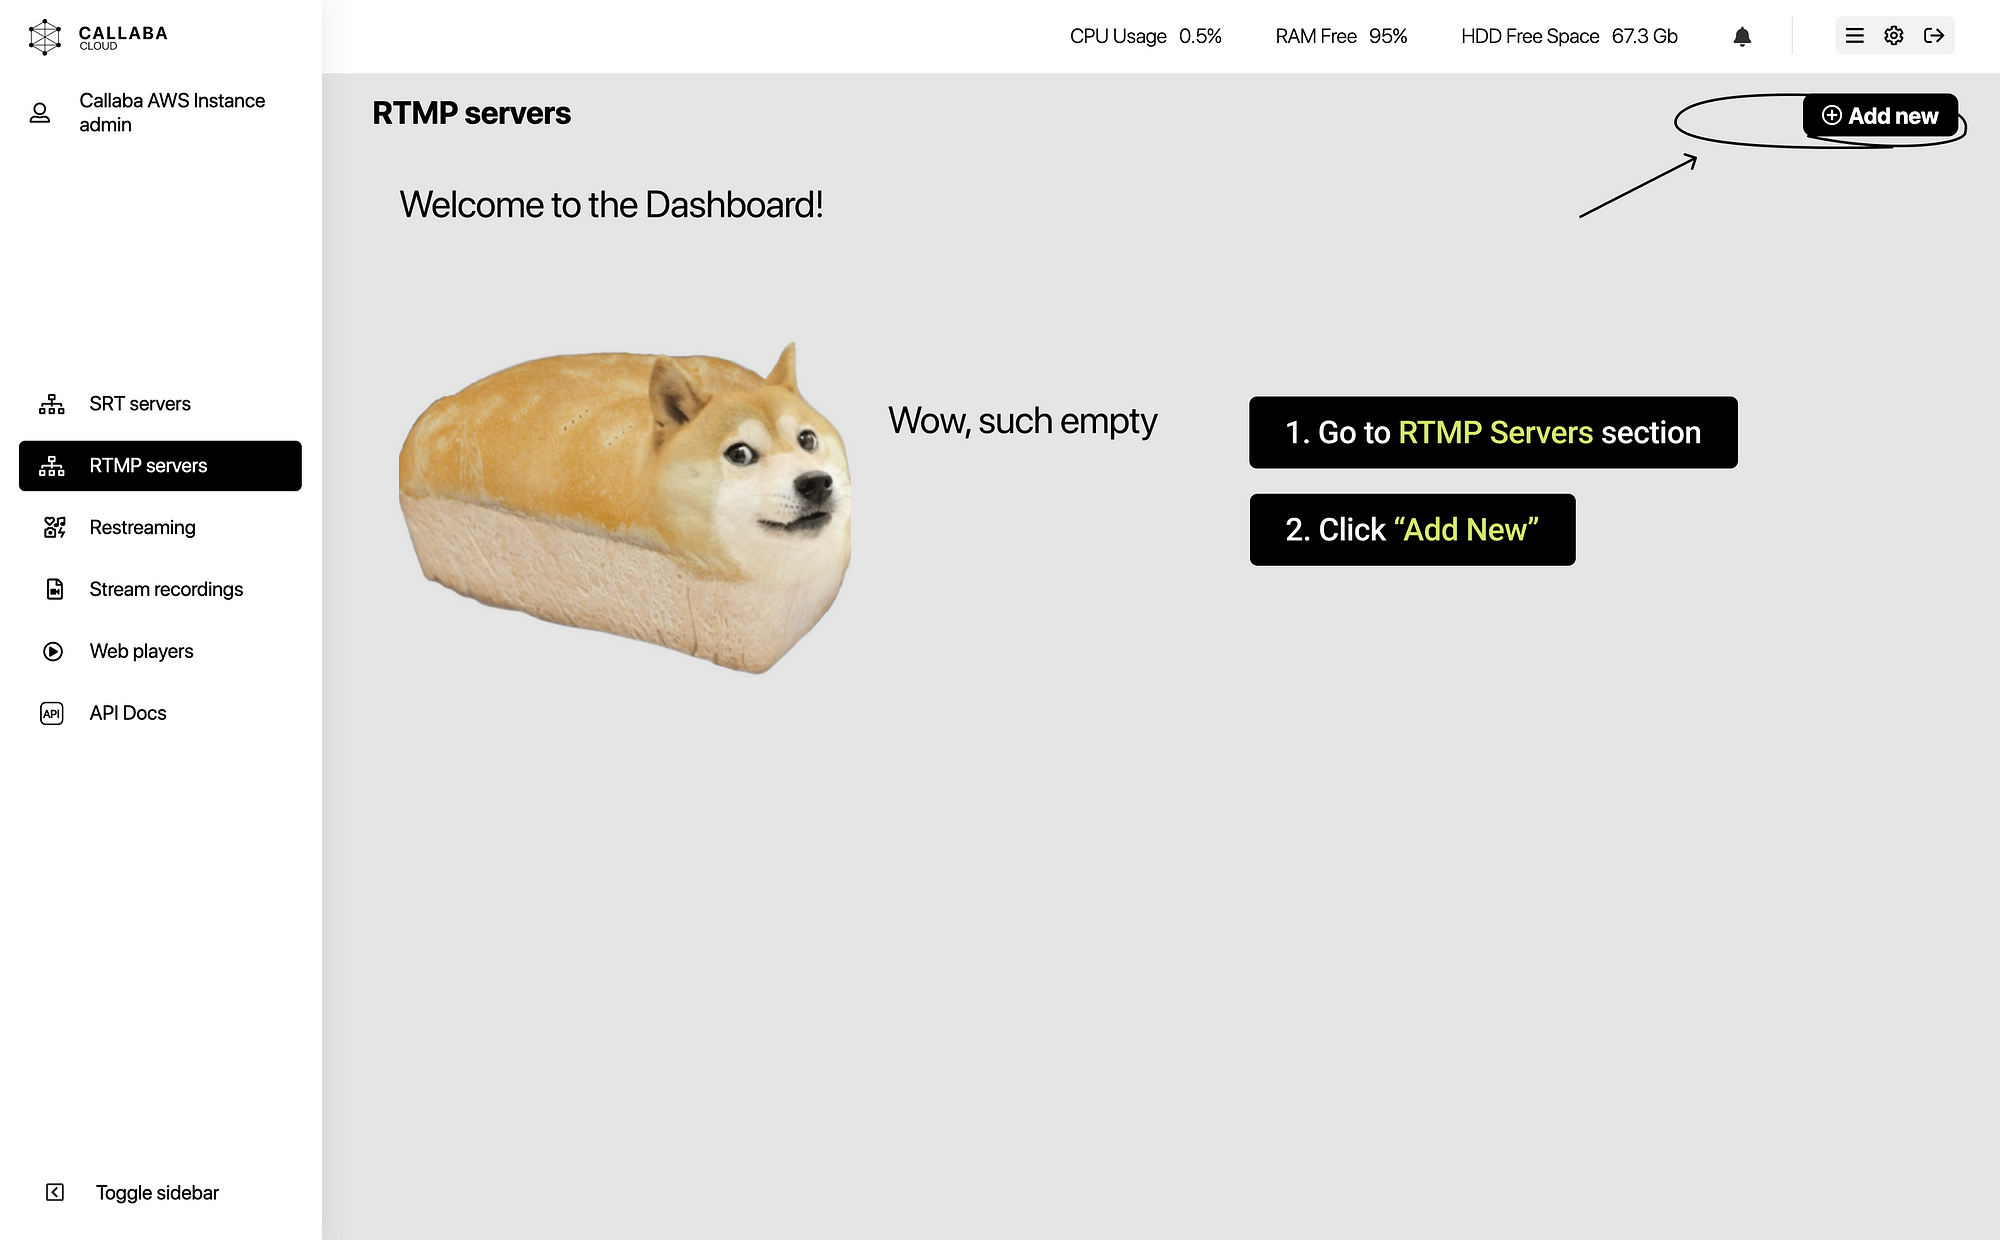
Go to RTMP Servers section
Click “Add New”
Name your RTMP server
Change Port, if needed
Click “Save”
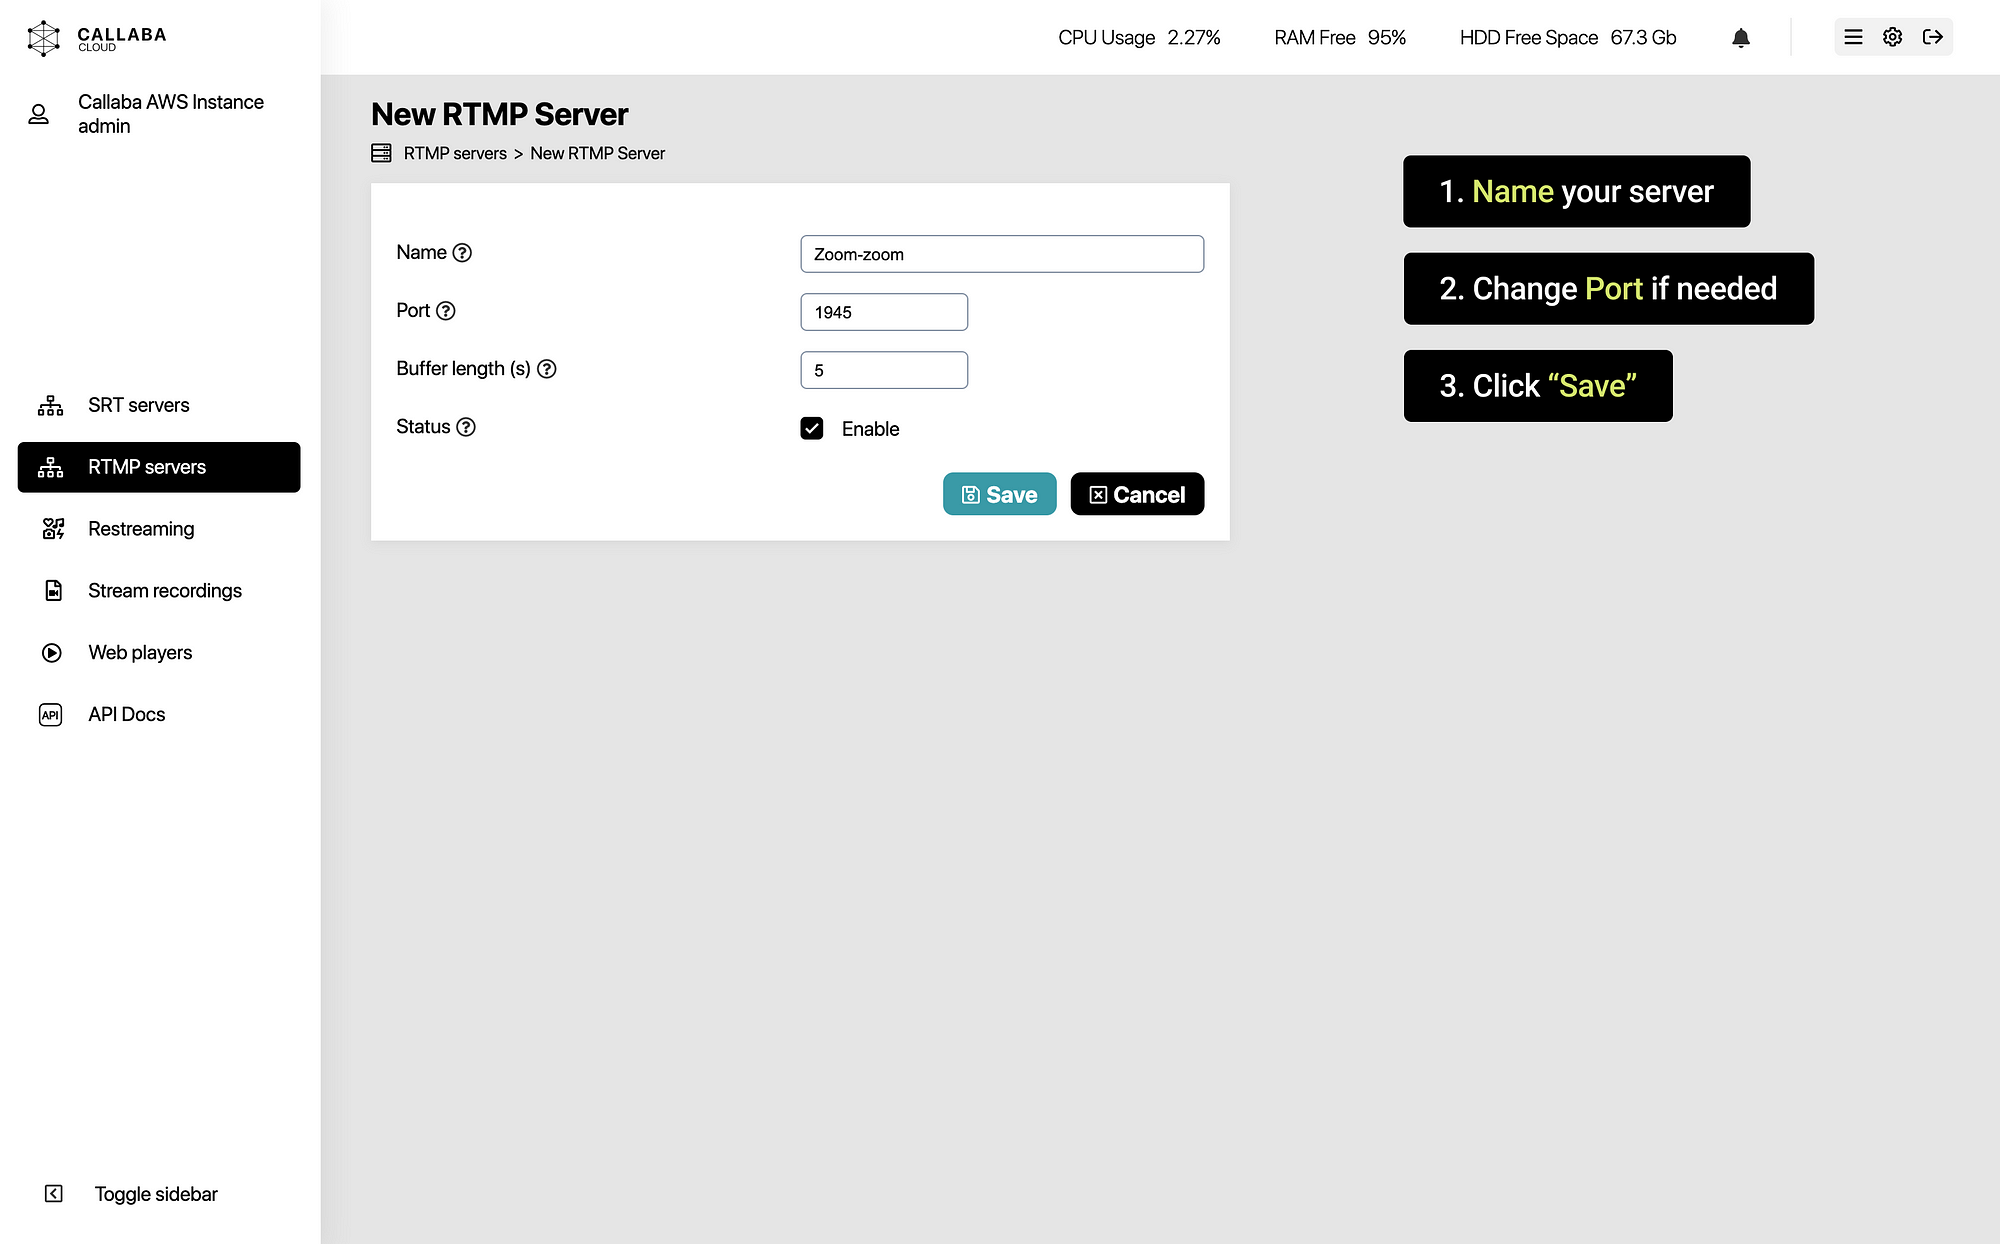
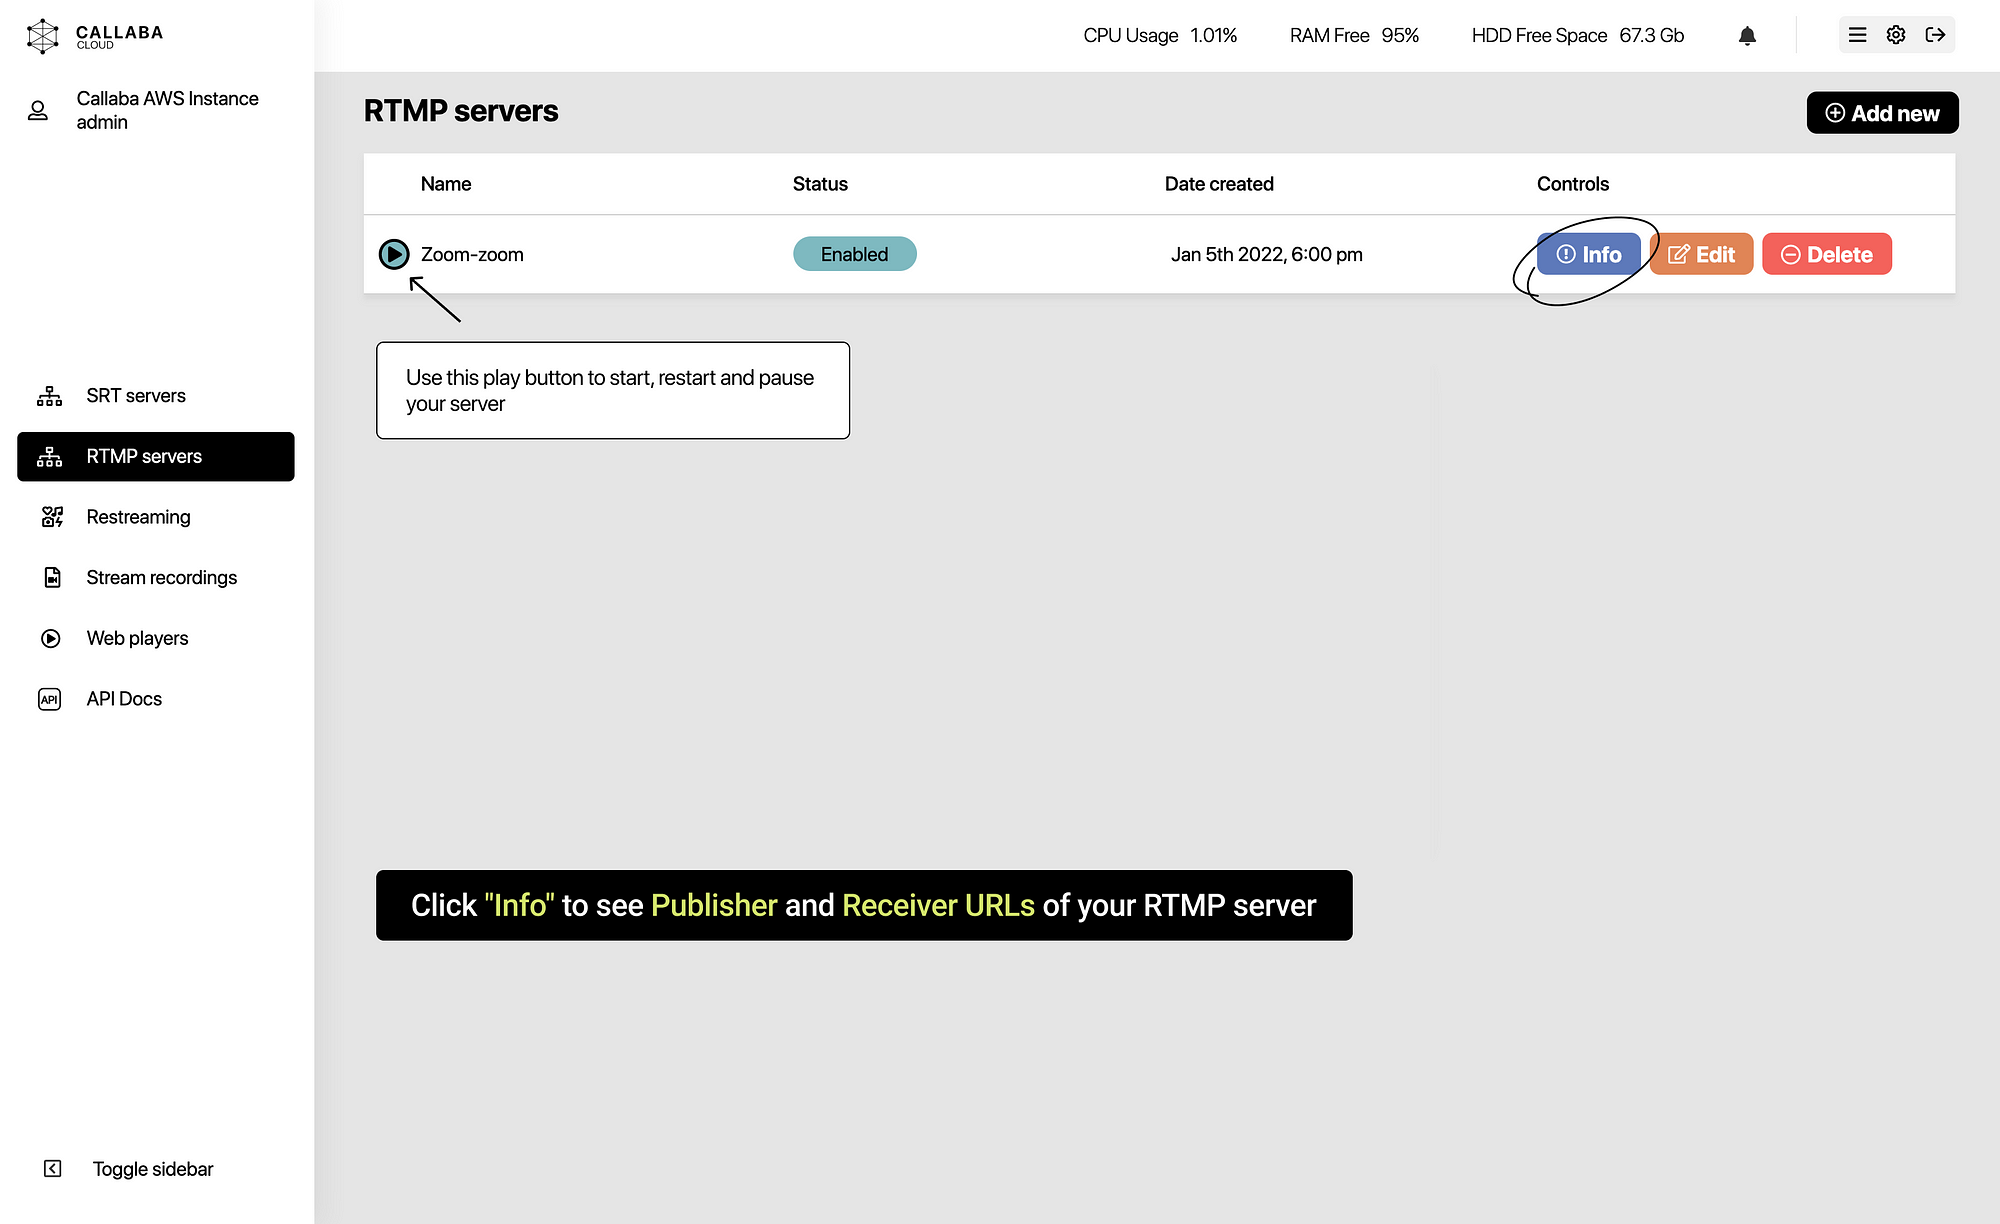
Tada! Our RTMP Server is ready.
Technically, all we have left to do is to connect Zoom to this RTMP server. But our newborn server does not know yet what to do with the stream and where to send it next. So the server is going to just receive the stream — and that’s all. It will not send it anywhere else. Yet.
We’ll tell the server where to send the stream in the Create re-streams section.
Connect Zoom to RTMP Server
5. On the RTMP Servers listing page, click “Info”
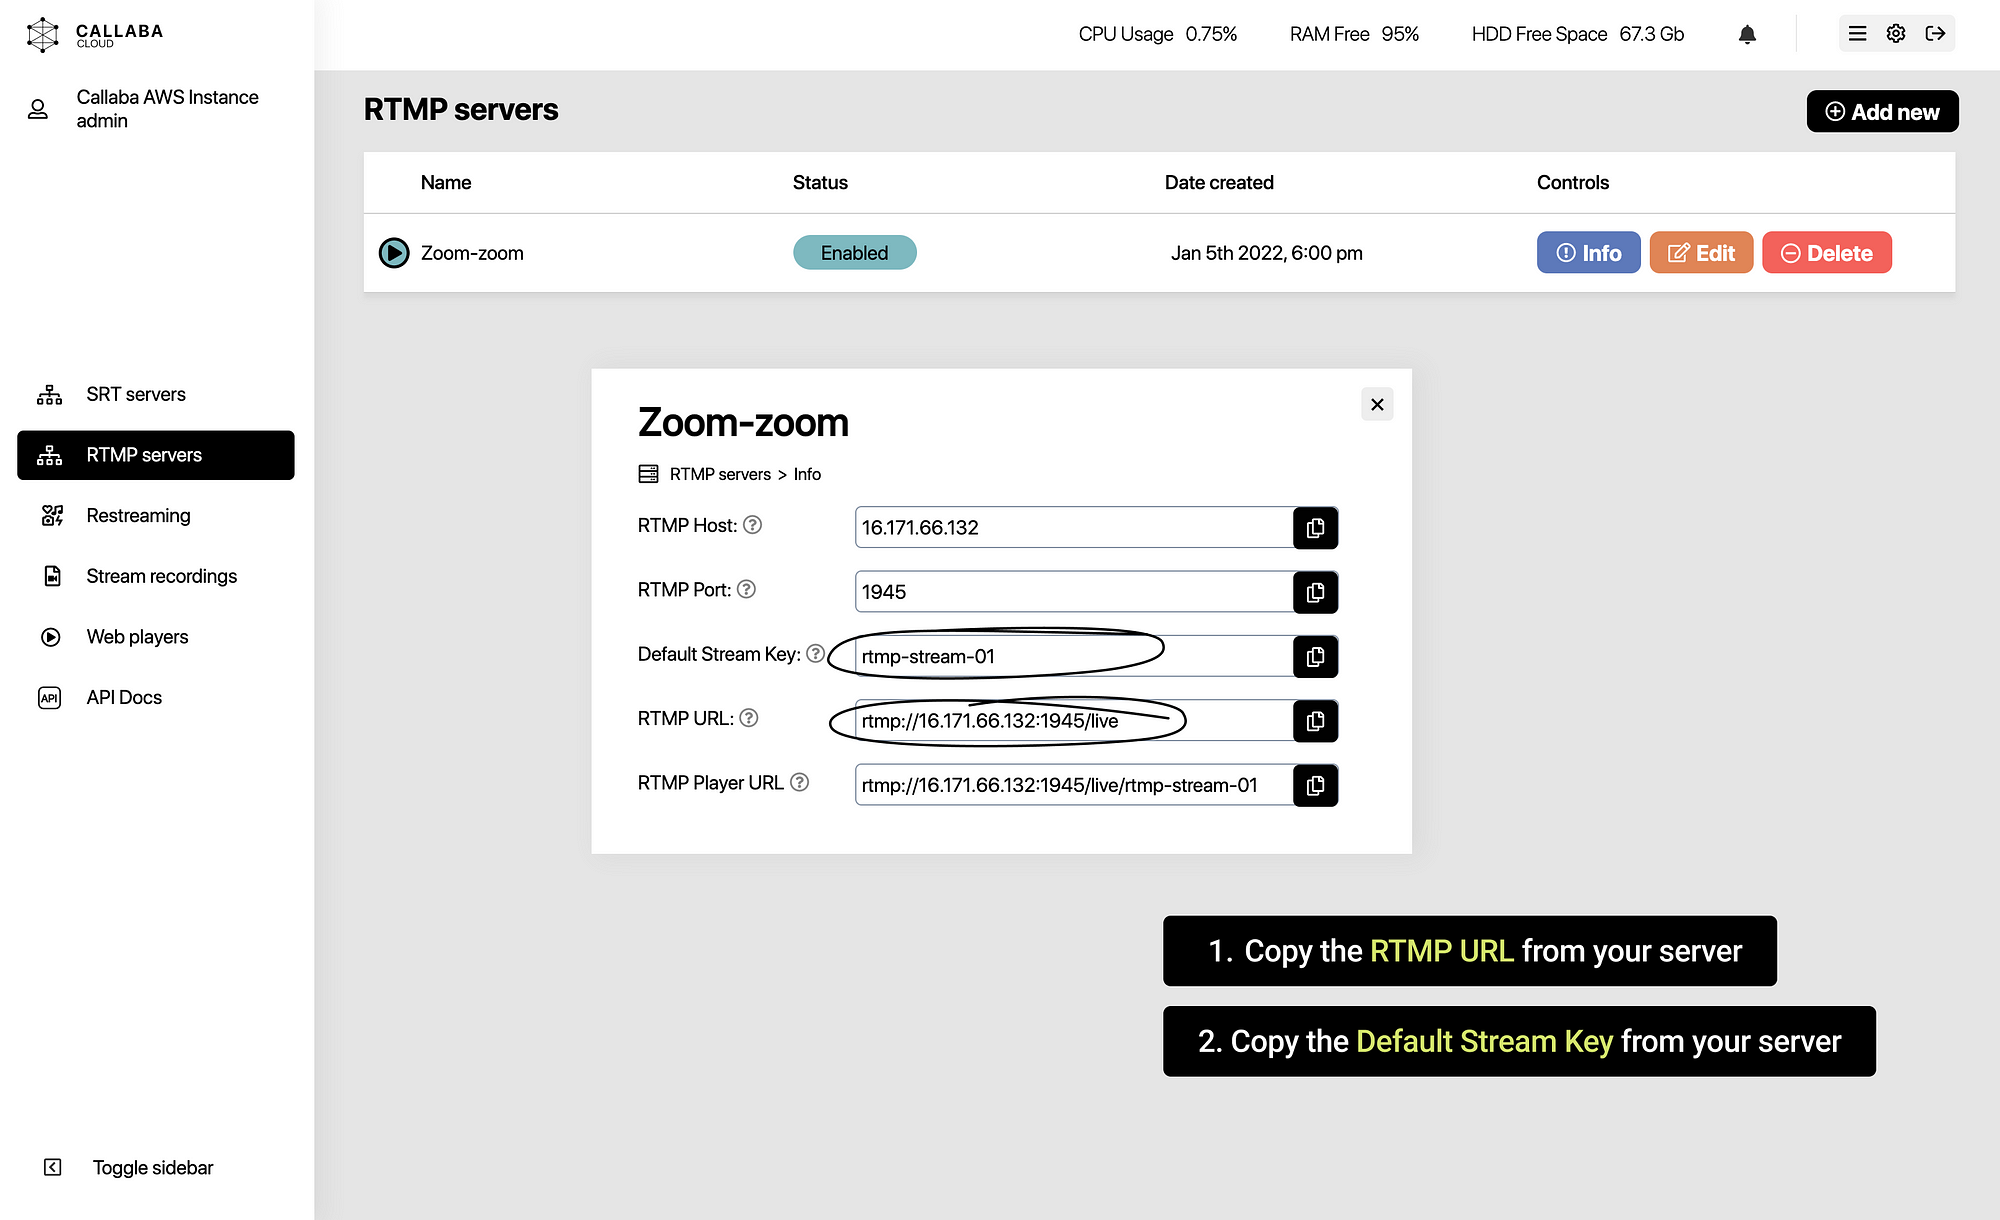
Copy RTMP URL
Copy Default Stream Key
Go back to the Zoom live streaming page
Paste RTMP URL into the “Streaming URL” field
Paste Default Stream Key into the “Streaming key” field
Put one of your destination URLs into the “Live streaming page URL” field
For some reason, “Live streaming page URL” field is required, but it does not affect anything. It’s only used to open up a page in the browser.
You can create many re-streams and it does not matter which of the destinations you put here.
I decided to use our testing Twitch channel URL for this example
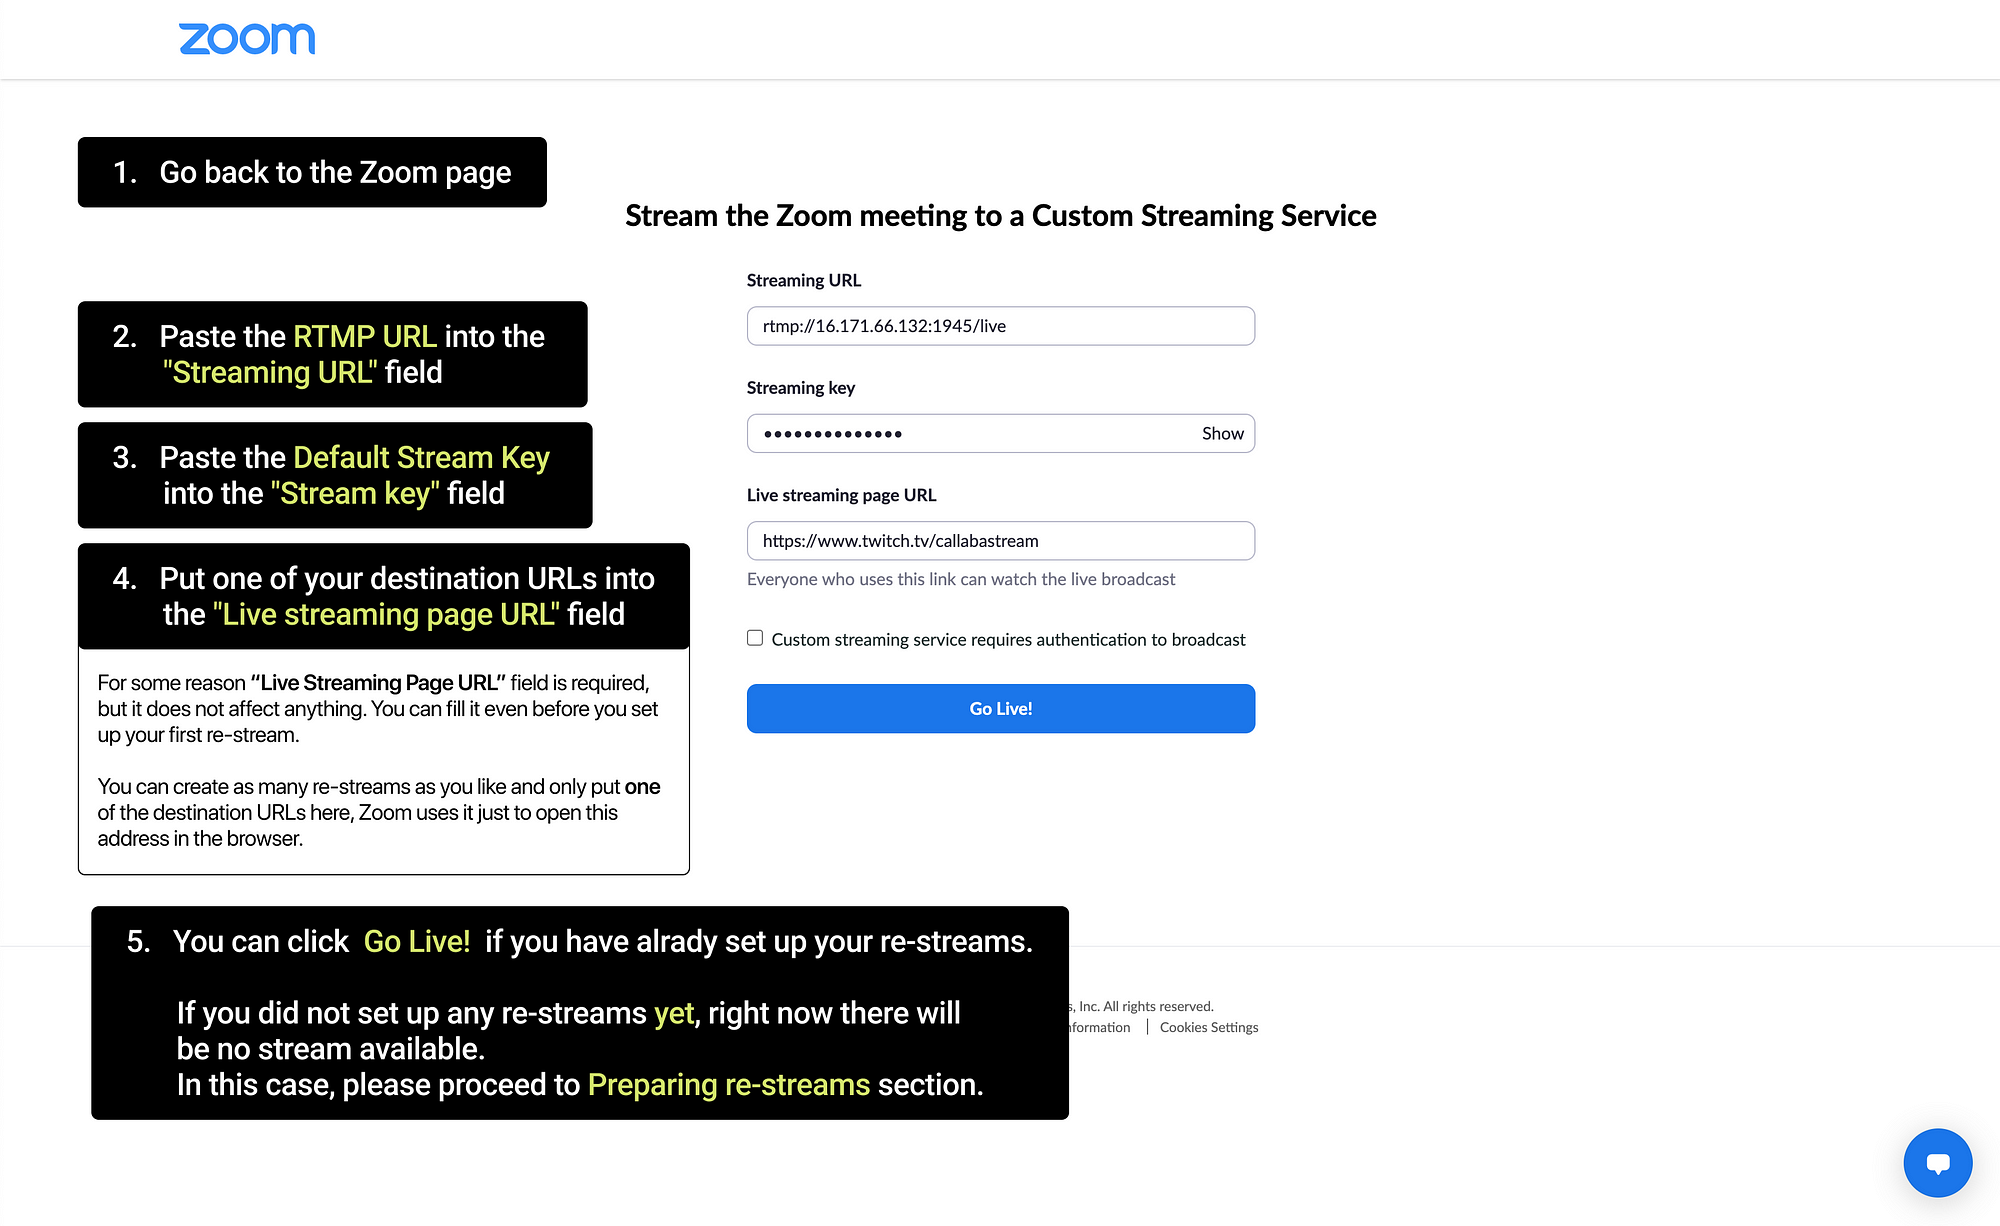
6. Click “Go Live!”
Friendly notice :
Generally, it’s better to set up your re-streams first and then connect Zoom to your RTMP Server. Please keep in mind that at this stage our server still does not know where to re-direct incoming stream. But we’ll fix it in our next section.
Create re-streams
01. Twitch
Now we are going to create a re-stream to Twitch
7. Log into your Twitch account
Go to the Twitch Dashboard (https://dashboard.twitch.tv/)
Find “Settings” in the left menu and click “Stream”.
In the window that appears, you will see the Primary Stream Key.
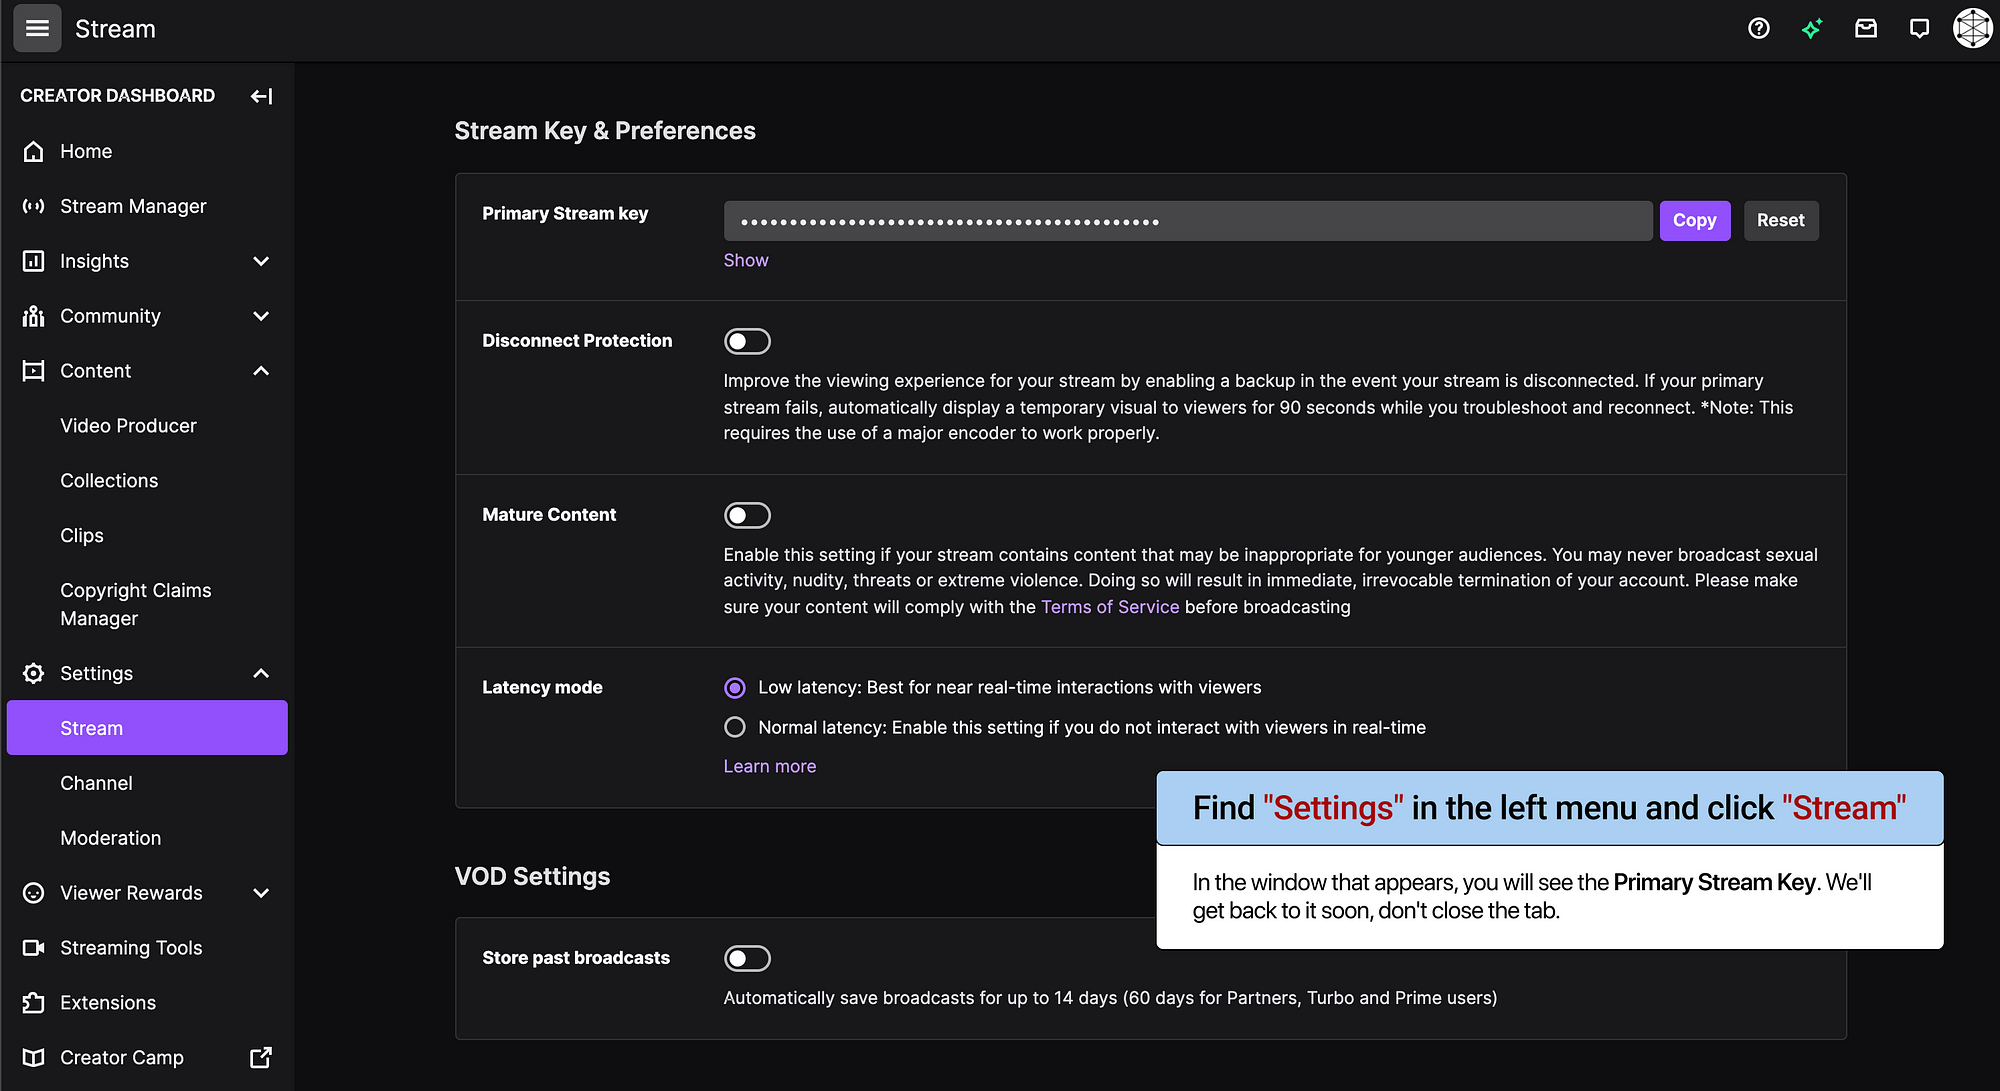
We’ll get back to it soon, don’t close the tab.
8. Open Callaba Cloud Dashboard
Go to Restreaming section
Click “Add New”
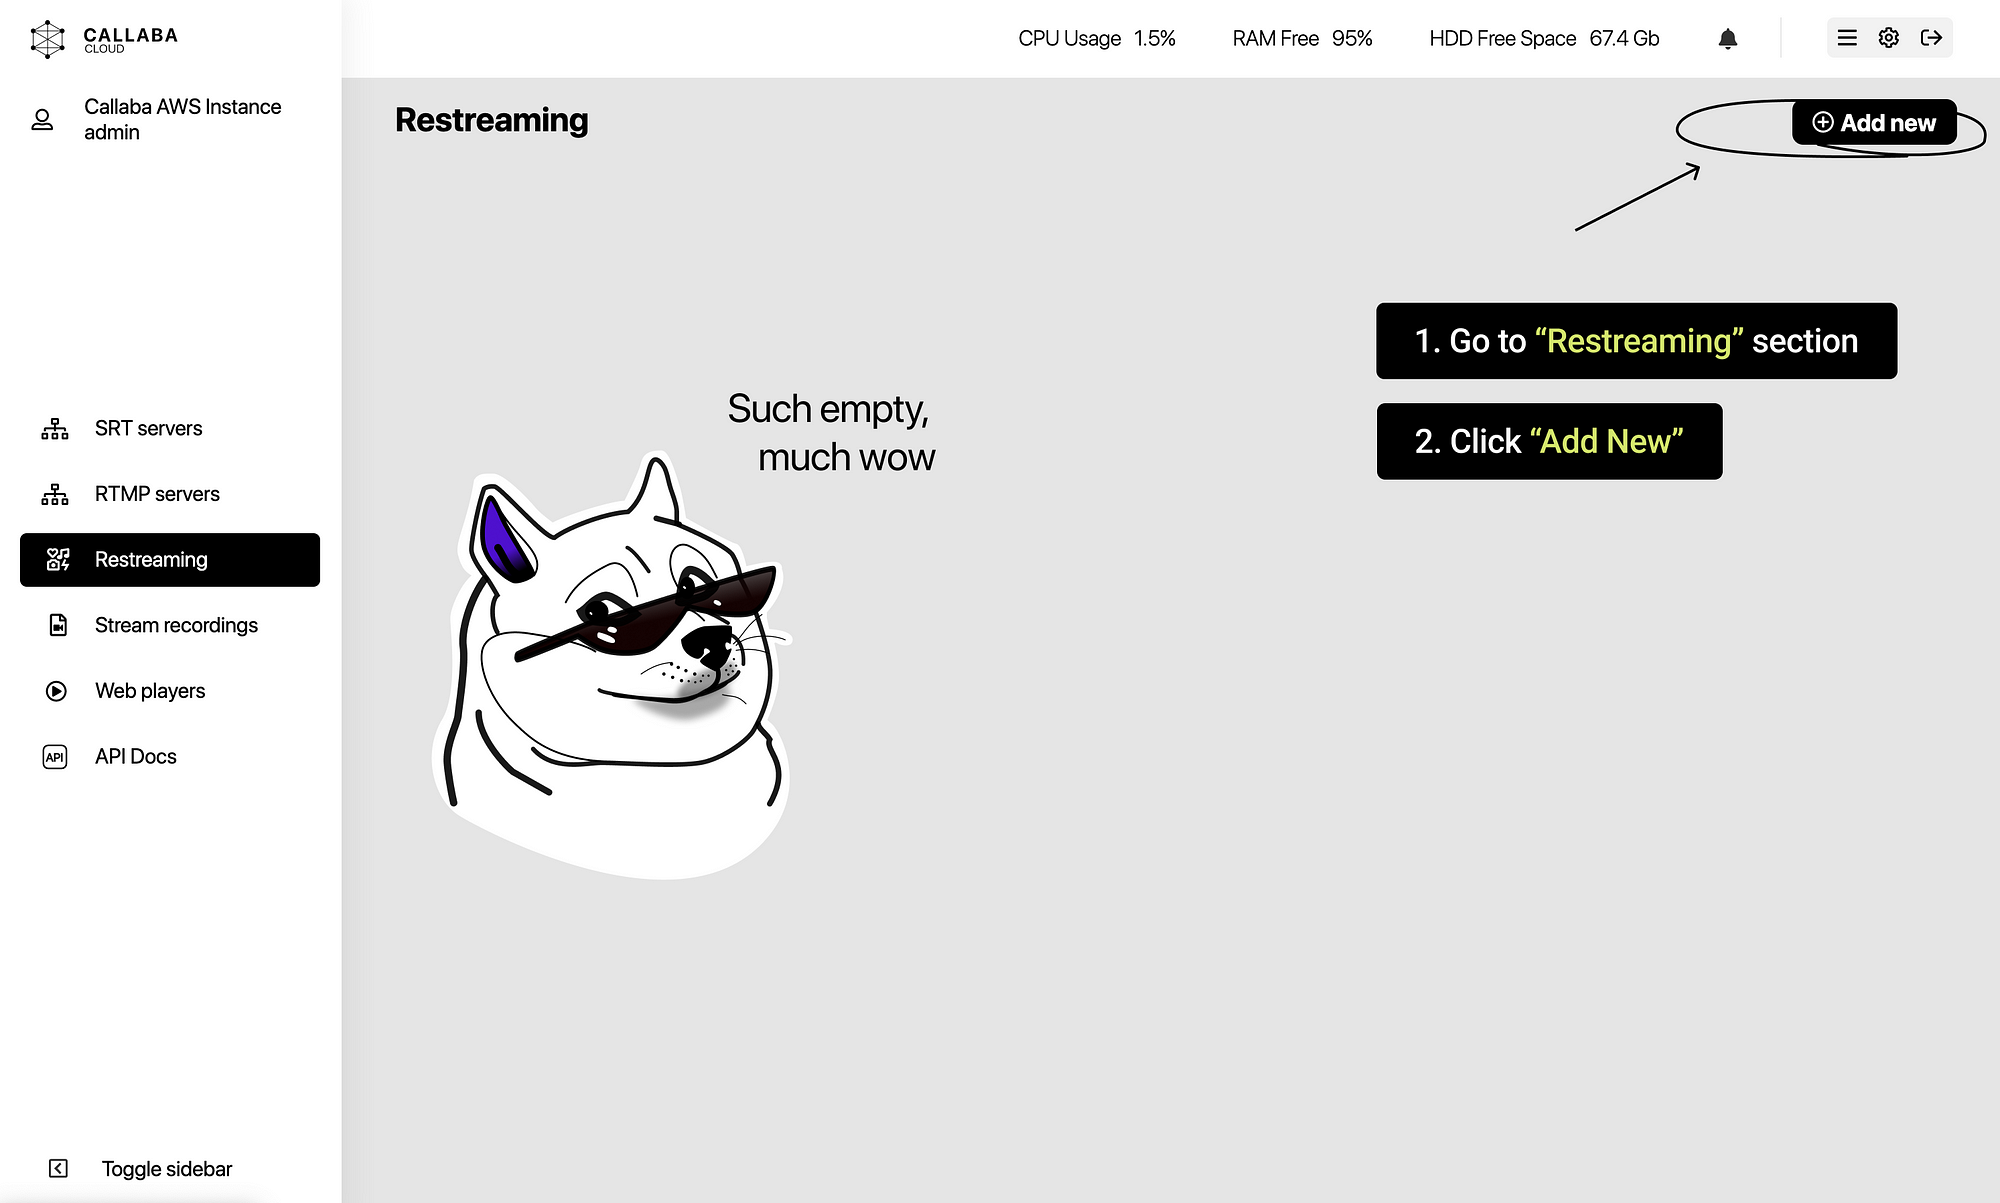
In the page that opens, fill in the fields
Restream Name:
Create a name for your re-stream
Input type :
Select RTMP stream from the list
RTMP Server:
Select an RTMP server from the list.
In our example the server is called “Zoom-zoom”
(I think it’s cute)
RTMP Stream key:
Put here the Default Stream Key
In our example it is /rtmp-stream-01
Streaming service destination:
Select Twitch from the list of social networks
Stream URL:
Please refer to the list of servers here : https://stream.twitch.tv/ingests/
Warning! Please use the appropriate Stream URL for your region. Our tests have shown that not all Twitch servers can work in a particular region.
Make sure to insert your Stream Key between the {} curly brackets.
Stream Key:
Paste Primary Stream Key from Twitch Dashboard
Click “Save”
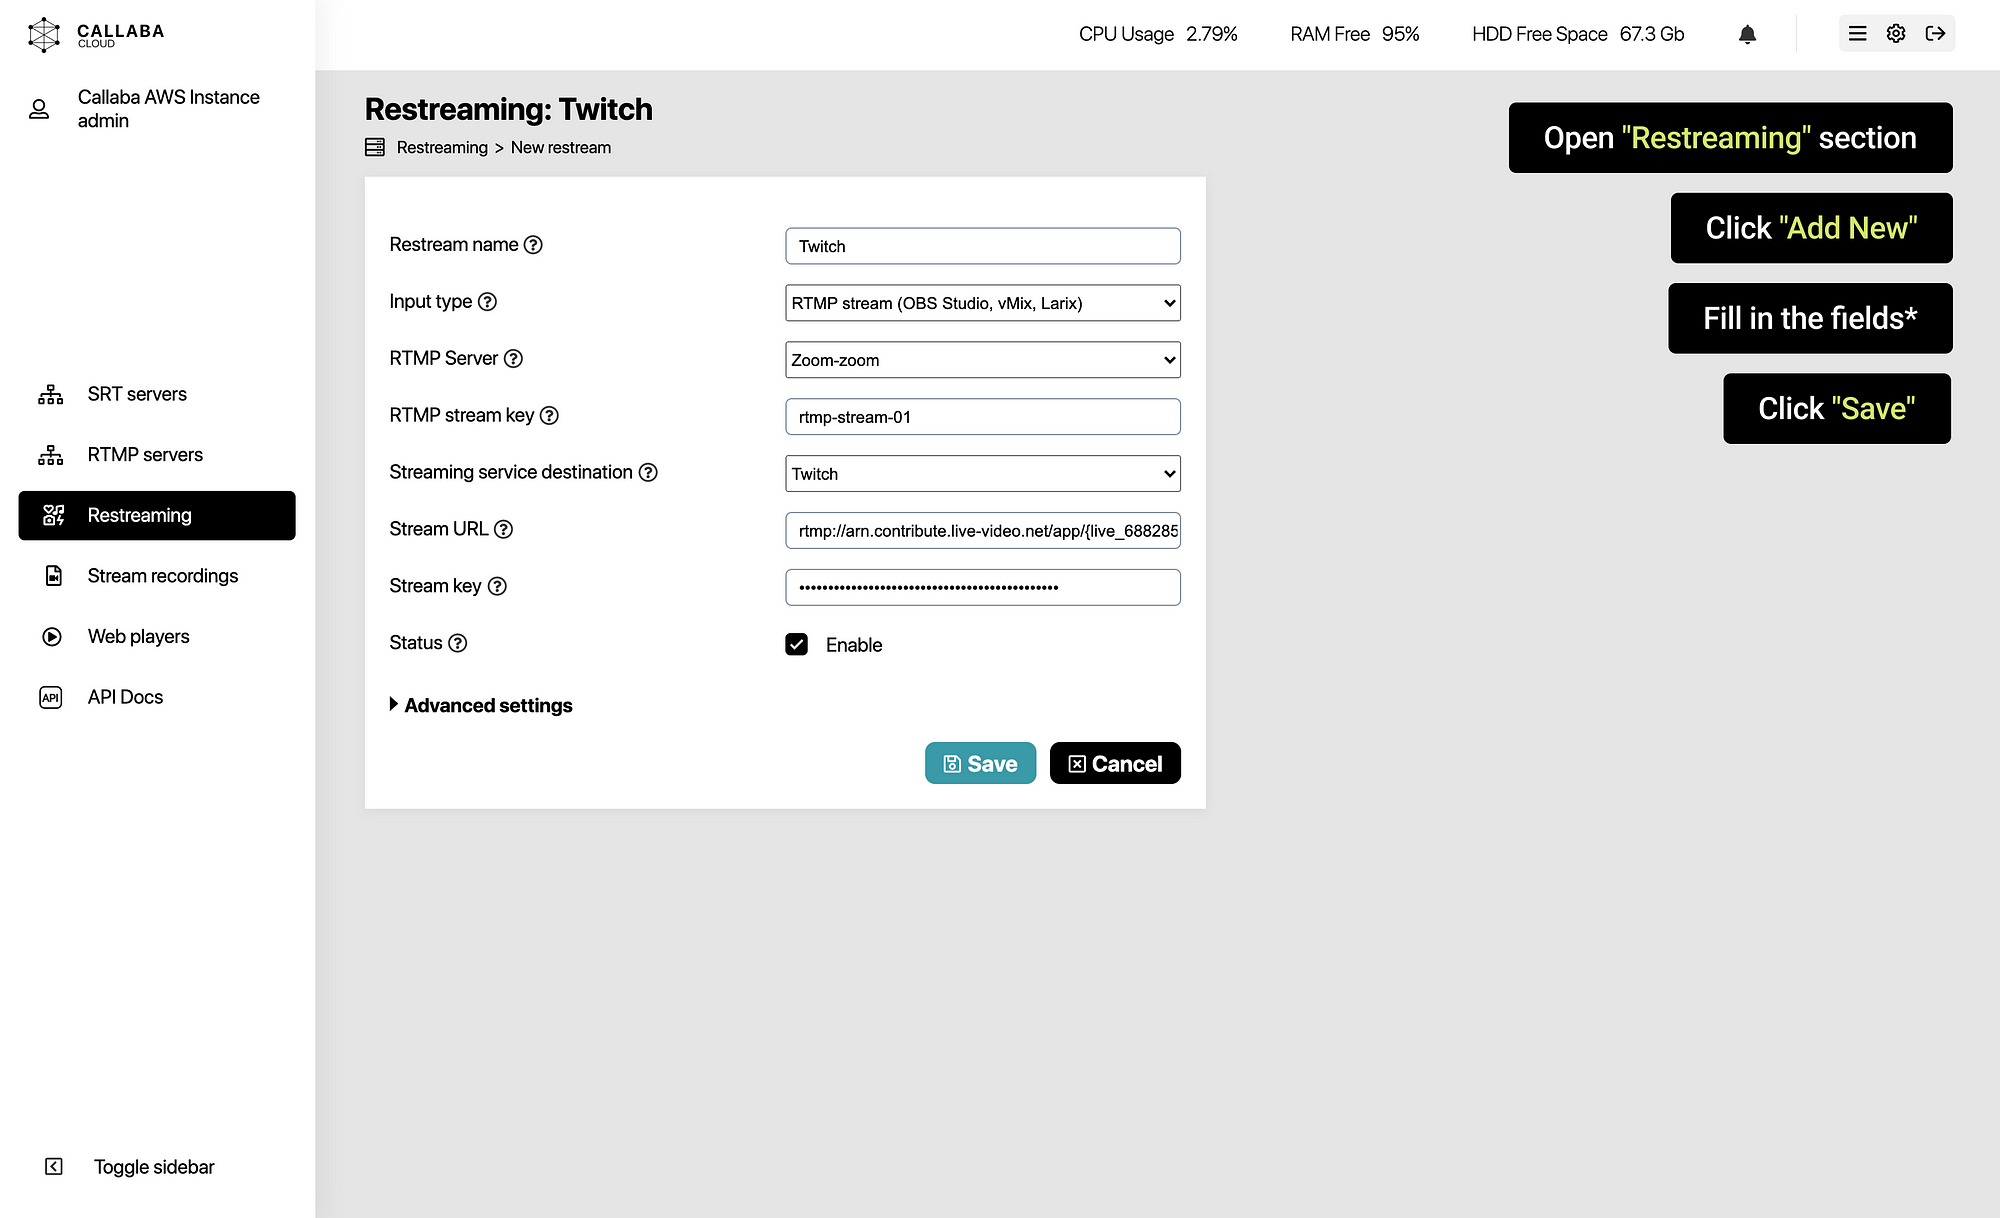
Awesome! Our re-stream for Twitch is ready.
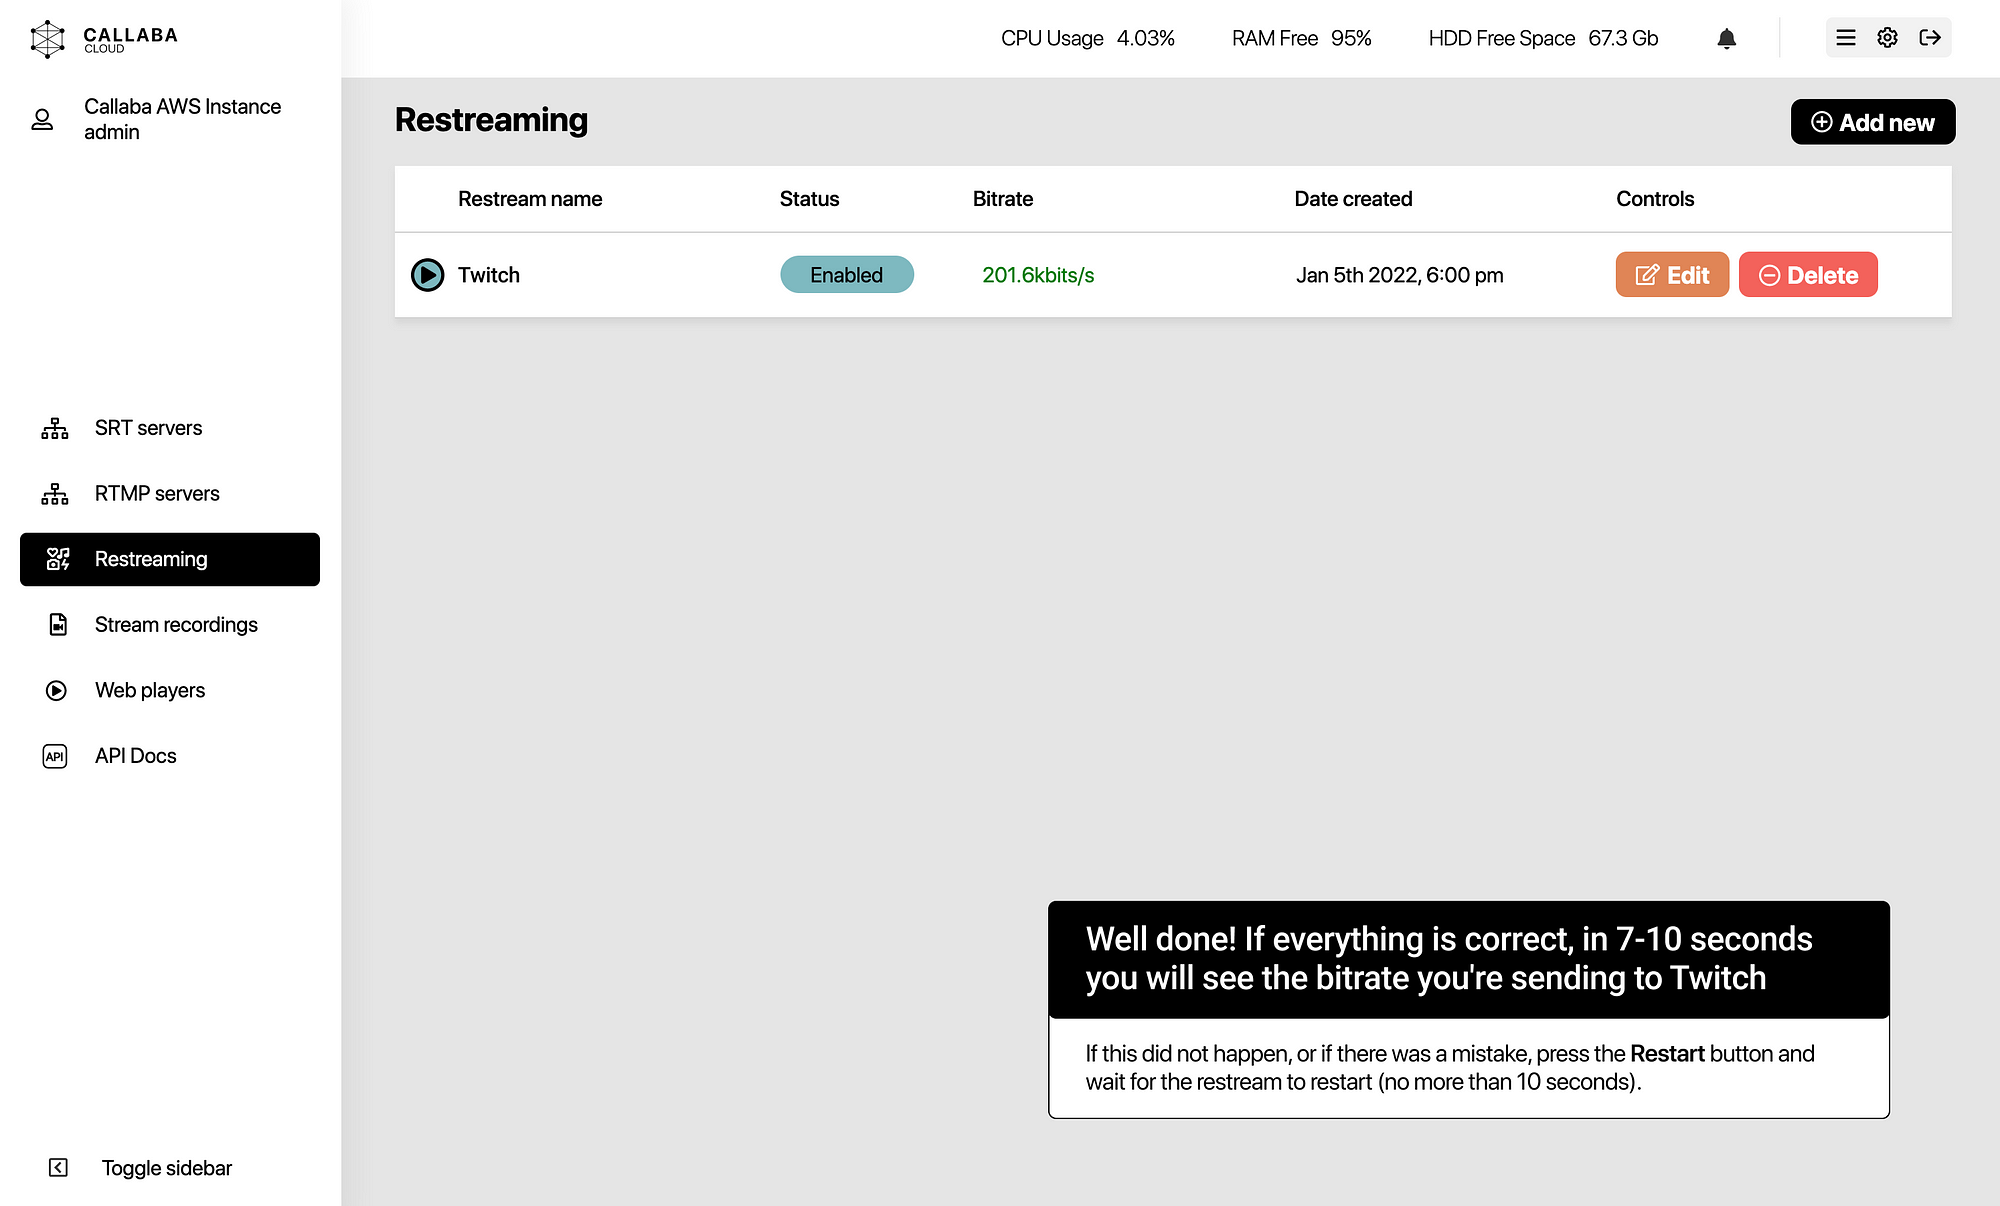
9. Now let’s make sure our re-stream to Twitch is healthy
If everything is done correctly, in about 10 seconds you will see the bitrate you’re sending to Twitch
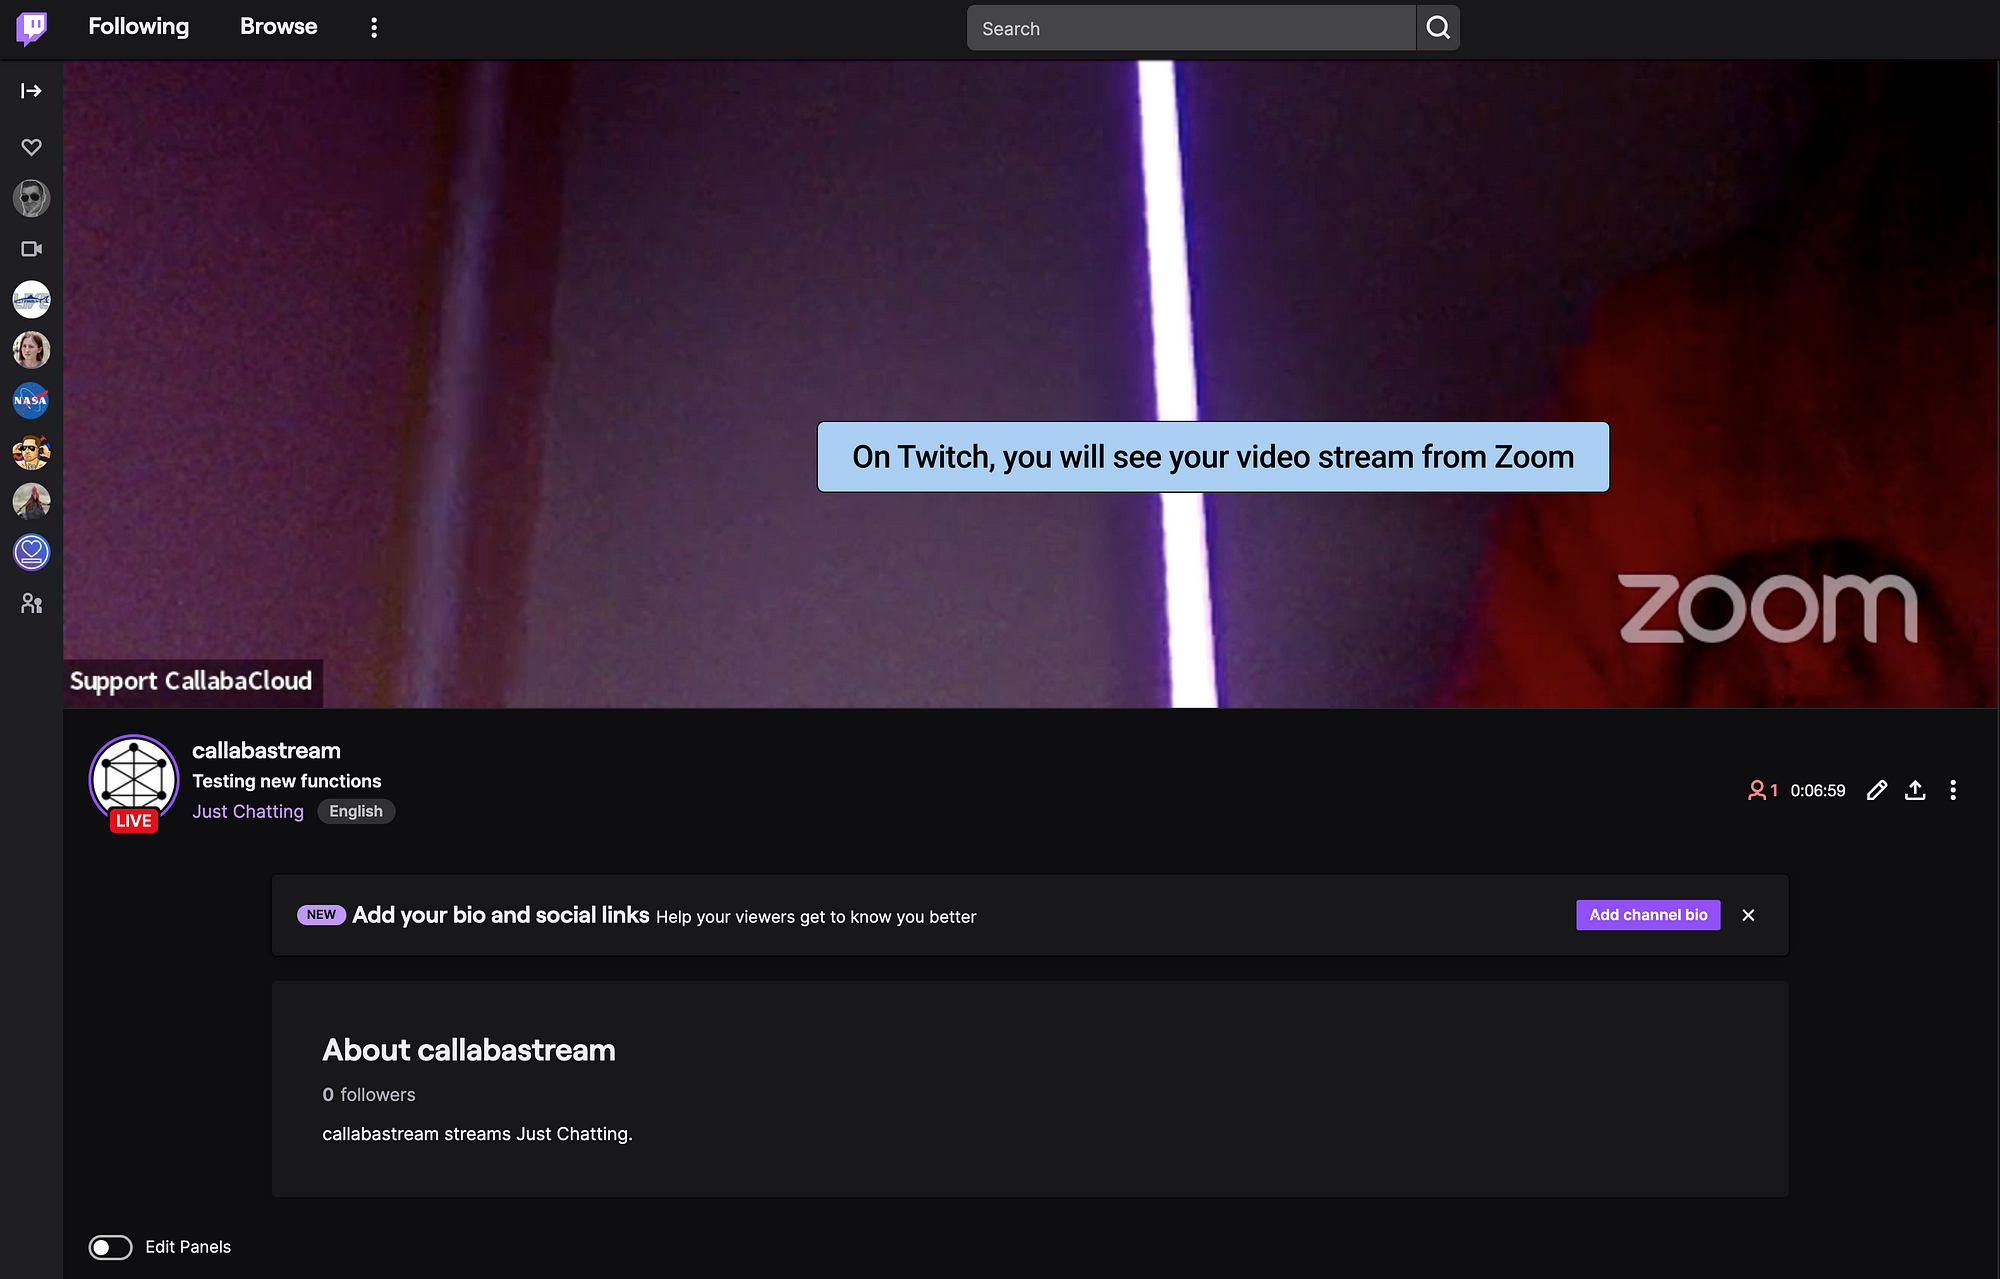
On Twitch, you will see your video stream from Zoom!
02. Youtube
Now we will figure out how to re-stream Zoom to Youtube.
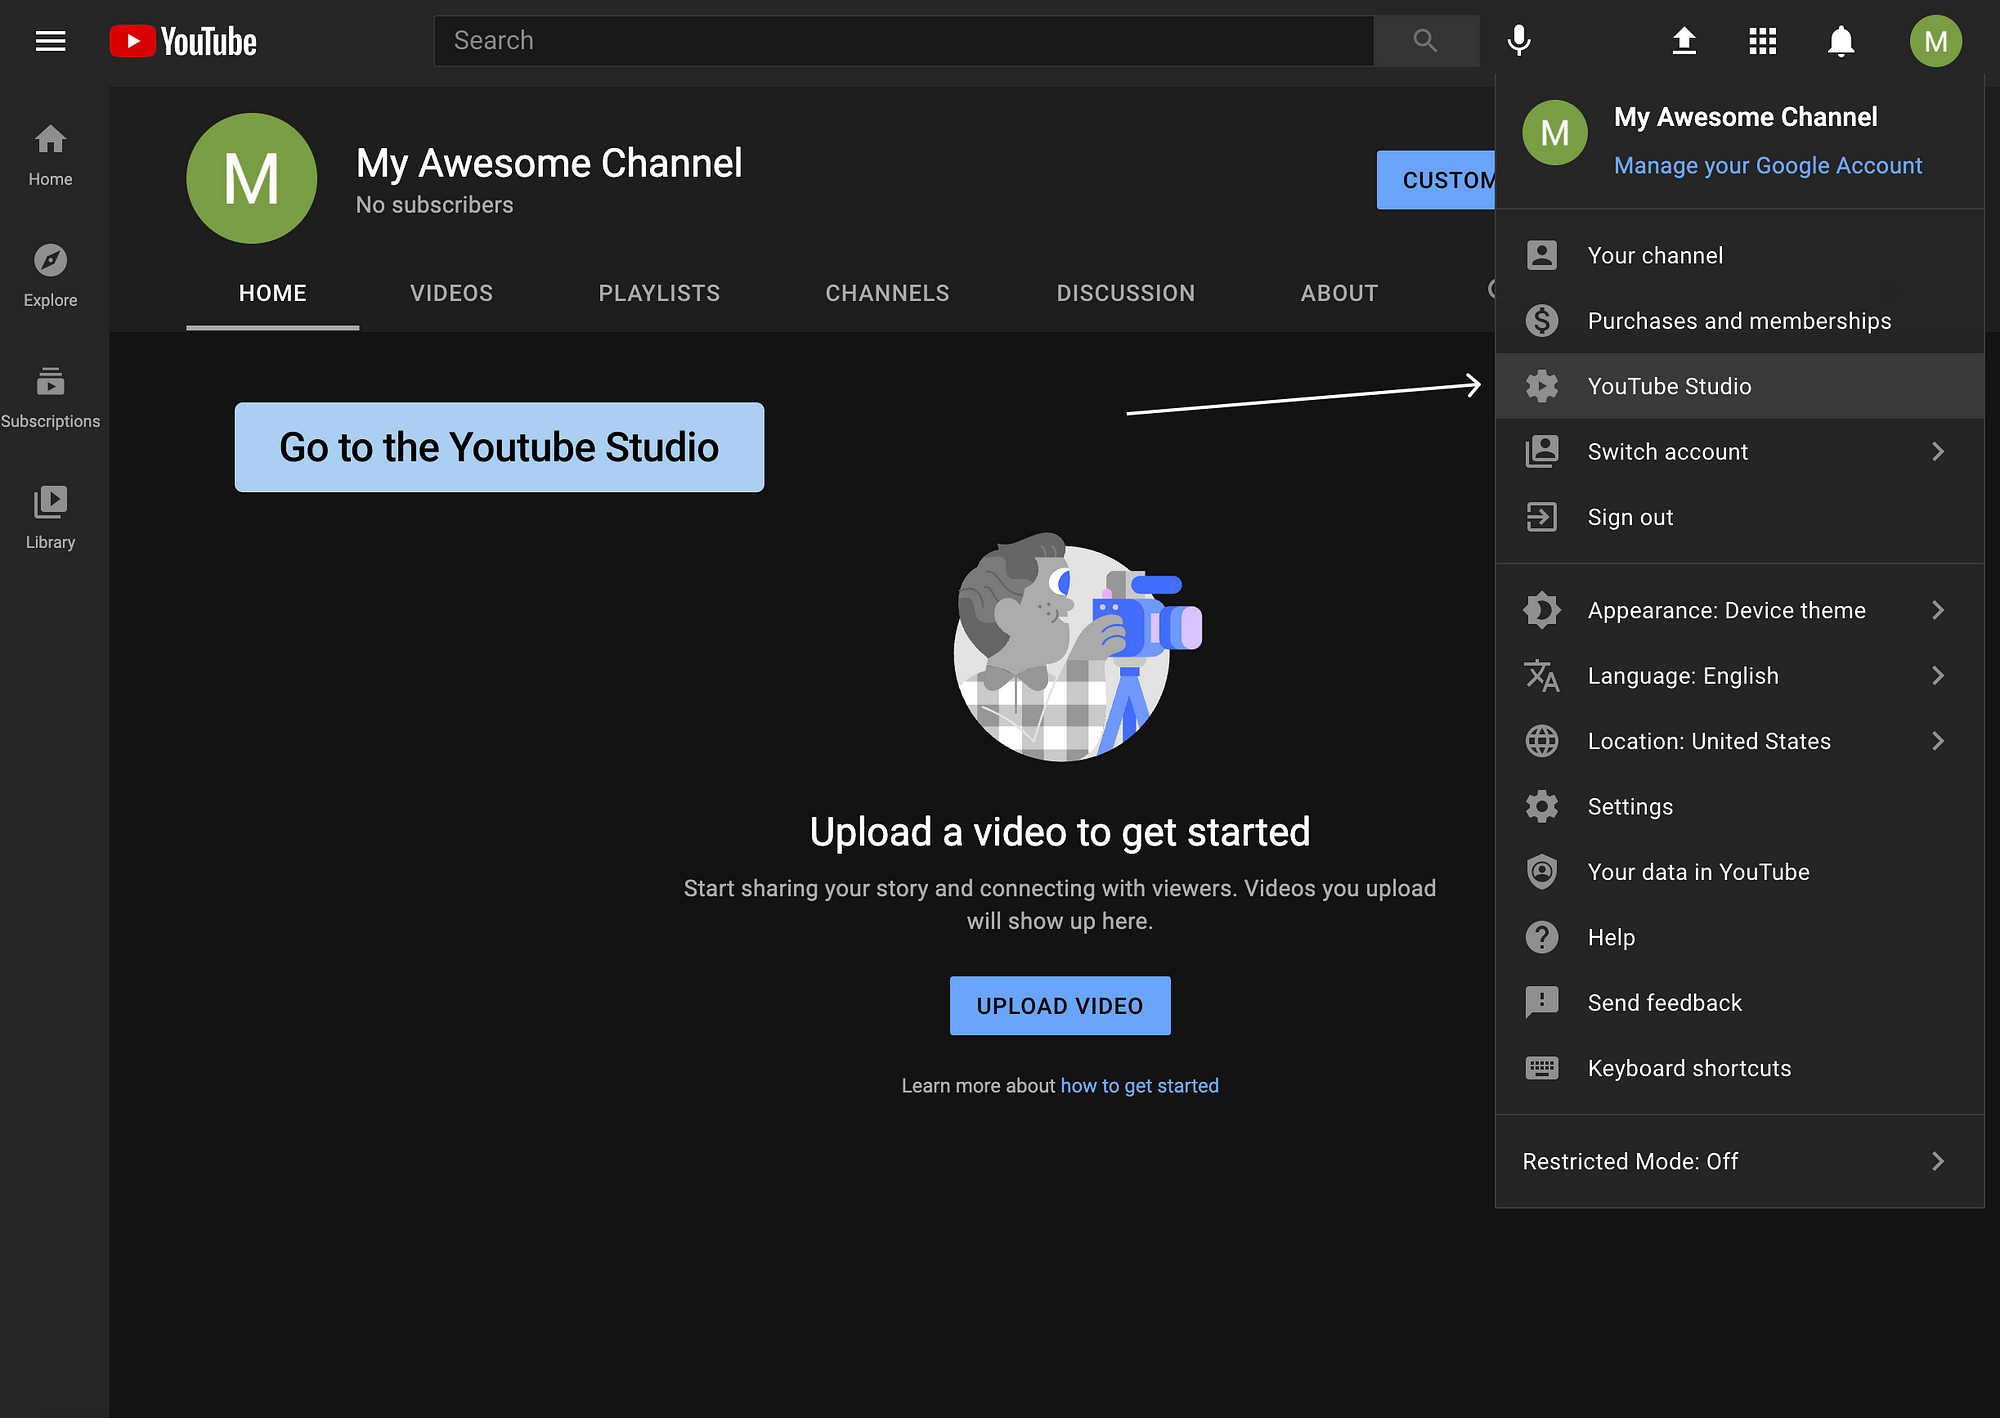
10. Log in to Youtube,
then open YouTube Studio (http://studio.youtube.com)
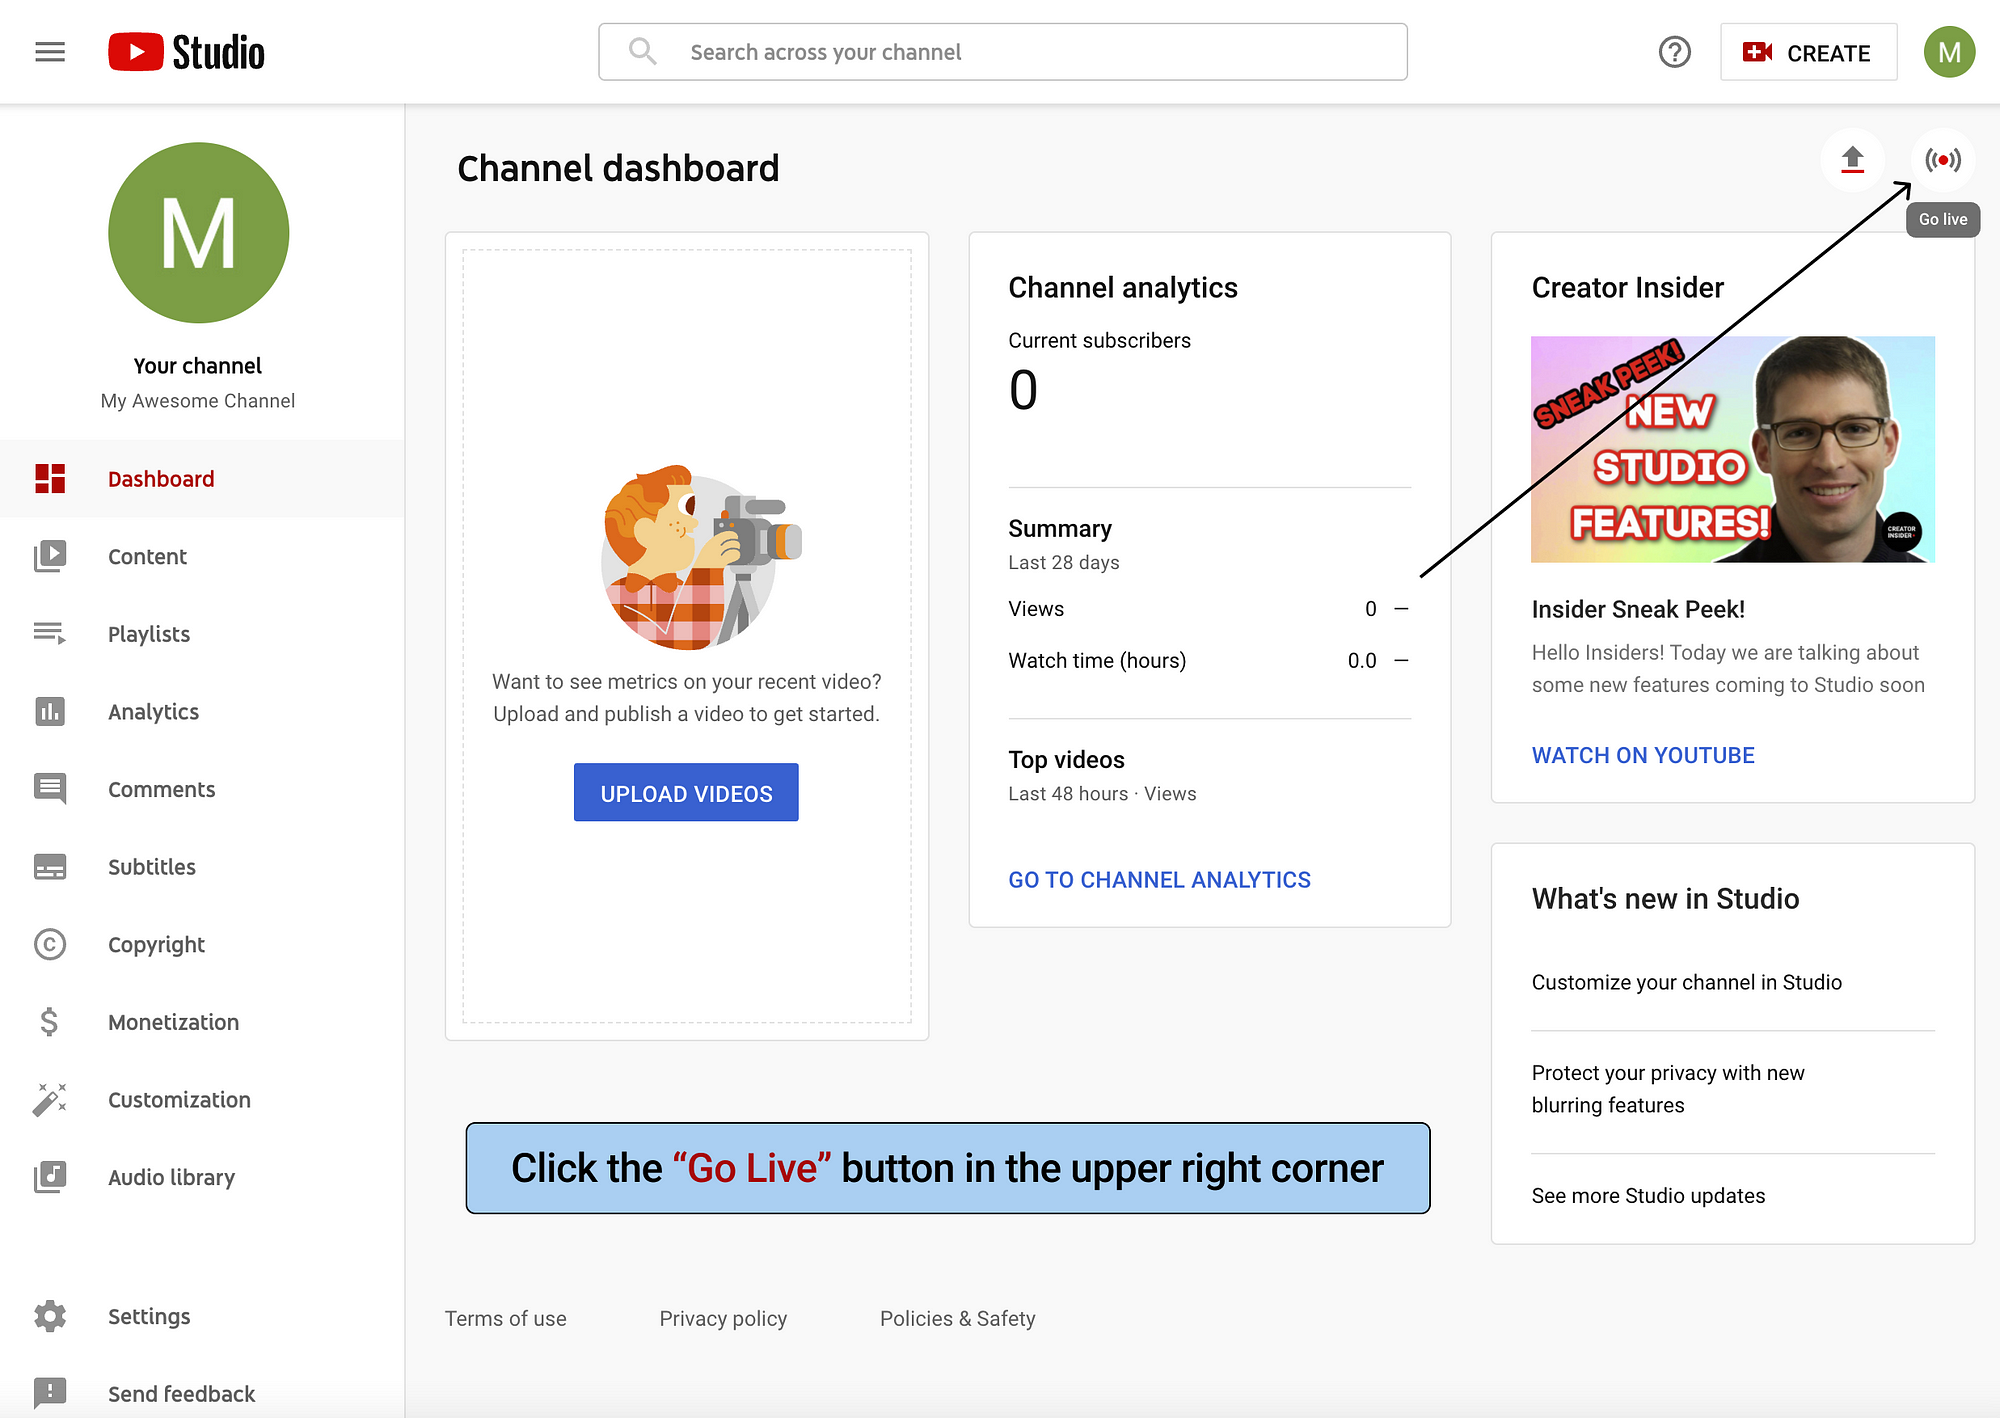
11. Click the Go Live button in the upper right corner
Warning:
If this is your first time live streaming to Youtube, you’ll have to confirm your phone number and wait for 24 hours for the changes to apply in order to be able to livestream on Youtube
12. On the Stream Settings tab, copy the Stream Key
4. Go back to Callaba Cloud Dashboard
Open Restreaming section
Click “Add New”
Now we will create our re-stream to Youtube
In the form that opens, fill in all the fields
Restream Name:
Create a name for your re-stream
Input Type:
Select RTMP Server
Server:
Select an RTMP server from the list.
In our example it’s called “Zoom-Zoom”.
RTMP Stream Key:
Paste the Default Stream Key
In our example it is /rtmp-stream-01
Streaming service destination:
Select Youtube from the list
Stream URL:
Paste Stream URL from from Youtube Studio Stream Settings tab.
Stream Key:
Paste Stream Key from Youtube Studio Stream Settings tab.
Click “Save”
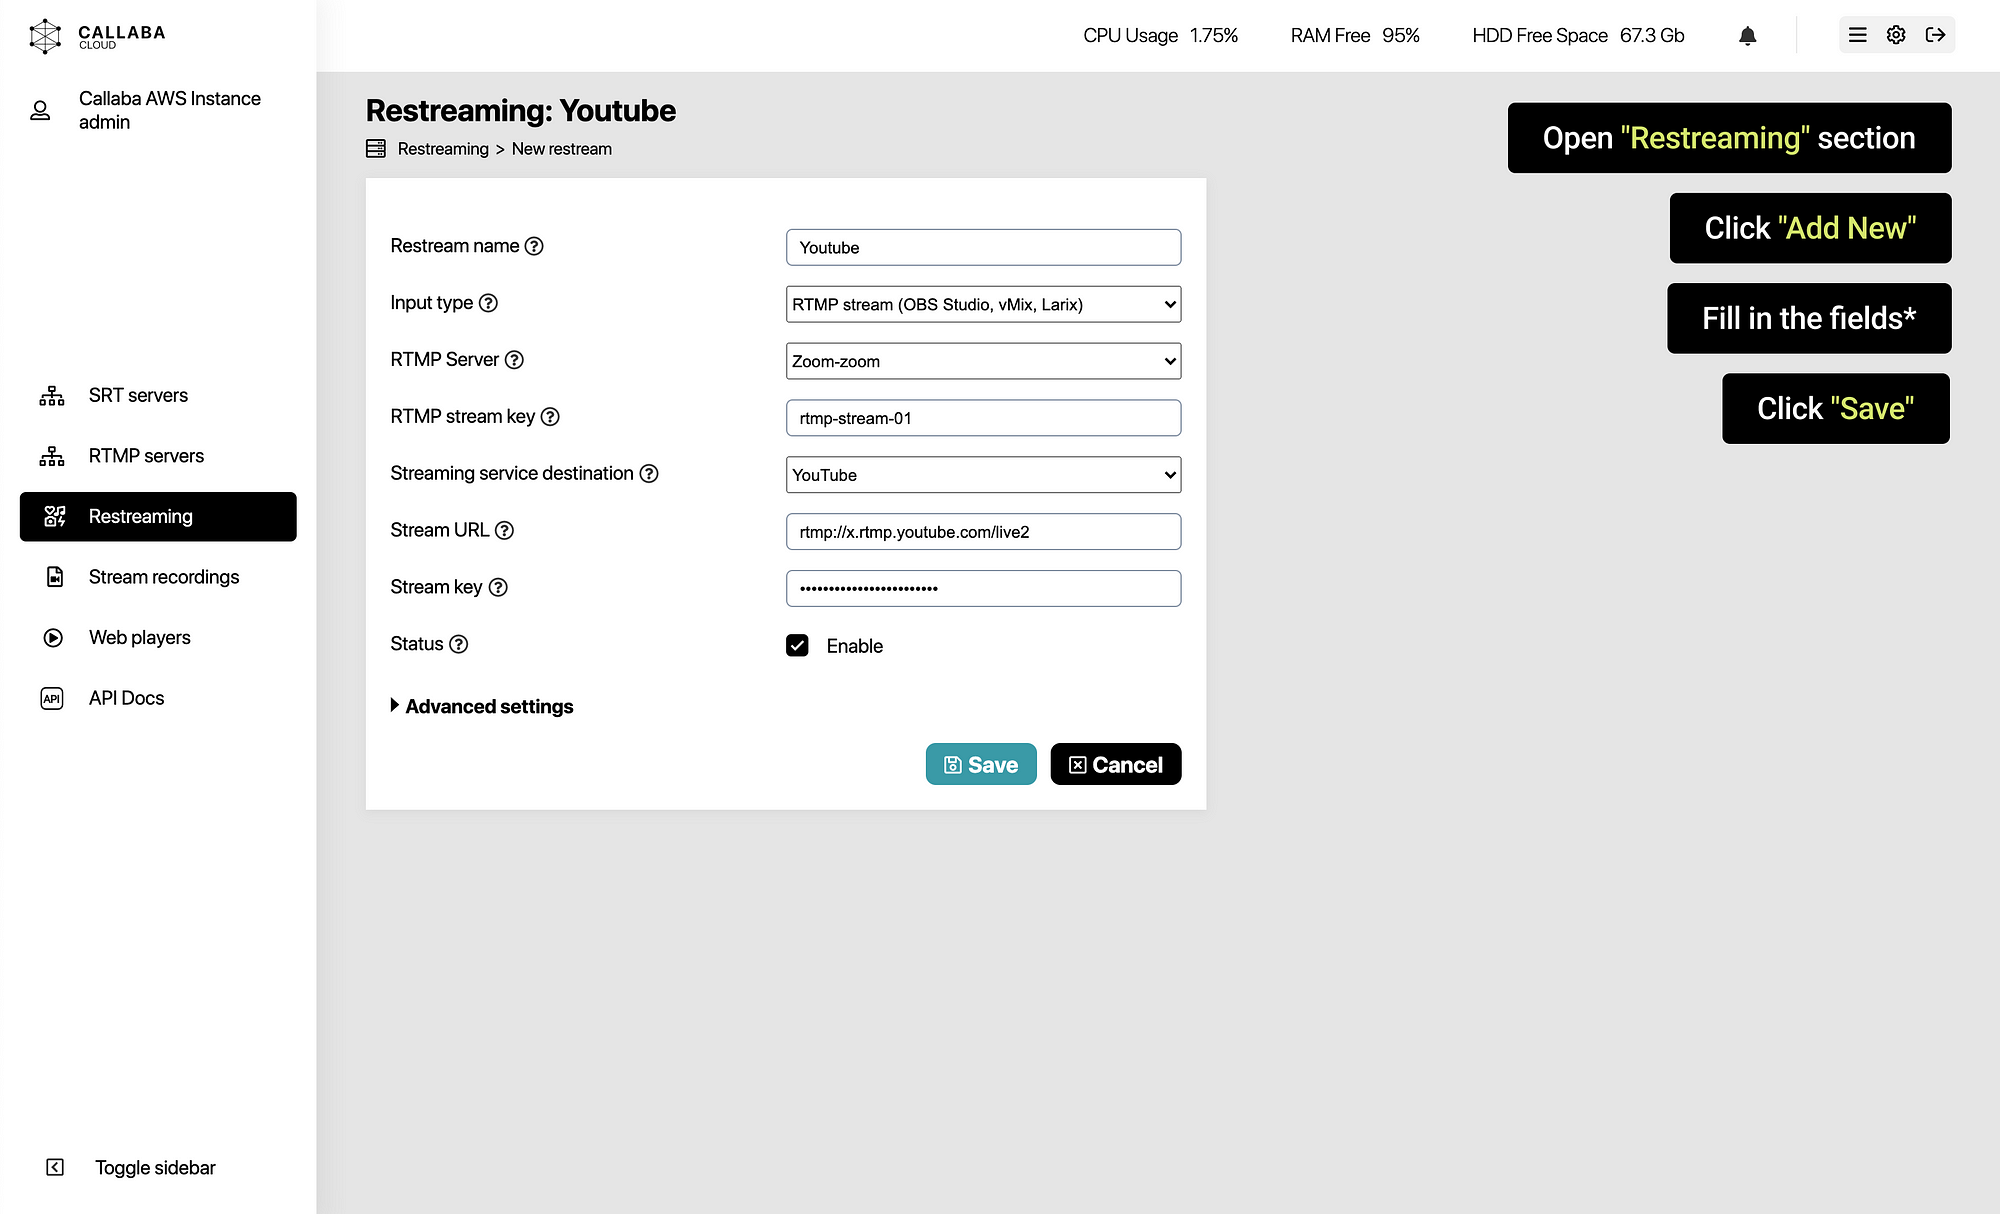
Awesome! Our re-stream for Youtube is ready.
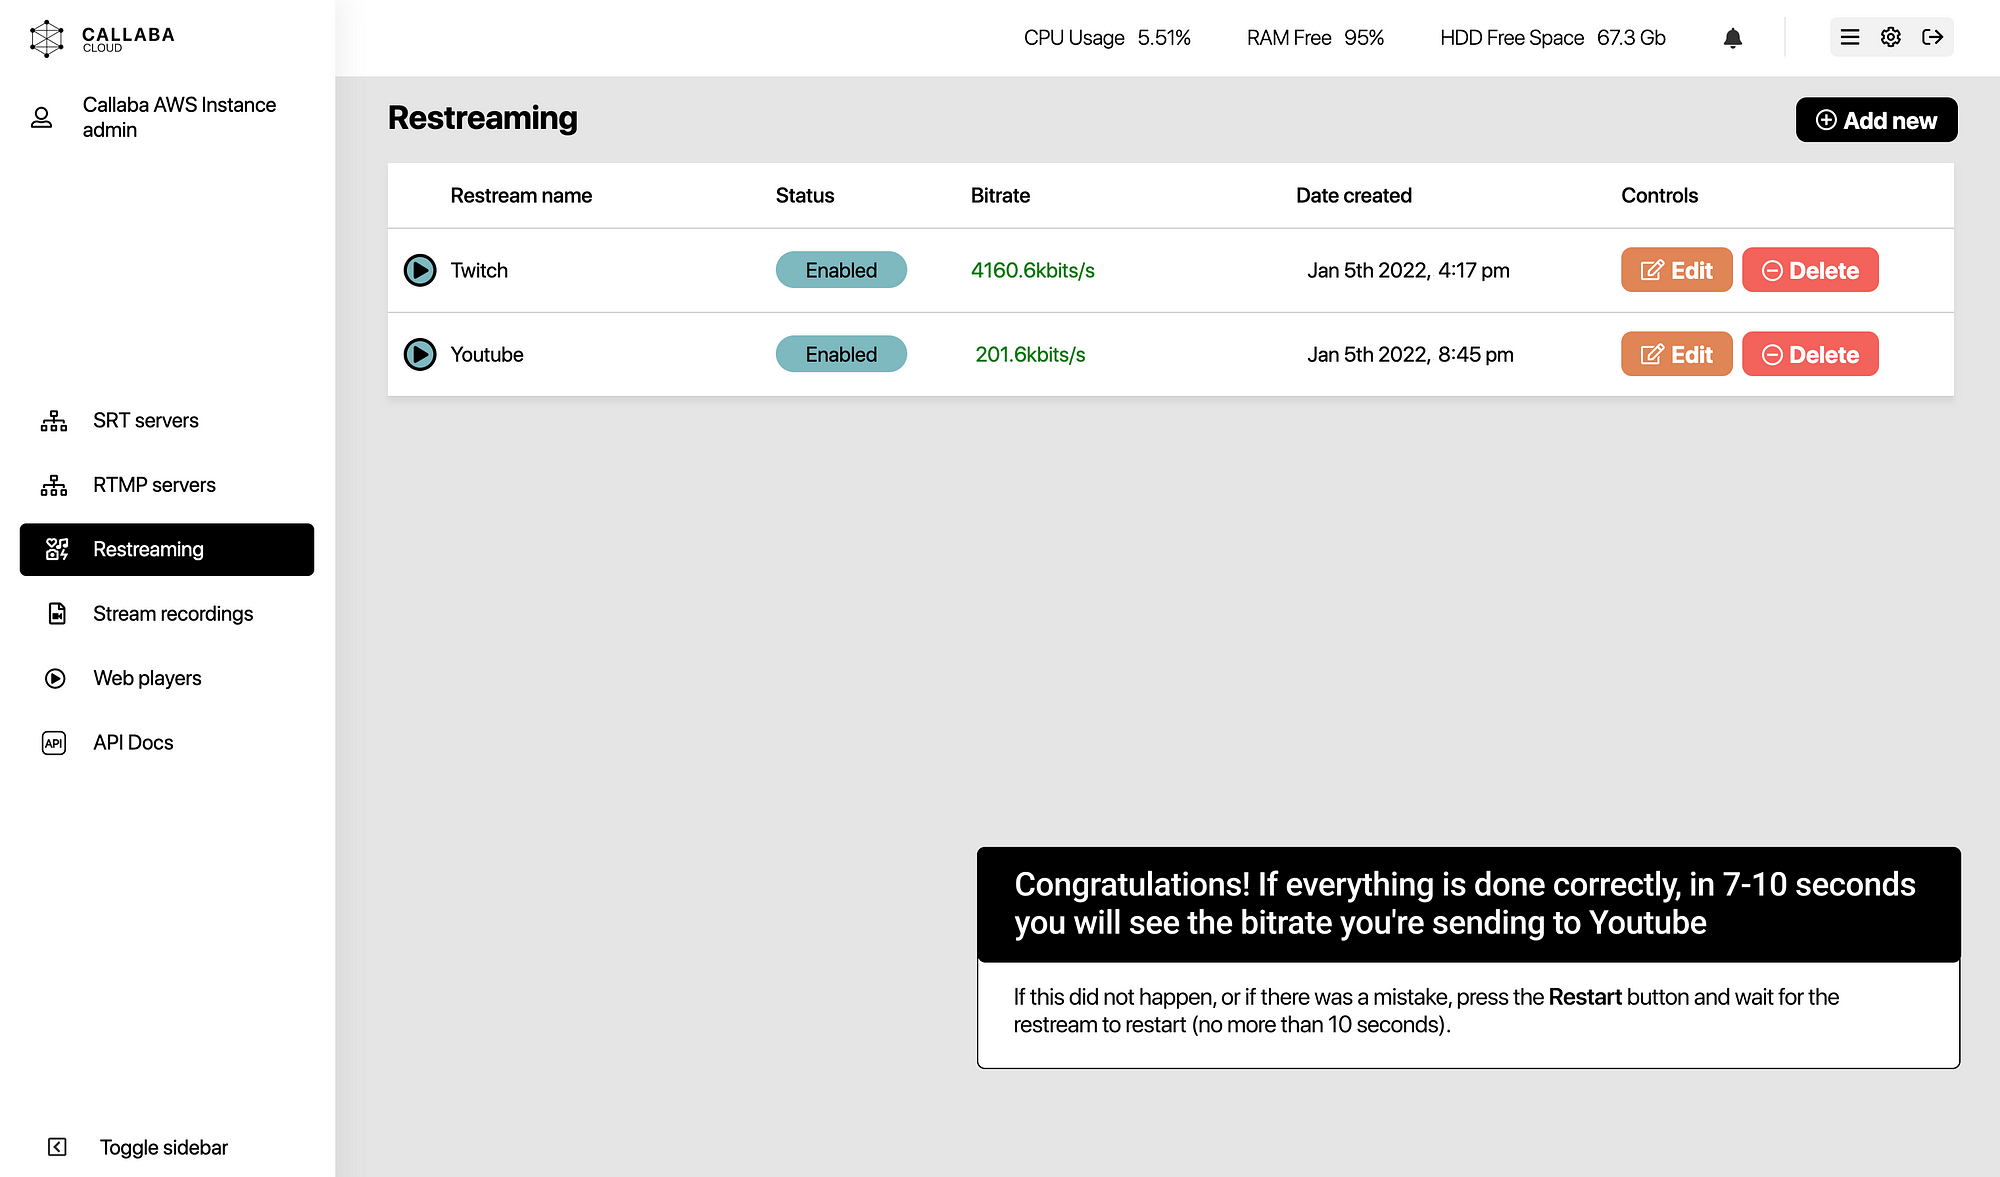
13. If everything is done correctly, in 7–10 seconds you will see the bitrate being sent to Youtube
If this did not happen, or if there was a mistake, press the Restart button and wait for the re-stream to restart (no more than 10 seconds).
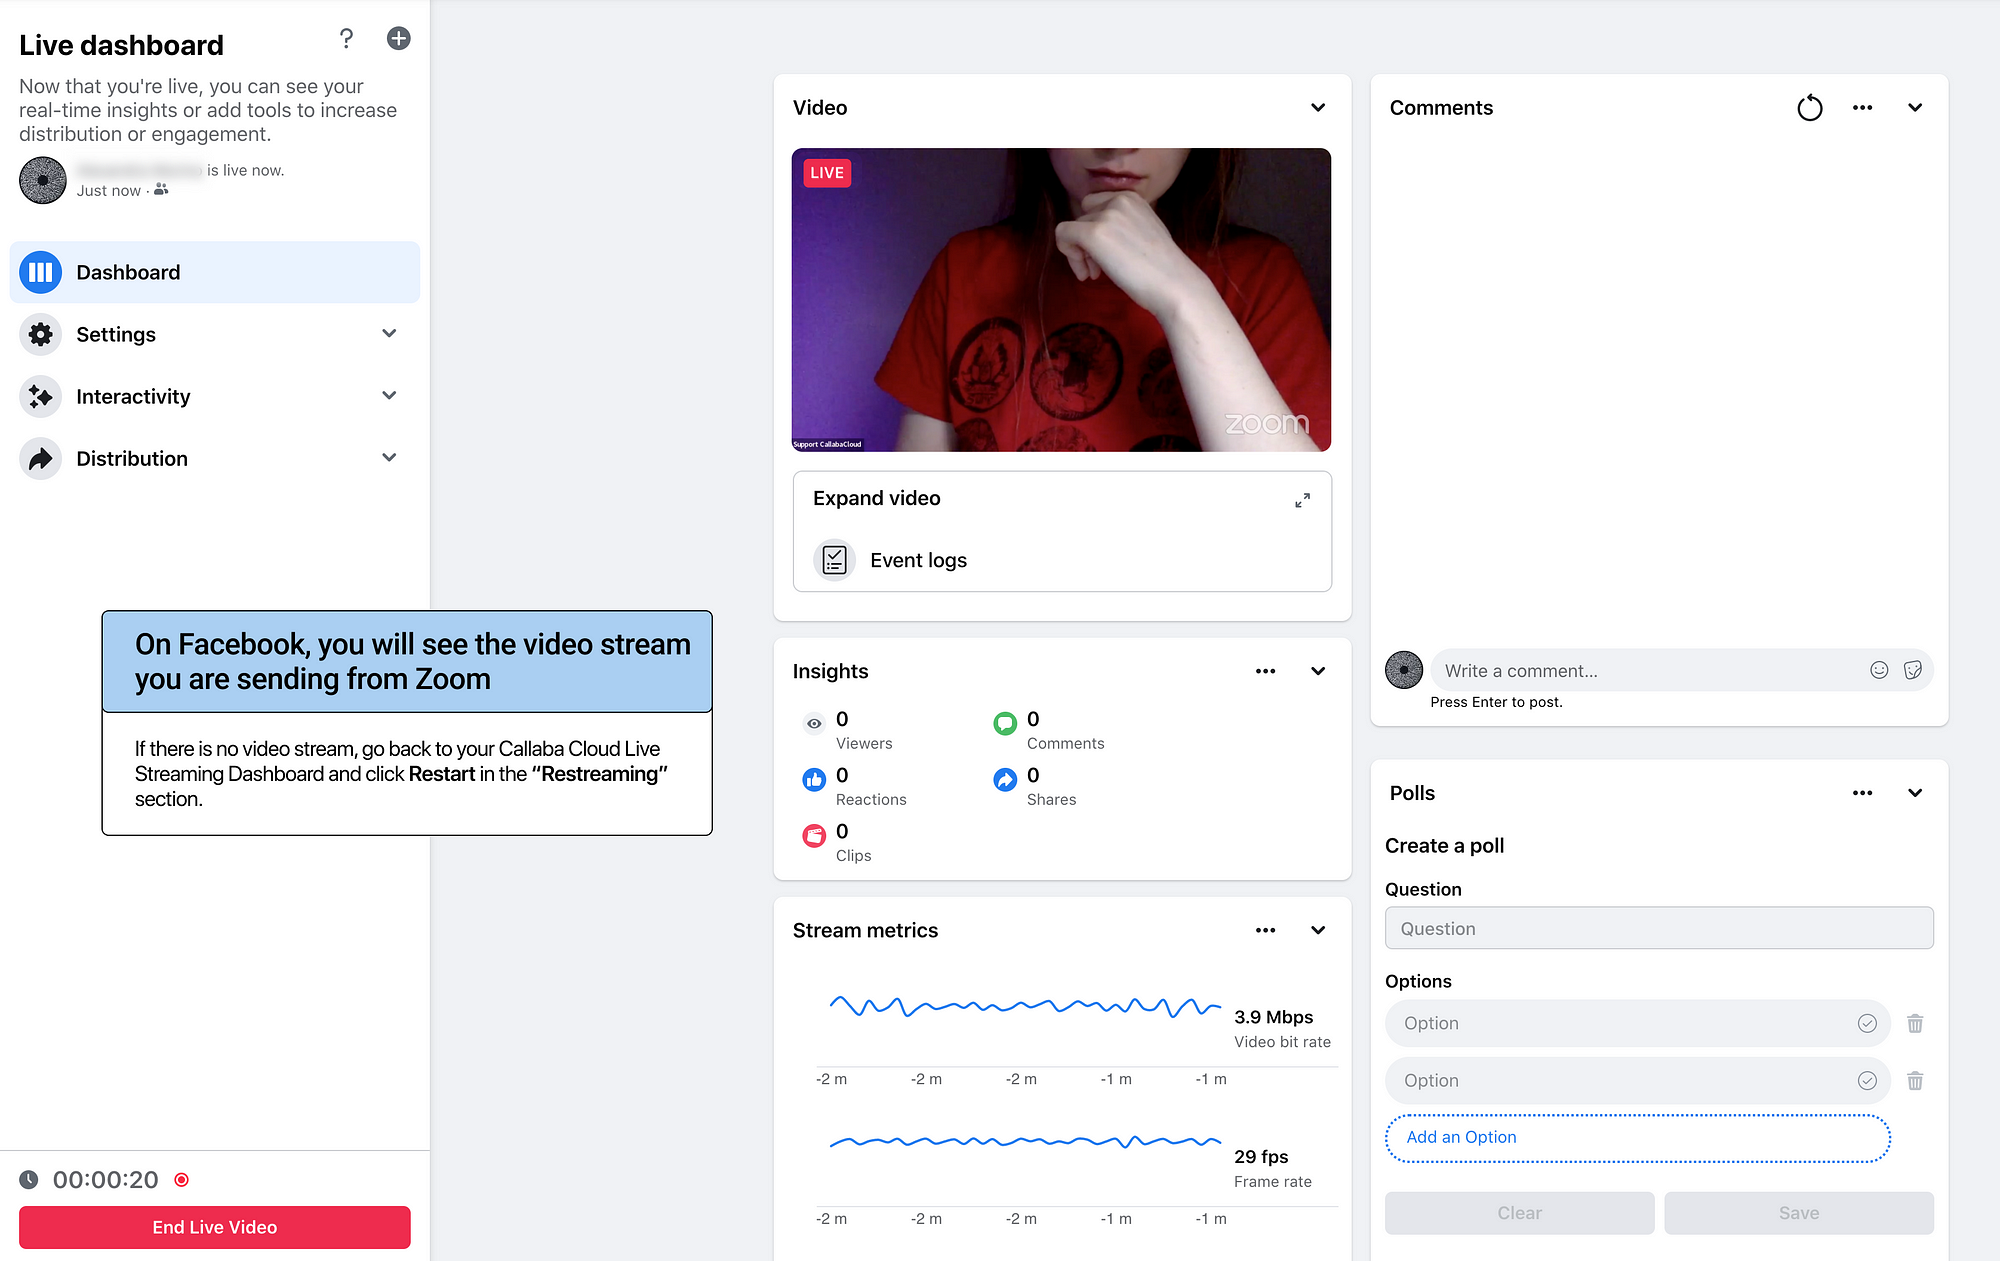
On Youtube, you will see the video stream you are sending from Zoom.
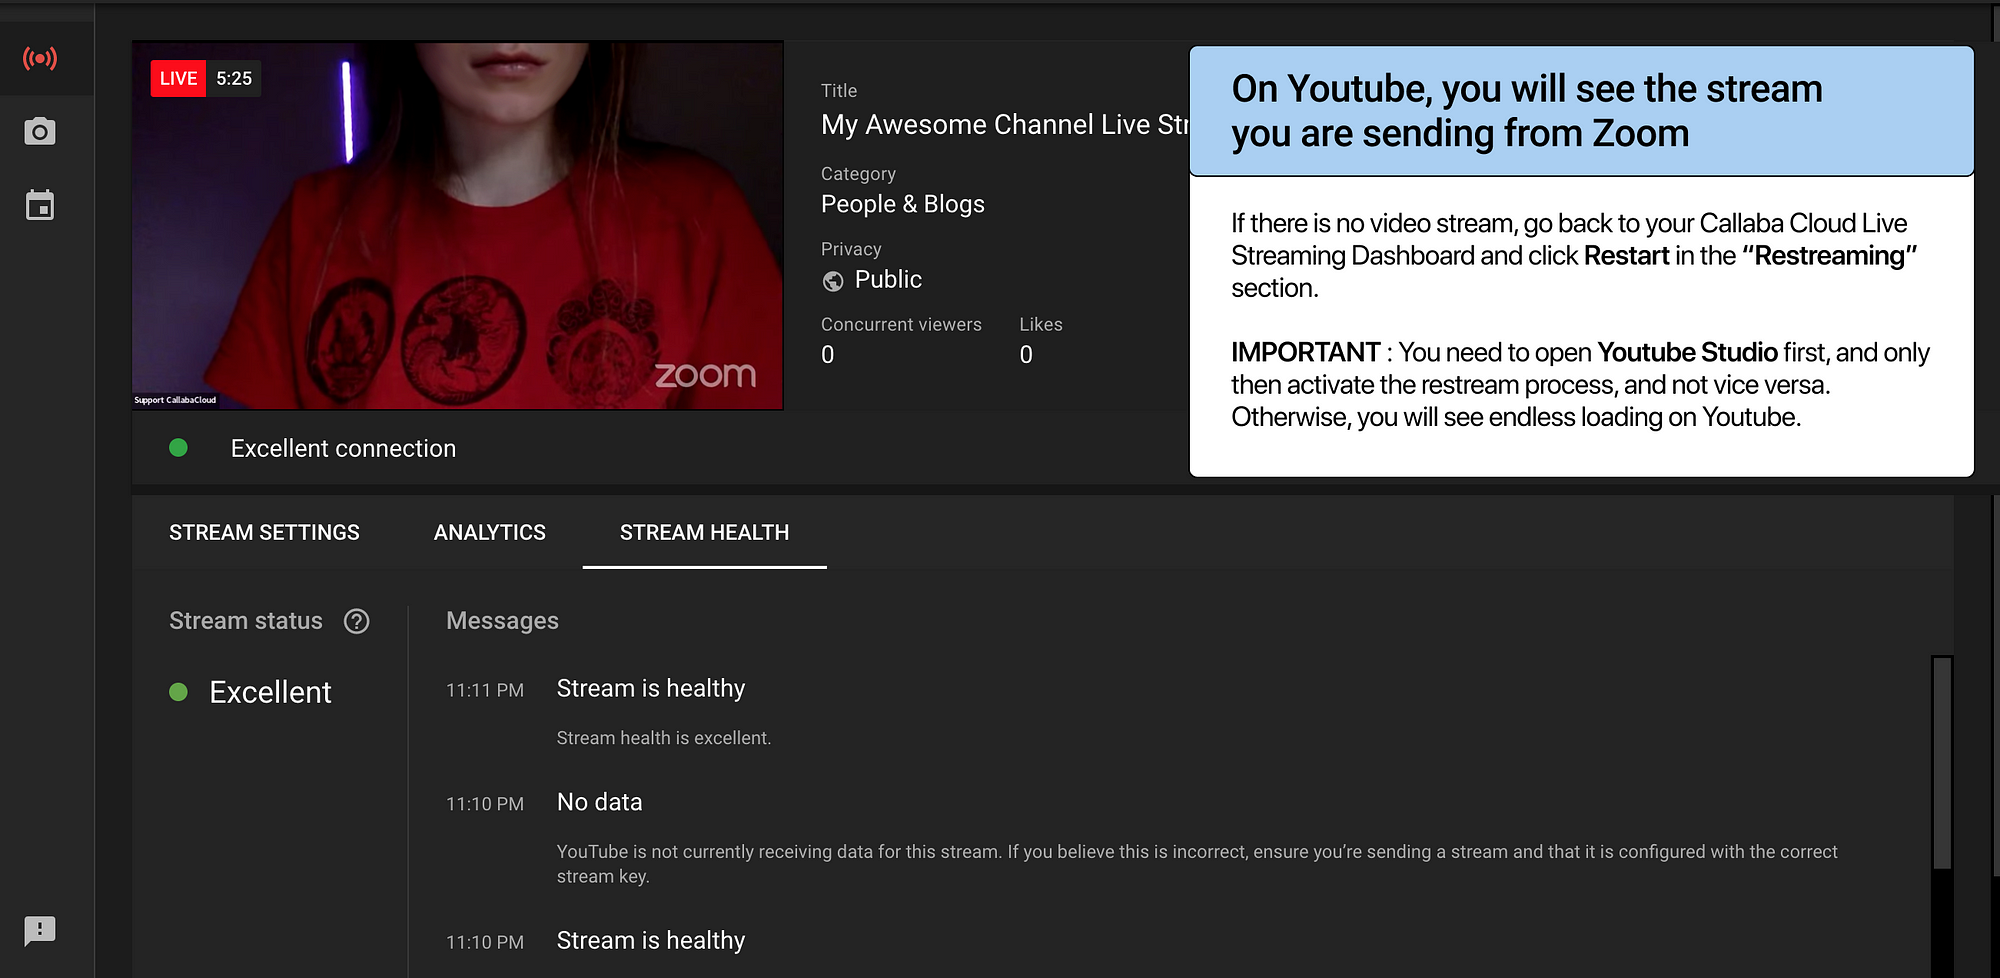
If there is no video stream, go back to your Callaba Cloud Dashboard and click Restart in the Restreaming section.
Warning! You need to open Youtube Studio first, and only then activate the re-stream process, and not vice versa. Otherwise, there is a risk that you will see endless loading on Youtube.
Also, our tests have shown that in case of network problems, sometimes Youtube just ends the stream on its own. In this case, in the Stream Finished window that appears, click “Dismiss”, go back to Callaba Cloud Live Streaming Dashboard, and click Restart.
03. Facebook
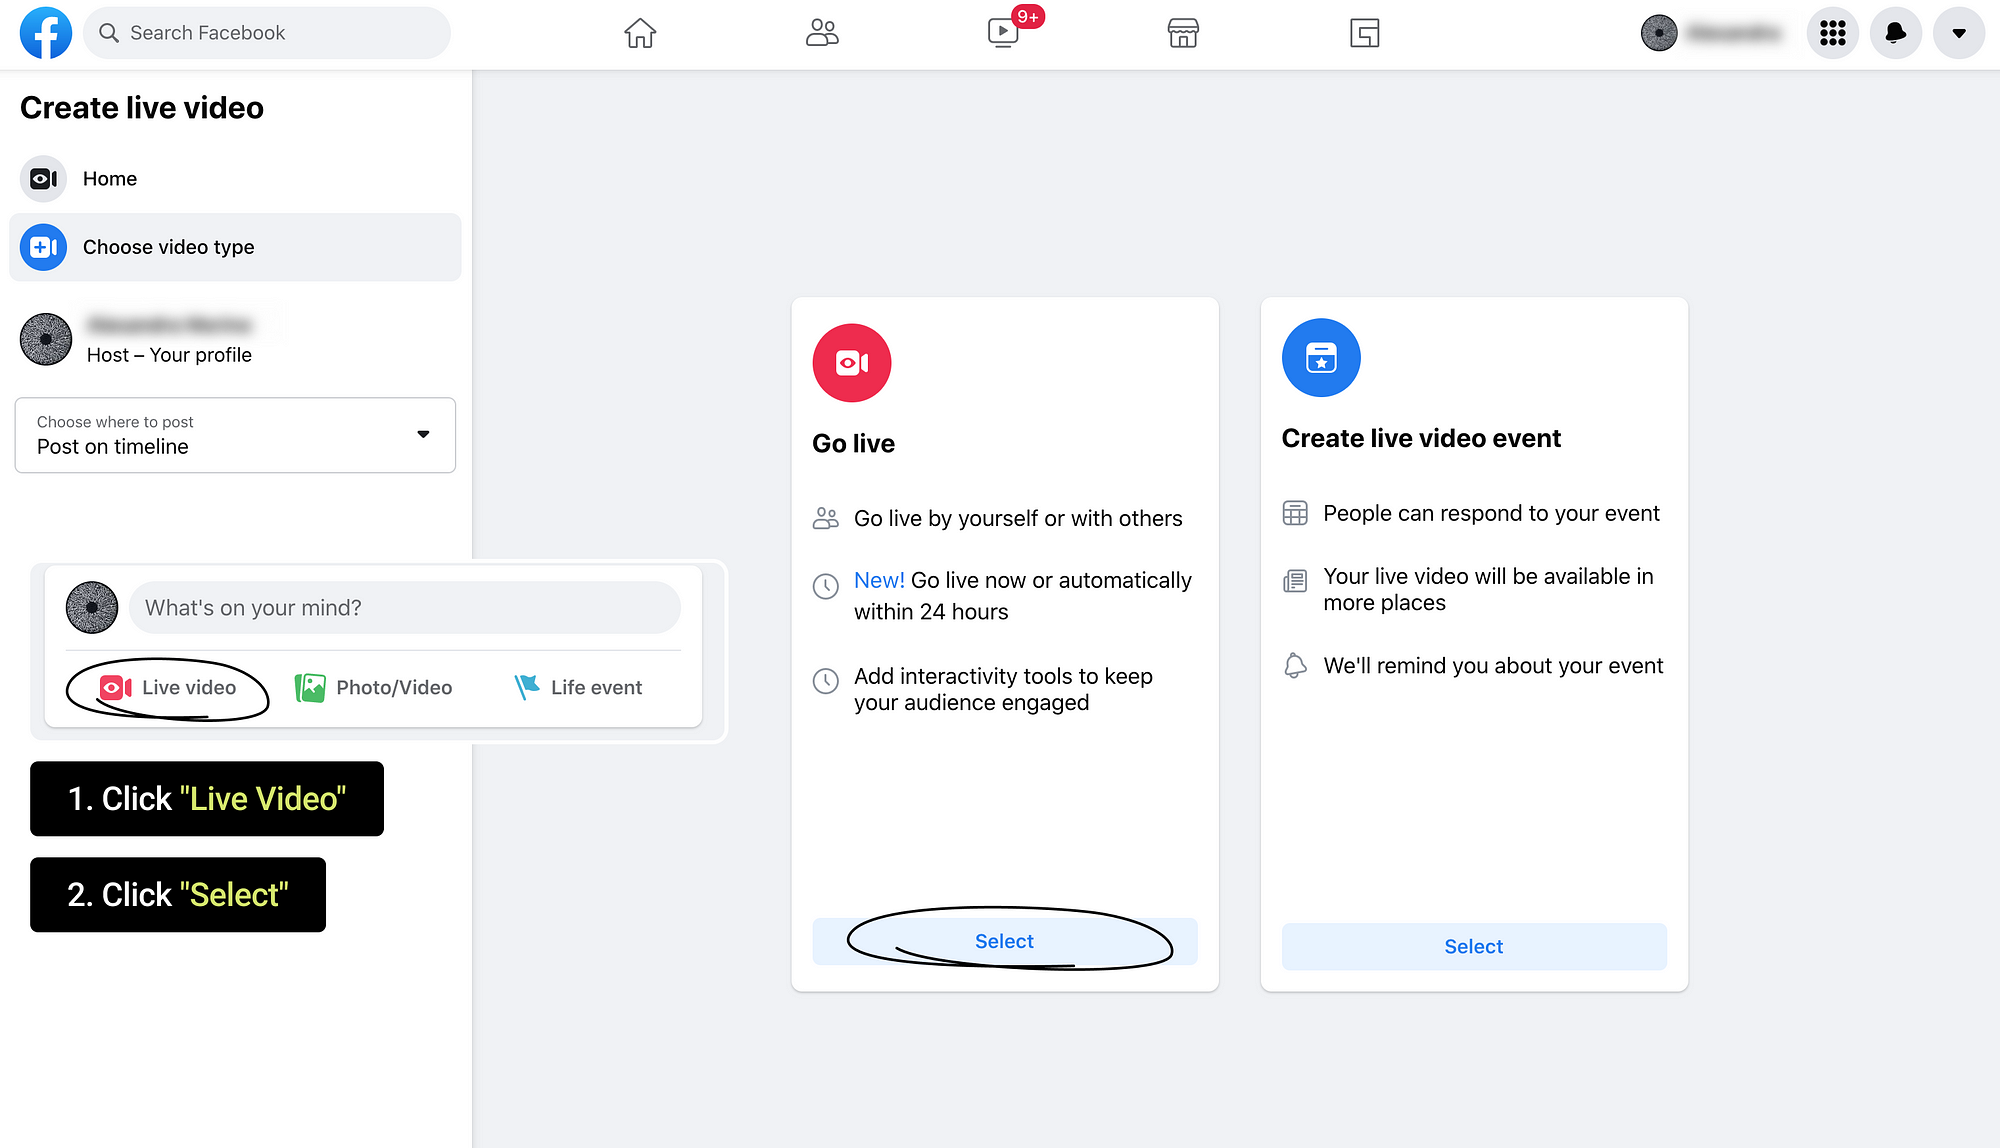
14. Log in to Facebook
Click “Live video” button on your page or go to https://www.facebook.com/live/producer/and click Select under the Go Live.
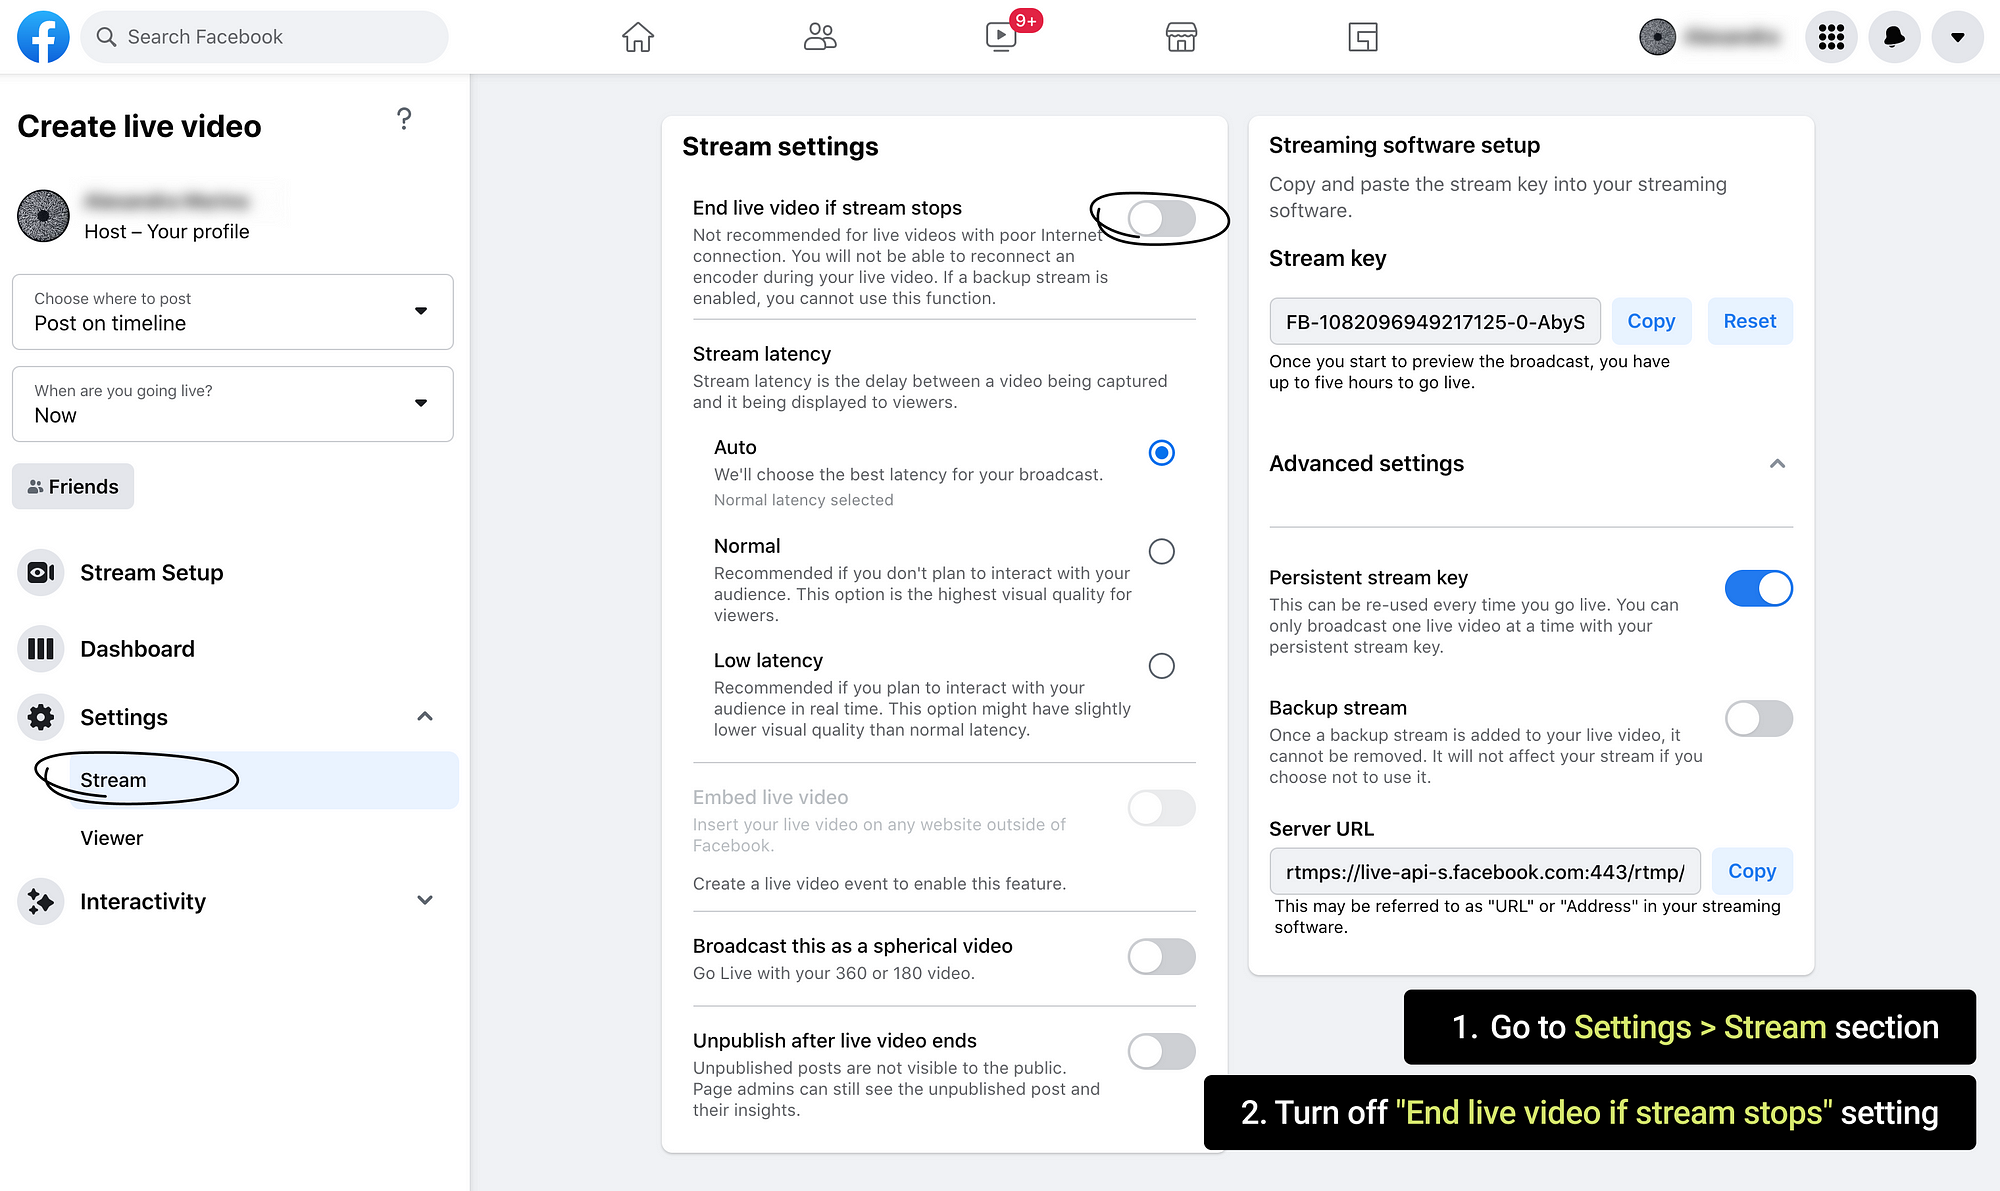
15. Go to Settings > Stream
Turn off the End live video if stream stops setting.
Also, our tests showed that using the Persistent Stream Key is preferable, as it’s more stable.
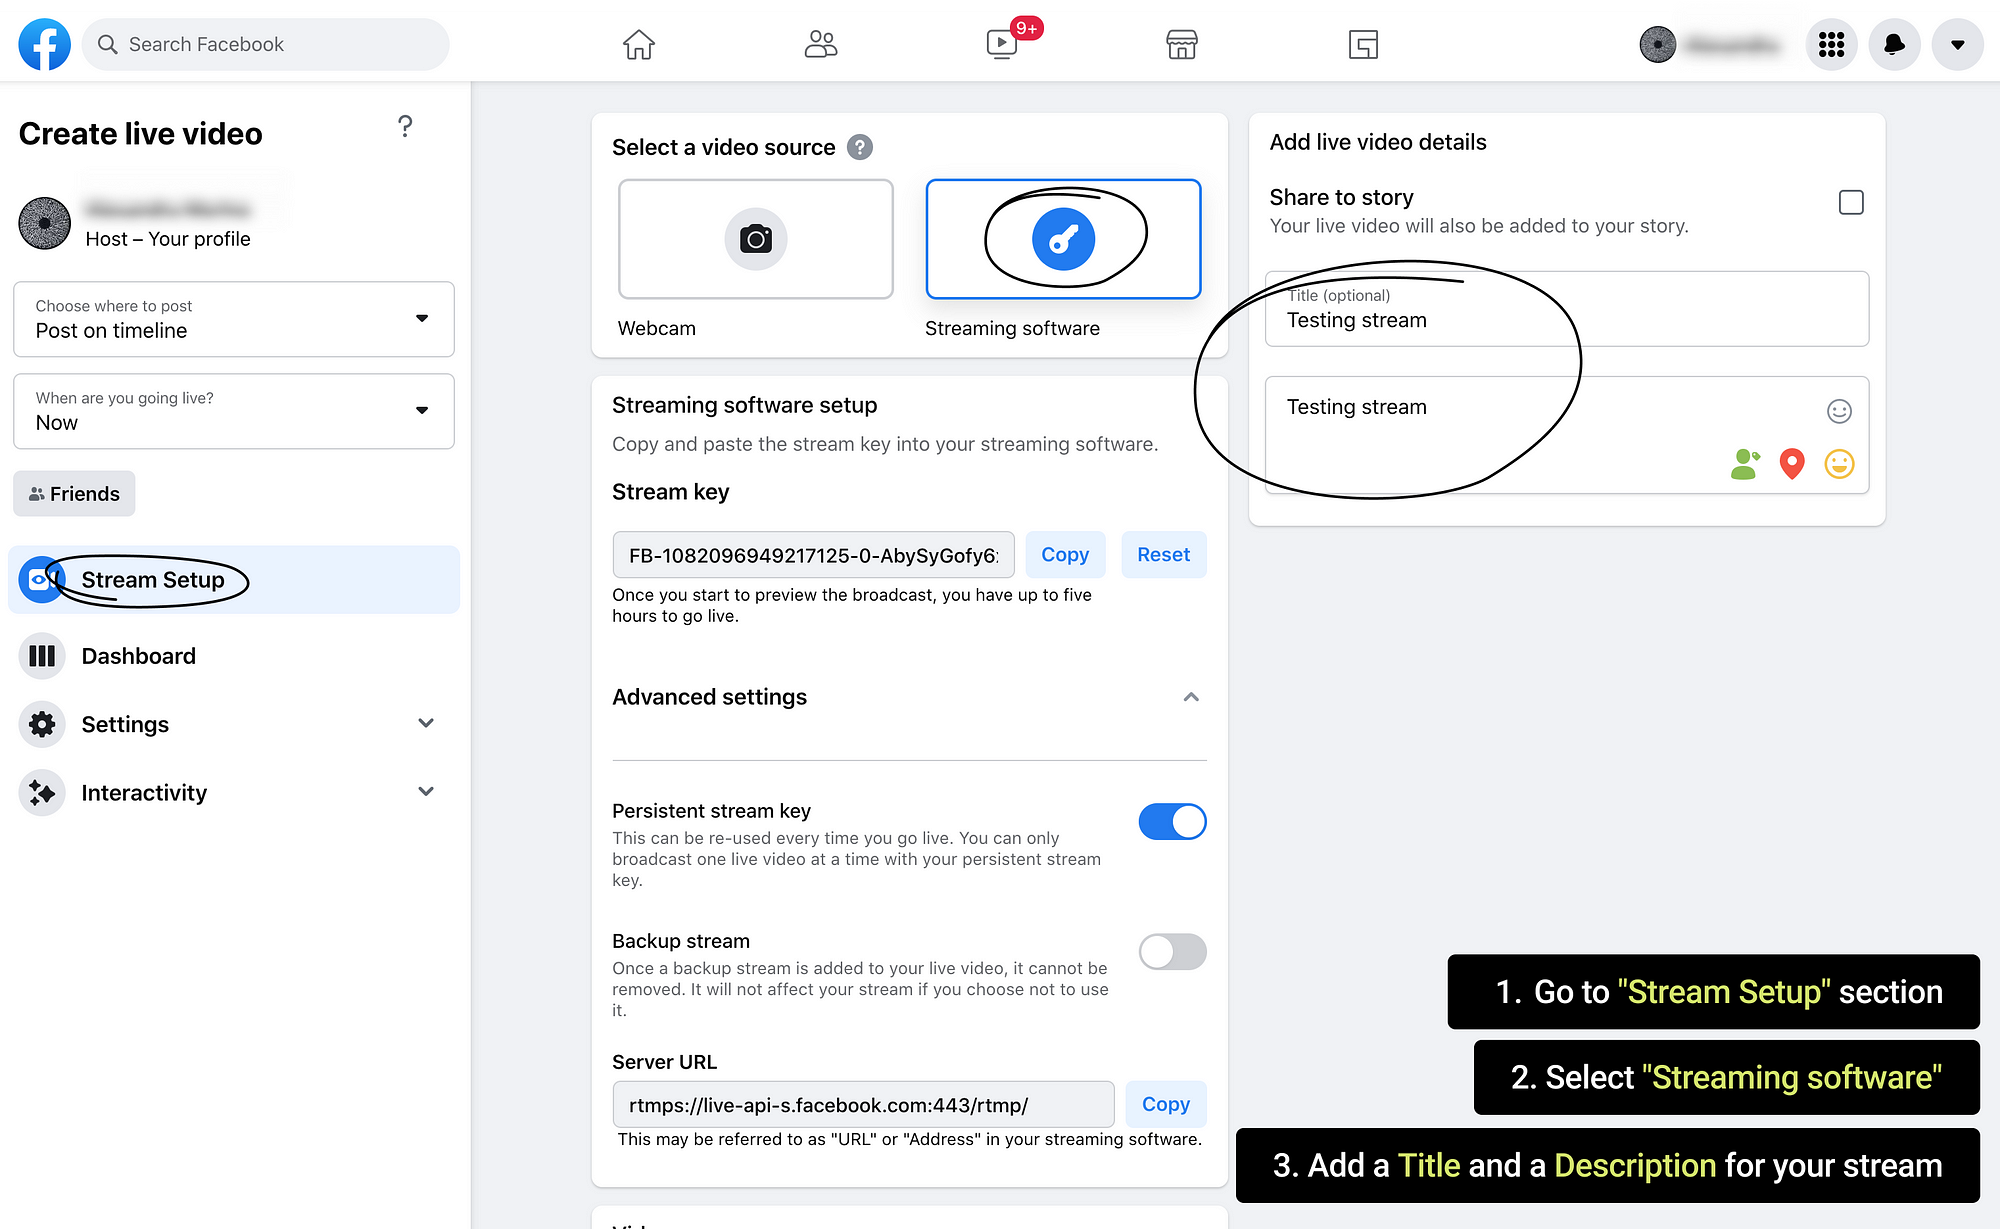
16. Go to Stream Setup section
Select “Streaming software”
Add a Title and a Description for your stream
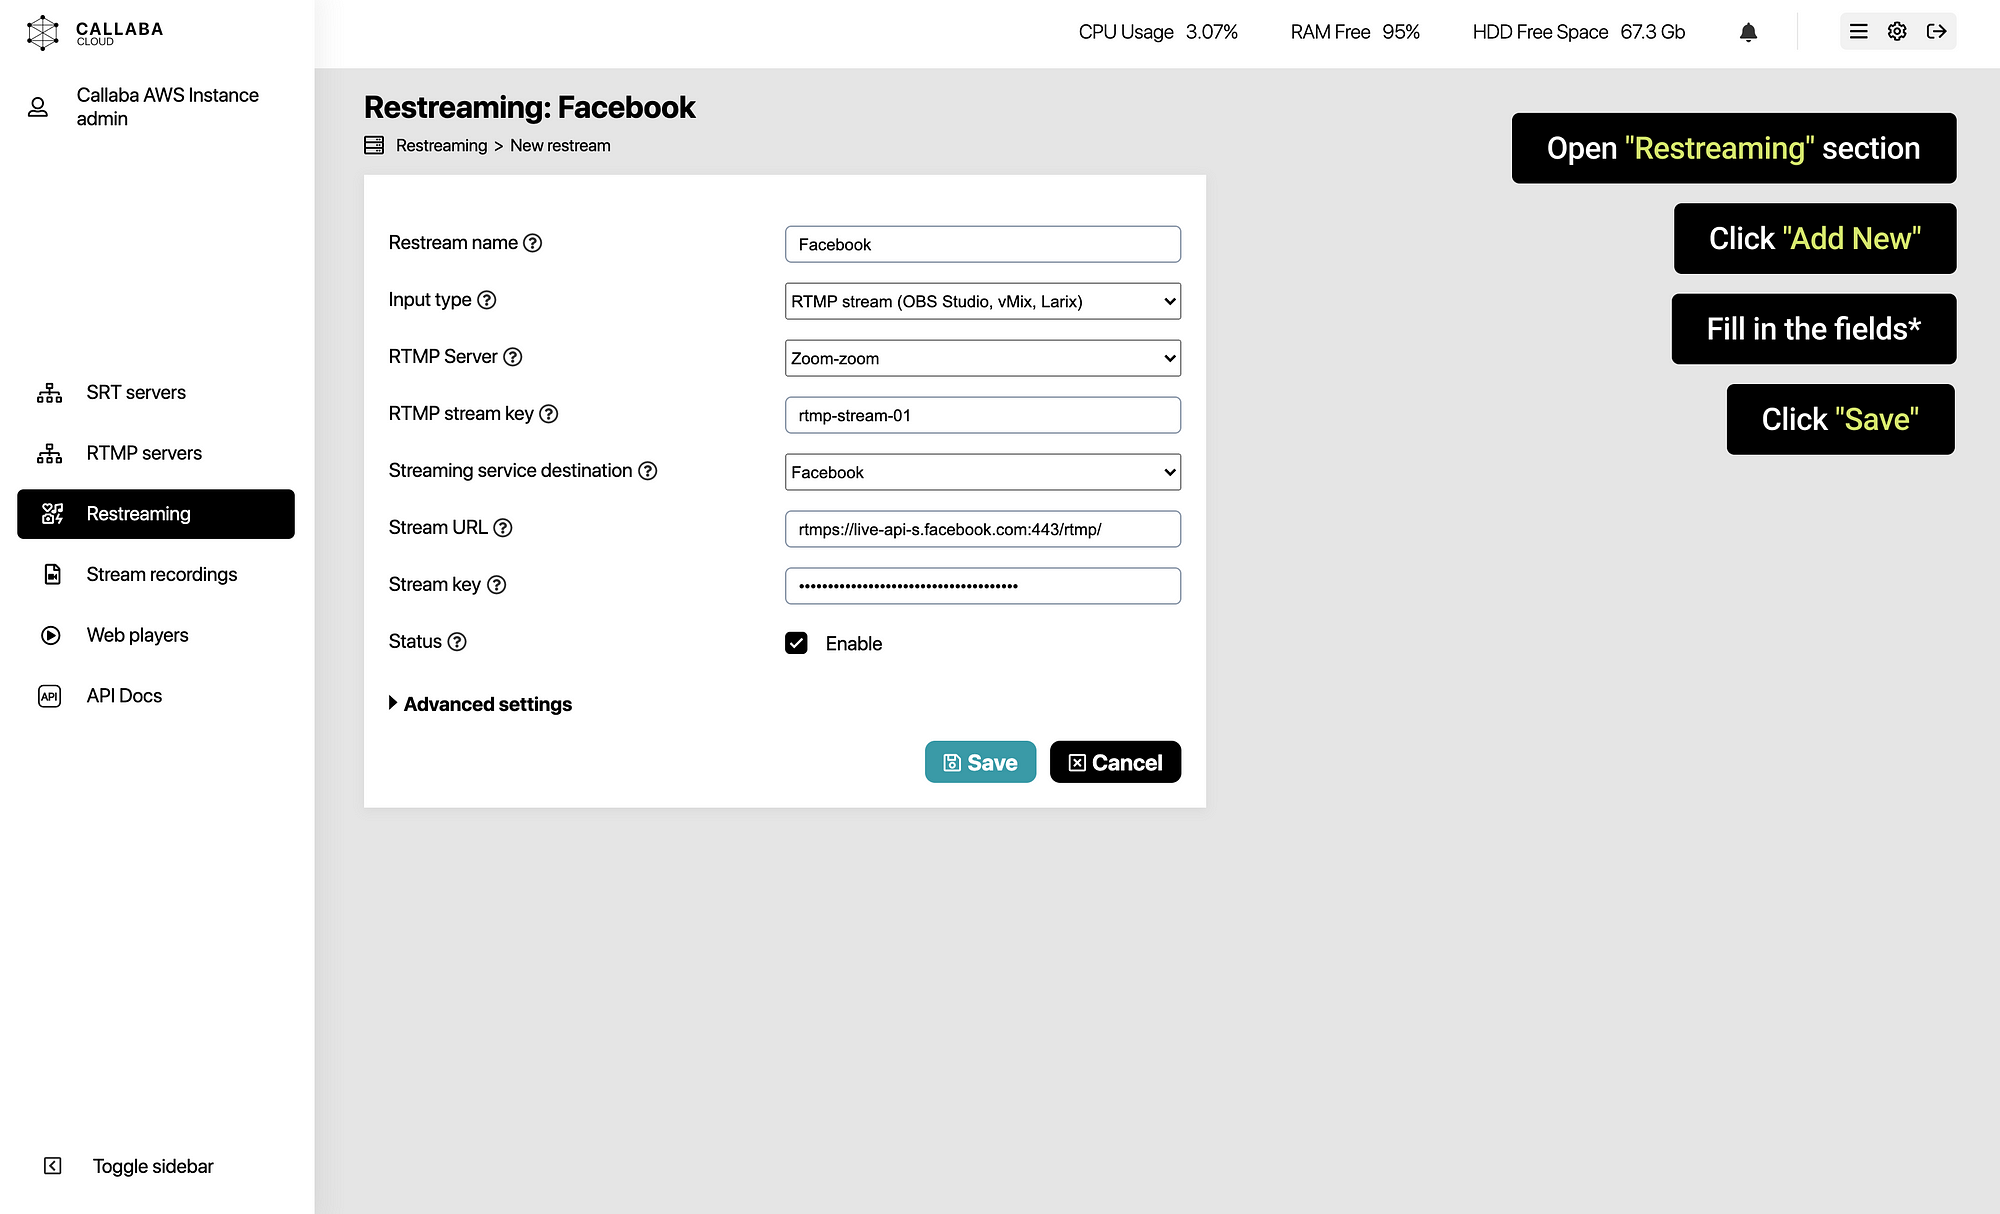
17. Open Callaba Cloud Live Streaming Dashboard
Go to Restreaming section
Click “Add New”
Now we are going to create a re-stream and send it to Facebook
In the opened window, fill in all of the fields
Restream Name:
Create a Name for your re-stream
Input type :
Select RTMP Server
RTMP Server:
Select an RTMP server from the list
In our example it’s called “Zoom-zoom”
RTMP Stream key:
Paste the Default Stream Key. In our example it is /rtmp-stream-01
Streaming service destination:
Select Facebook from the list
Stream URL:
Paste Server URL from Facebook Stream Settings page
Stream Key:
Paste Stream Key from Facebook Stream Settings page
Click “Save”
18. Awesome! Our re-stream for Facebook is ready.
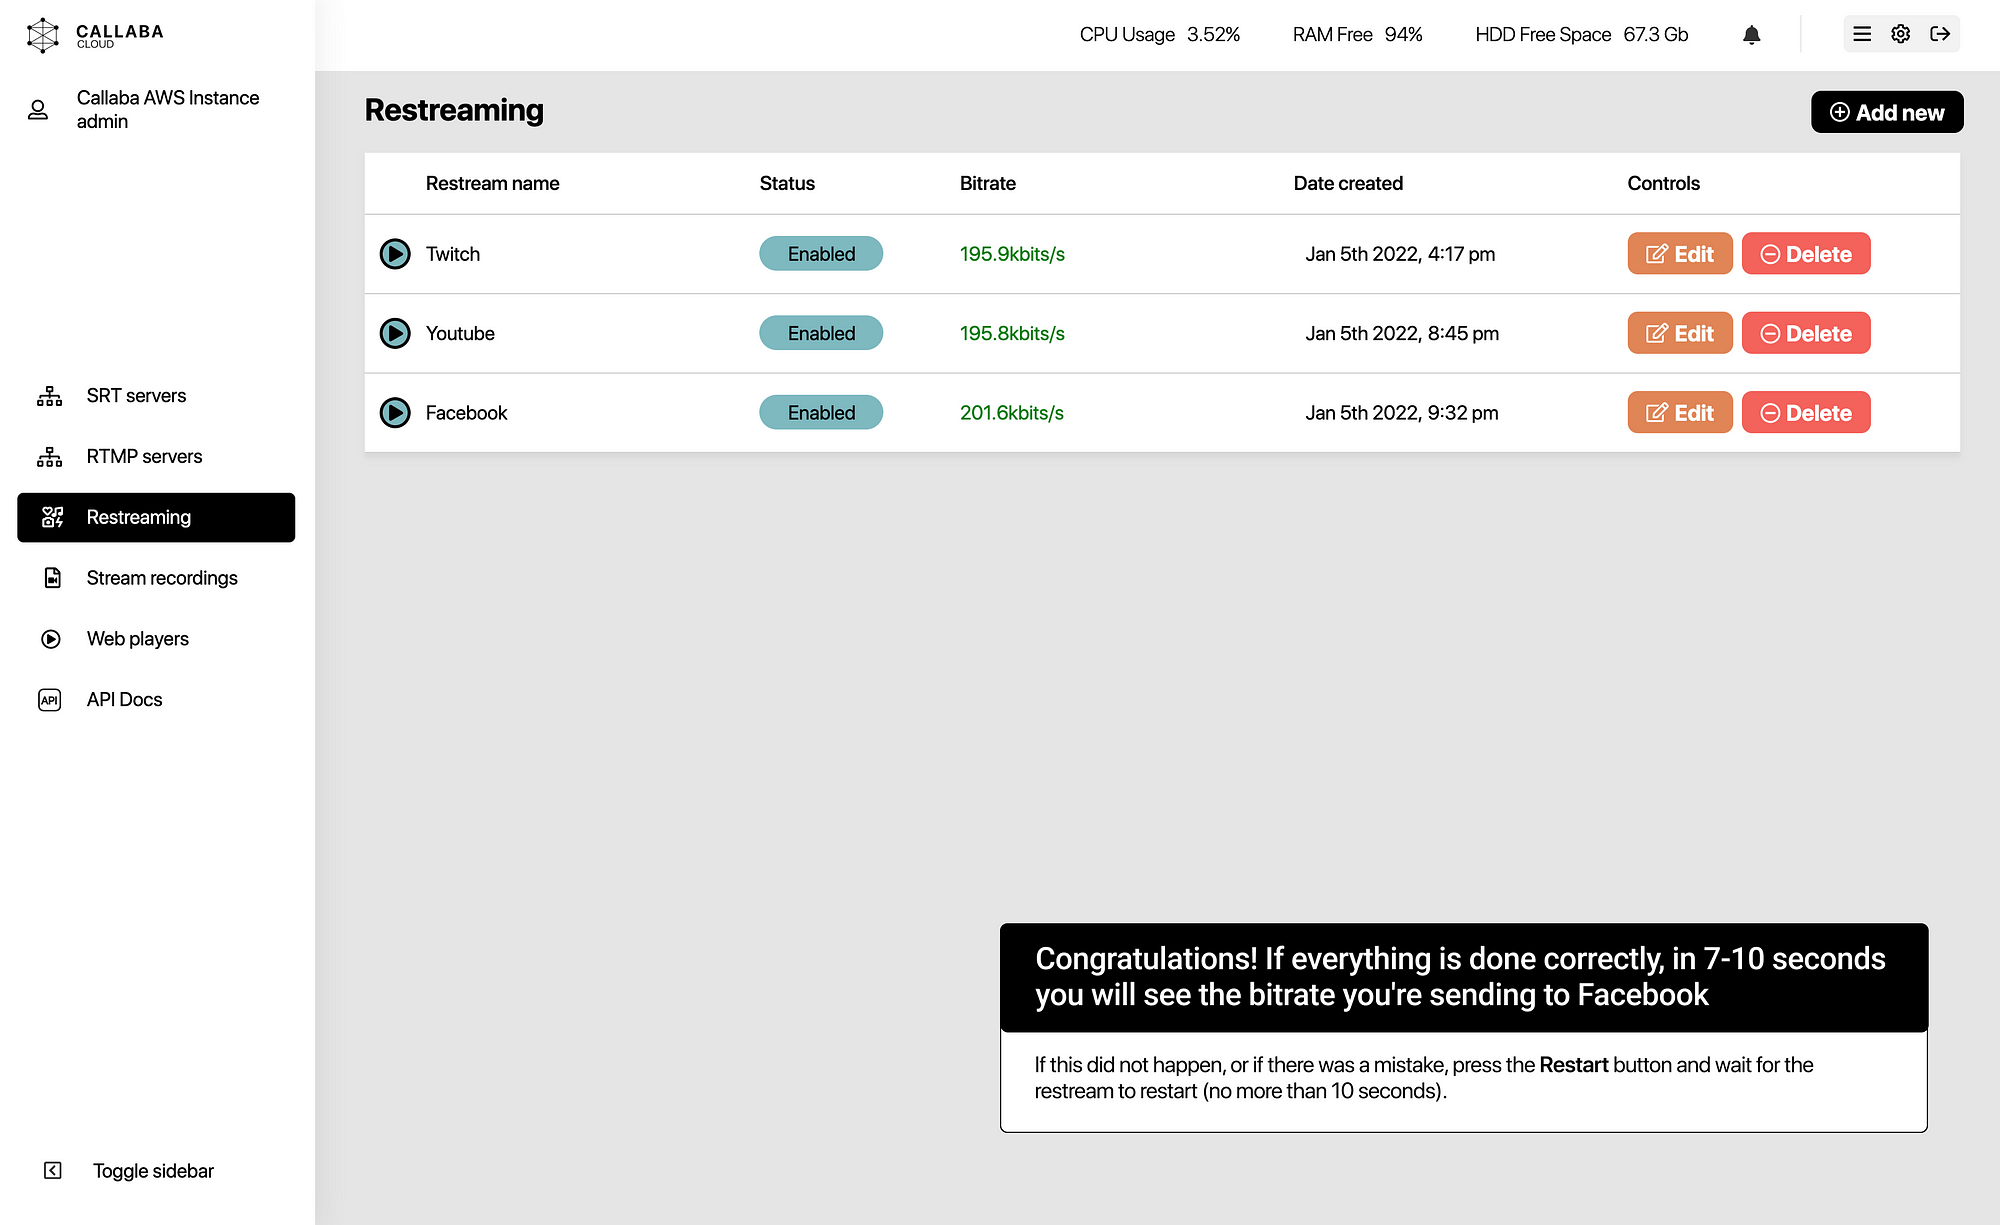
19. If everything is done correctly, in 7–10 seconds you will see the bitrate you’re sending to Facebook.
If this did not happen, or if there was a mistake, press the Restart button and wait for the re-stream process to restart (no more than 10 seconds).
20. On Facebook, you will see the preview of your video stream from Zoom.
To make your stream live, click the Go Live button.
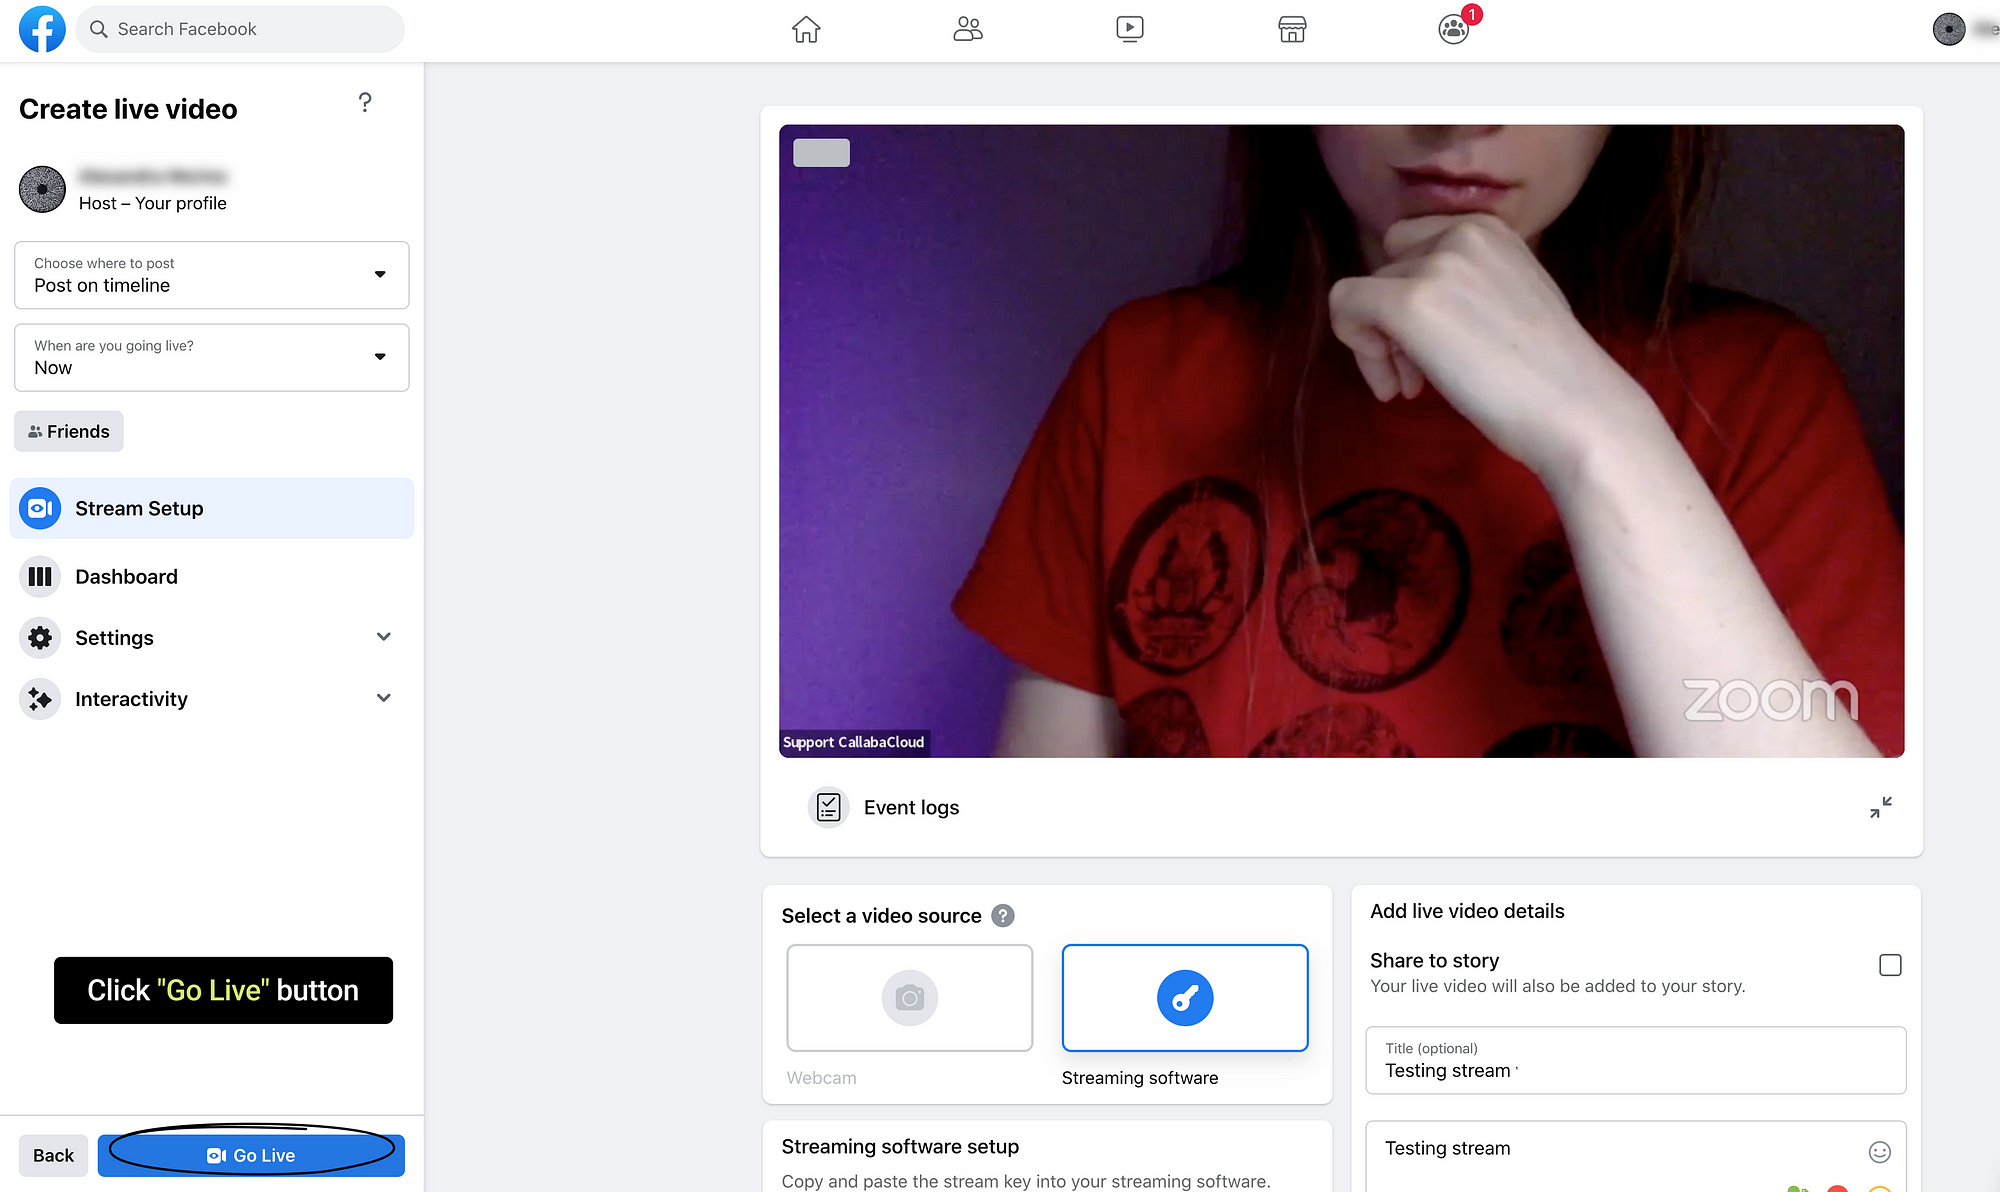
21. Now you will see your live stream from Zoom on Facebook
This is the end of our tutorial.
If you have any questions, please contact us at: [email protected]
We will respond to you within 48 hours.
Happy streaming!
Related articles :
How to launch Callaba Cloud Live Streaming
How to start streaming in OBS Studio over the SRT Protocol
How to multi-stream from OBS Studio to Twitch, Youtube and Facebook
How to multi-stream from Wirecast to Twitch, Youtube & Facebook
How to set up geo-distributed routing of video streams using SRT protocol and Callaba Cloud


