How to set up Elastic IP address on AWS
What is Elastic IP address?
Elastic IP address is a permanent IP address that can be assigned to your instance for as long as you want to keep it.
If you do not assign Elastic IP address to your instance, then every time you stop and later re-launch your instance it will have a new IP, different from the one it had before you stopped it.
If you’ve set up some complex settings that are tied to the IP of your instance (like CloudFront), then you’ll have to re-set everything every time. Doing the same work over and over does not sound great, and here Elastic IP address comes like useful tool.
Before we begin
For this tutorial to be useful to you, ideally should already have an account on Amazon Web Services and an instance in your EC2 console.
If by chance you came here before you managed to get all that, please check out this tutorial first :
How to create SRT server and start streaming over the SRT Protocol.
There we cover the process of launching an instance on AWS in great detail.
Make sure to learn how to stop or terminate your instance when your work is done, as AWS charges running instances on a per-hour basis.
⚠️ Be aware of the cost
AWS charges a small per-hour fee for the IPs that are allocated in your account.
As small as $0.005 per hour. Which is around $3.6 per month.
However, different regions have different prices.
Learn more
(Last update : November 16, 2023)
🔗 New – AWS Public IPv4 Address Charge + Public IP Insights
🔗 Why am I being billed for Elastic IP addresses when all my Amazon EC2 instances are terminated?
Okay, now let’s begin.
Associating Elastic IP address with your instance
1 . Open EC2 Console
Go to Elastic IPs
Click “Allocate Elastic IP address”
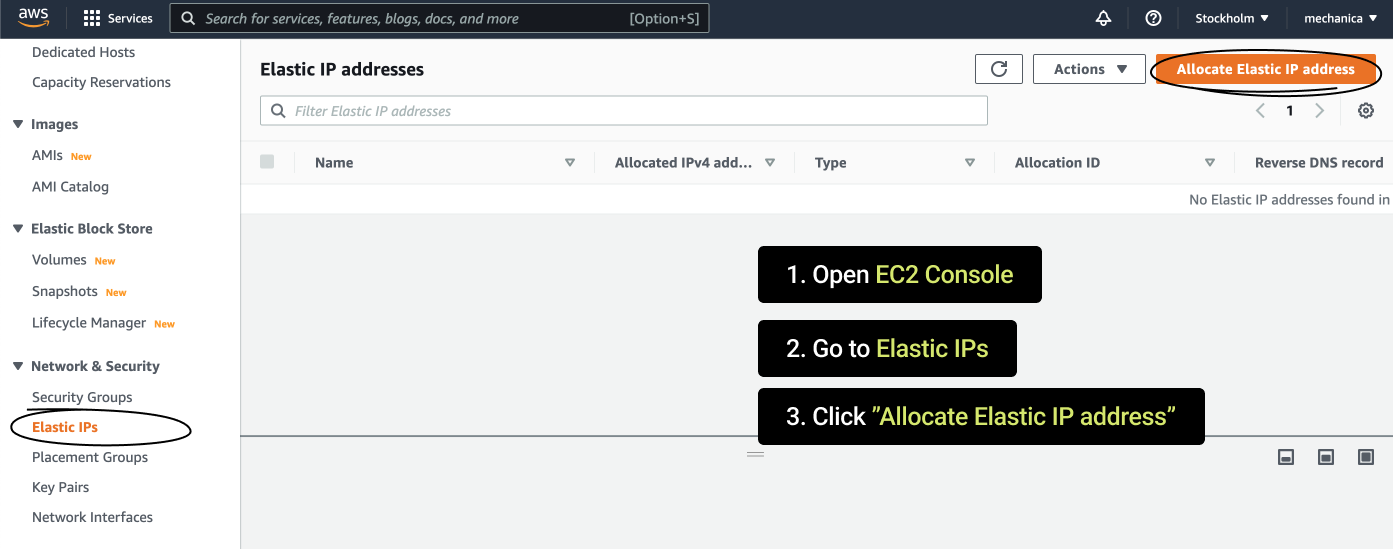
2. Click “Allocate” to get an IP address from the AWS pool of addresses
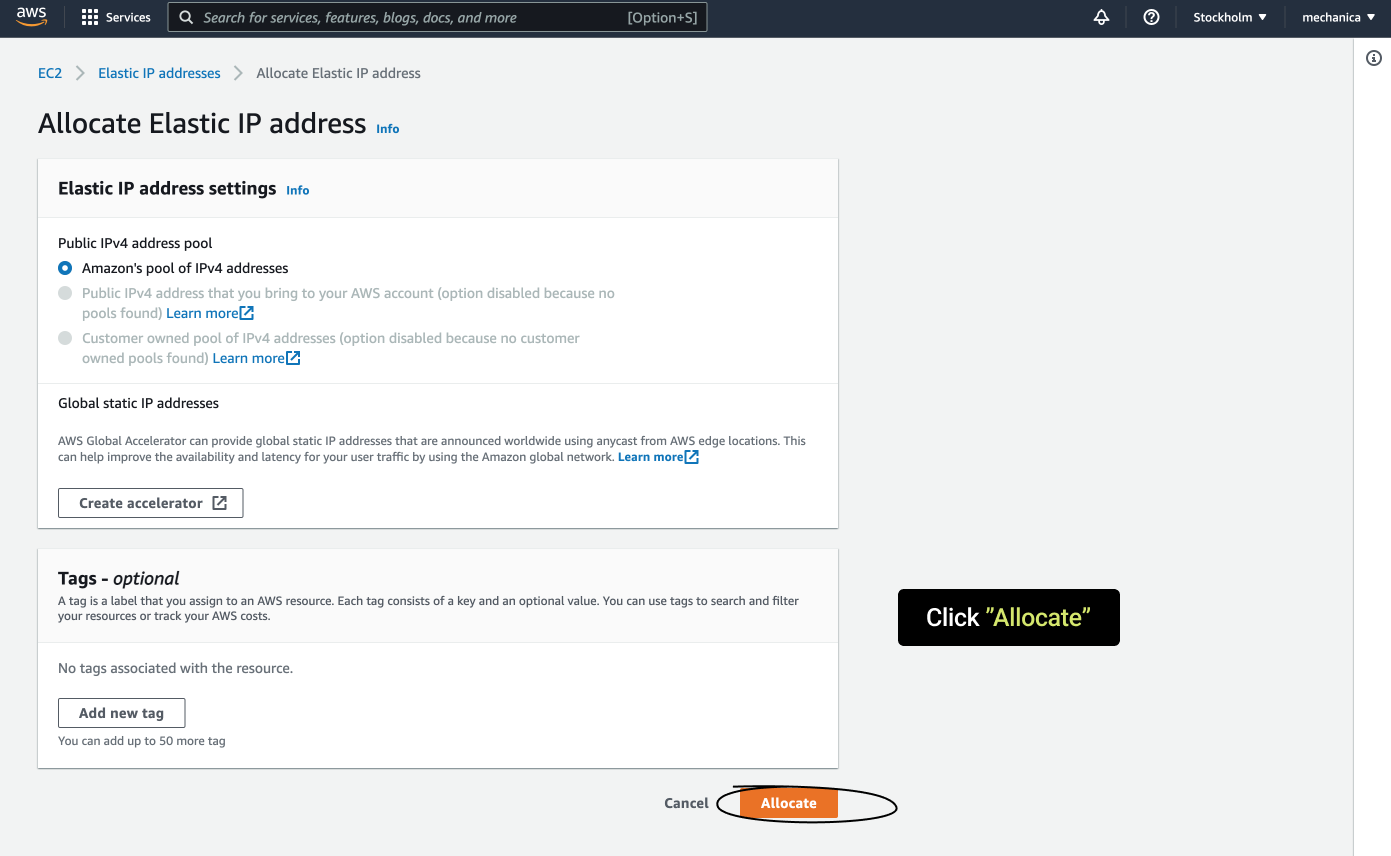
3. Tada! Your IP was allocated. Now we are going to assign this IP to our instance.
Back on the Elastic IPs page
Select your generated Elastic IP address
Click Actions > Associate Elastic IP address
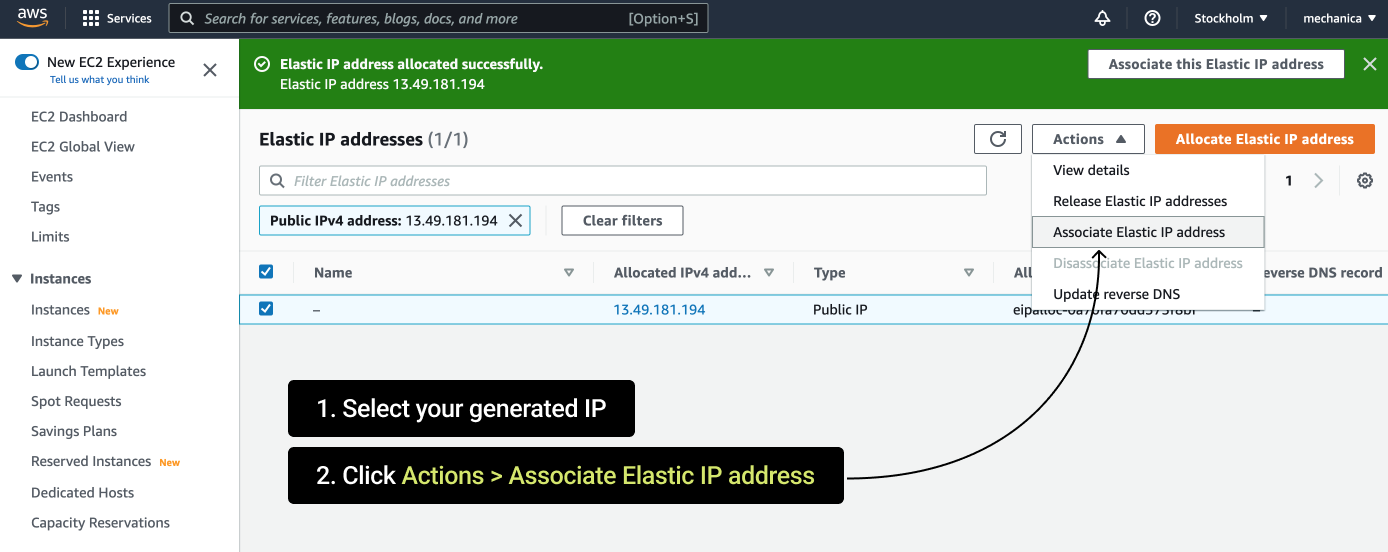
4. On the page that opens fill in the forms
Resource type : Instance
Instance : select your instance ID
Private IP address : select the Private IP address of your instance
Click “Associate”
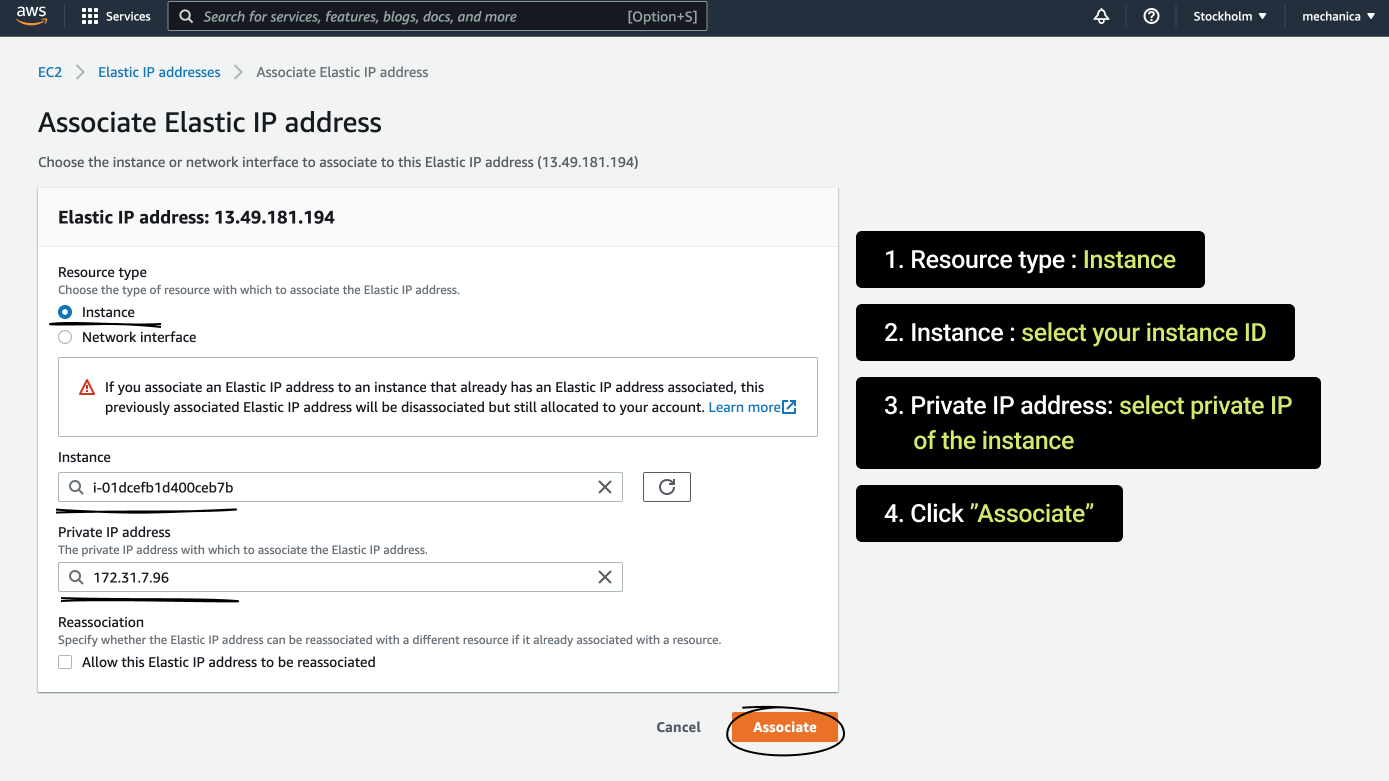
Great! You’ll see a notification about the association
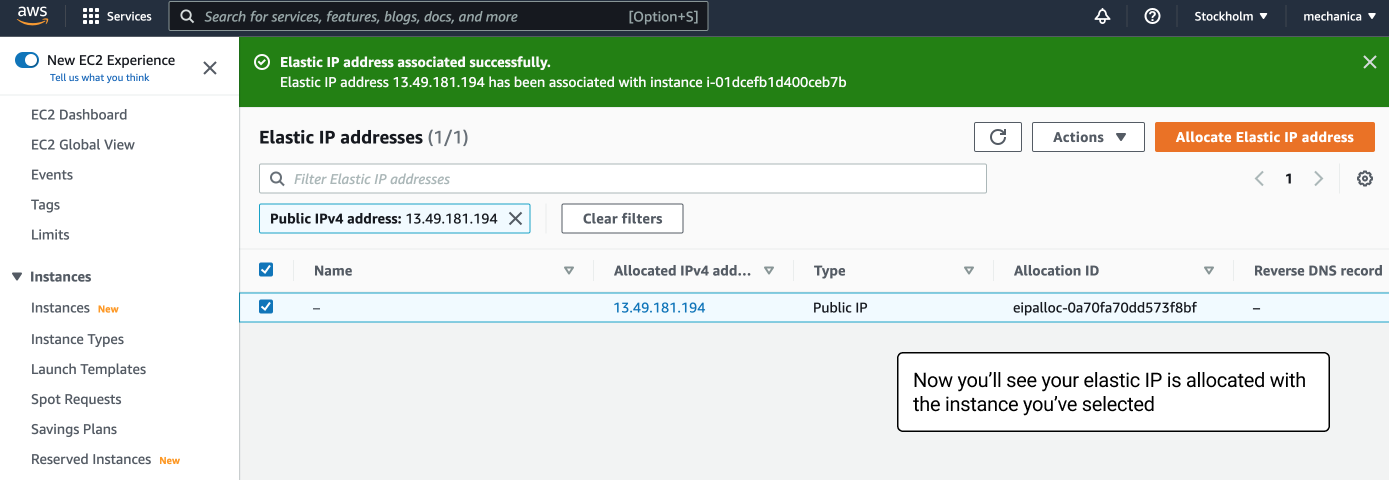
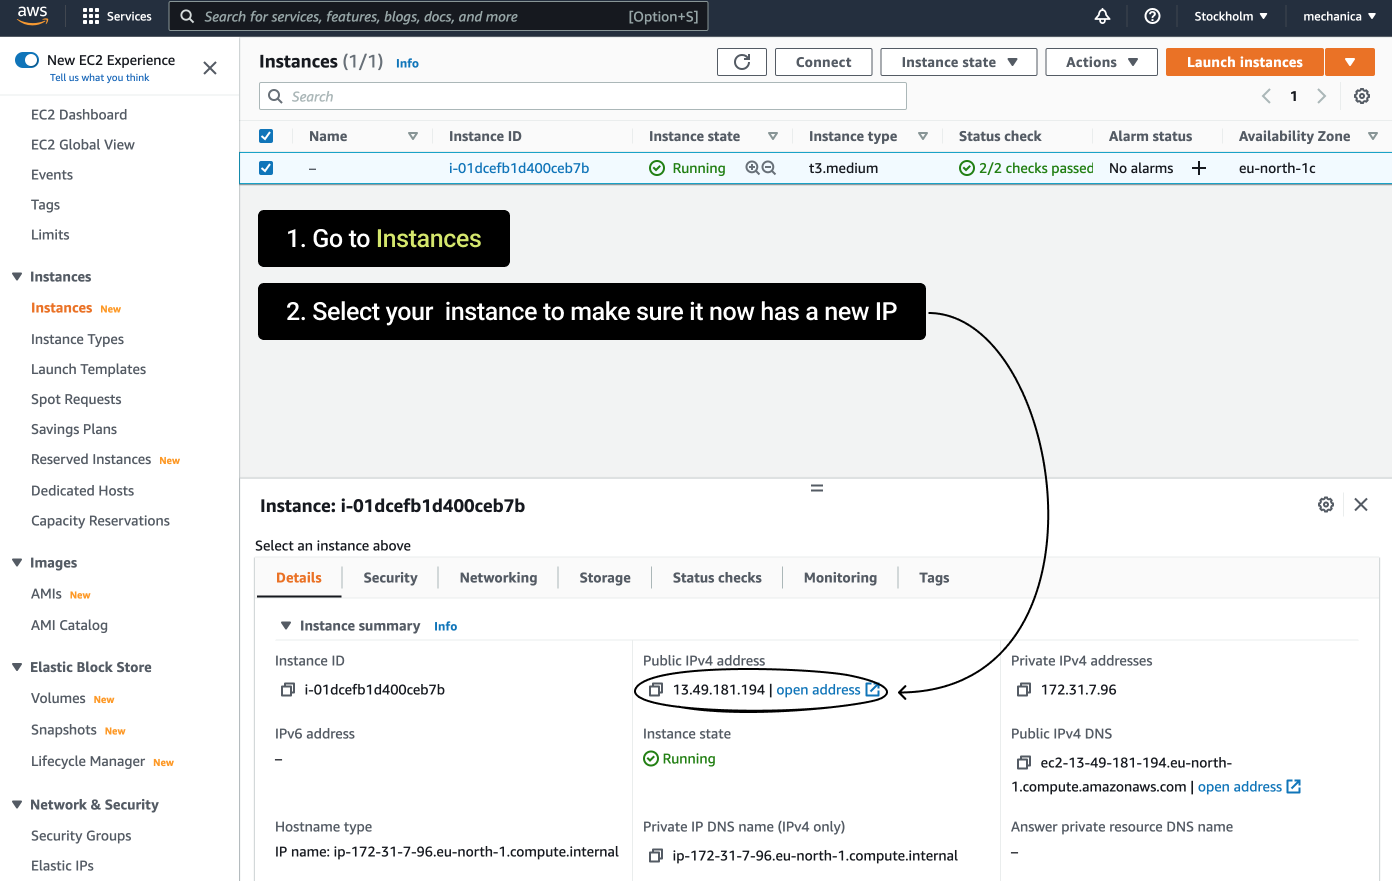
5. Now let’s make sure that our instance has our new IP address
Go to Instances
Select your instance and check it’s IP
Update IP Address within Callaba
Once you've associated a brand new shiny Elastic IP address with your instance, you also need to update the IP address within Callaba itself.
So that the links Callaba will generate for you will contain this new address.
1. Go to General Settings,
Unfold Server settings
Change Streaming domain name to your new Elastic IP address.
Click Save

Disassociating and deleting Elastic IP addresses
To change the instance your Elastic IP address is being associated with or to delete it, you need to disassociate it from the current instance first.
Disassociating Elastic IP
1 . Open EC2 Console
Go to Elastic IPs
Select your Elastic IP
Click Actions > Disassociate Elastic IP address

Deleting Elastic IP
Disassociate your Elastic IP first
Then click Actions > Release Elastic IP

Once you’ve released your Elastic IP, there will be no more charges for the usage of the Elastic IP.
This is the end of our tutorial.
If you have any questions, please contact us at: [email protected]
We will respond to you within 48 hours.
Happy streaming!
Related articles :
How to launch Callaba Cloud Live Streaming
How to start streaming in OBS Studio over the SRT Protocol
How to multi-stream from OBS Studio to Twitch, Youtube and Facebook
How to multi-stream from Wirecast to Twitch, Youtube & Facebook
How to set up geo-distributed routing of video streams using SRT protocol and Callaba Cloud


