Setting up Main/Backup SRT connection bonding in Callaba Cloud
What is SRT connection bonding
Why Main/Backup switching is cool
- it allows to save bandwidth, because it only uses one active stream at a time
- if the main stream stops working for whatever reason, this mechanism switches seamlessly to the backup source and the stream continues
- it’s possible to have more than one backup stream: all backup links will stay connected and ready for data transmission, but not activated for actual payload transmission.
- backup links are only activated for actual transmission when the main link fails or doesn’t achieve the required throughput
If you want to learn more about how main/backup algorithm works, please refer to official SRT documentation here.
How to set up Main/Backup switching in Callaba
For this tutorial you will need your streaming sources, main one and another one to fall back to, plus a Callaba Cloud instance.
To keep this tutorial short and sweet, we are not going to explain the basics here.
If you’ve never tried Callaba Cloud and this is your first time engaging with a cloud platform, please read our step-by-step manual: How to Launch Callaba on AWS.
Subscribing to Callaba Cloud will take no more than 5 minutes.
Callaba is a streaming service that supports a broad range of video industry standards. We provide simple and convenient video streaming pipeline within a single solution : input source encoding, video processing, output source decoding, live video and audio streaming, video recording, video on demand.
Pro tip :
Make sure you read launching tutorial to the end, so that you know how to stop your instance when your work is finished. This is important to avoid unnecessary charges.
Let’s begin
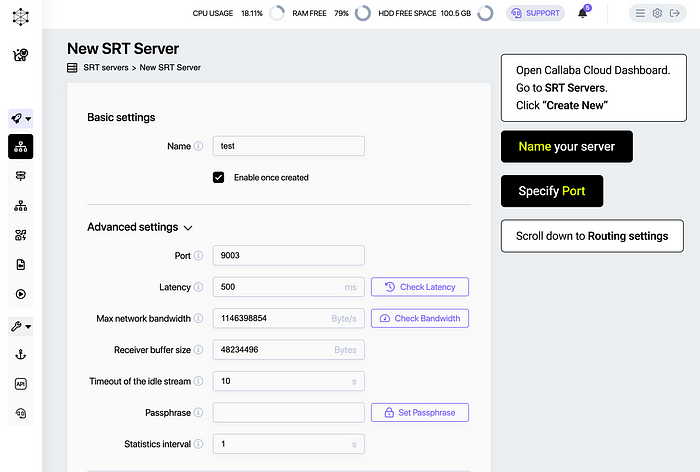
1. Log into Callaba Cloud Live Streaming dashboard
2. Go to SRT Servers section
Click “Add New”
In the page that opens
Name your server
Port : specify port (in our case 9003)
Scroll down to the Routing Settings

SRT Routing : Public IP
Routing mode : Pull
In our example we’re going to be pulling both of our streams (the main one and the backup one).
Now all we need to do is to specify our sources (Hosts).
Routing Host IP : specify your source IP
Routing SRT Port : specify port

The same way we’ll have to add our backup source.
Click “+ Add SRT Host”
Routing Host IP : specify your backup source IP
Routing SRT Port : specify backup source port
If you have more backup sources, add them the same way

Allow Pulling
This step is required for version 7.3 and above.
In our version 7, we have added Allowed Streams.
"Allowed Streams" is a protective mechanism to ensure that only allowed streams can connect to your instance. No outsiders!
By deafult, each SRT server has two allowed streams - Publisher and Receiver. This means that the SRT server can send (publish) and receive streams.
As we are setting up routing that requires Pulling, we need to add a new allowed stream to tell the SRT server that it's okay to engage in this type of connection. We've allowed it.
Without this explicit permission, Pulling will not work.
Let's do it
Unfold Allowed Streams
Click "Add Stream"
In the new stream that appears, set Role to Puller.
Role : Puller
Click "Save"

Cool. Done. Now Callaba will switch to backup in case if main stream get interrupted.
Pro tip :
To see your incoming / outgoing bitrate you’ll need to set up some kind of a receiver for your stream. A receiver can be a player, a recording process, a restream, for example. Or you can grab the stream any other way.

This is the end of this tutorial.
If you have any questions, please contact us at: [email protected]
We will respond to you within 48 hours.
Happy streaming!


