Creating a Test App to manage Callaba Engine on AWS using a RESTful API
For this tutorial you will need an account on AWS and at least some programming knowledge. We’ve tried to include tips for newcomers. If you are an experienced developer, you can skip the tips sections.
Server side app
In this section of our tutorial we are going to create a server side application that is going to use our keys to access our account to execute a number of methods, like adding a new instance and creating an SRT Server.
Getting access keys
So the first thing you have to do is to create and download your access keys.
- Log into AWS Console
2. Click onto your username, then select Security credentials

3. Expand Access keys (access keys ID and secret access key)
4. Click “Create New Access Key”
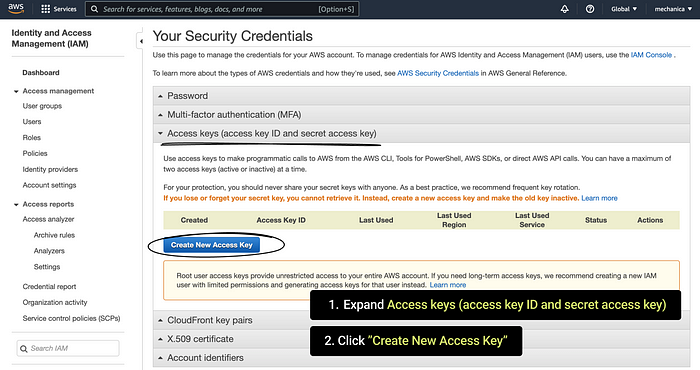
5. In the window that appears, click “Download Key File”

Storing access keys
- Create a file credentials and paste your keys into it this way :
[default]
aws_access_key_id = YOUR_ACCESS_KEY_ID
aws_secret_access_key = YOUR_SECRET_ACCESS_KEY
*credentials file has no file extension
For Linux, Unix or MacOS
Save the file by this path:
~/.aws/credentials
For Windows
Save the file by this path:
C:\Users\<USER_NAME>\.aws\credentials
AWS SDK will find this file and use the stored credentials.
Hints for newbies
(you can skip this section if you are an experienced developer)
For MacOS & Linux users
Run these commands one by one in MacOS or Linux terminal:
cd ~mkdir .awscd .awstouch credentialsecho "[default]" >> credentialsecho "aws_access_key_id = YOUR_ACCESS_KEY_ID" >> credentialsecho "aws_secret_access_key = YOUR_SECRET_ACCESS_KEY" >> credentials

For Windows users
Run these commands one by one in Windows command line :
mkdir .awscd .awsecho > credentialsecho [default] > credentialsecho aws_access_key_id = YOUR_ACCESS_KEY_ID >> credentialsecho aws_secret_access_key = YOUR_SECRET_ACCESS_KEY >> credentials
AWS SDK will find this file and use the stored credentials.
End of hints.
Creating a Security Group
Now we are going to create a security group.
Attention! Create a security group in the region you plan to launch your instances in.
- Log into your AWS EC2 Console
- Change your region to the desired one
- Go to Security Groups
- Click “Create security group”

5. In the page that opens
Name :
Create a name for your Security Group
Description :
Create a description for your Security Group
Inbound rules :
Click “Add rule”
Create first rule
Type — All TCP
Source — Anywhere IPv4
Create second rule
Type — All UDP
Source — Anywhere IPv4

Outbound rules :
Click “Add rule”
Create first rule
Type — All Traffic
Source — Custom
6. Scroll down, then click “Create security group”

7. Take note of your Security group ID, copy and save it somewhere.
Later you will need it to put it into code.

Creating a Key Pair
Now we are going to create a Key Pair.
Attention! Create a security group in the region you plan to launch your instances in.
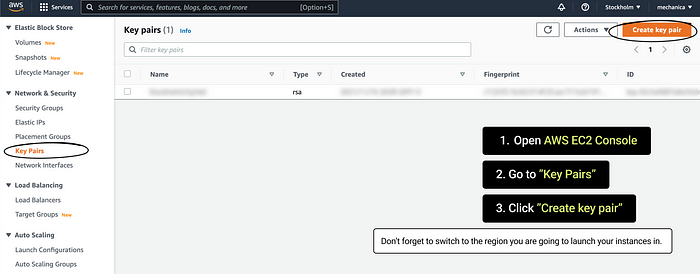
- Log into your AWS EC2 Console
- Change your region to the desired one
- Go to Key Pairs
- Click “Create key pair”
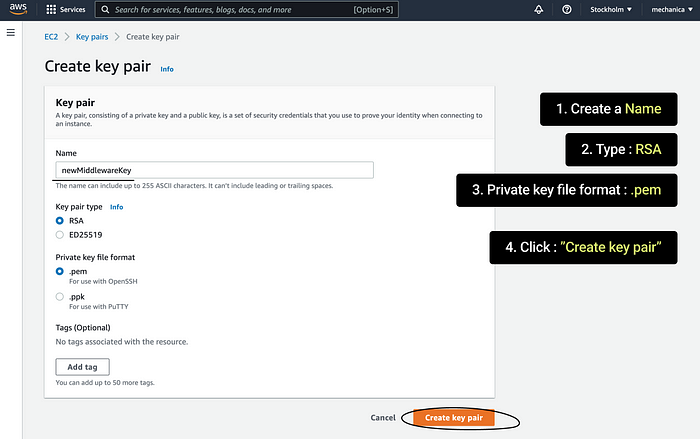
5. Create a key pair
Name :
Create a name for your key pair
Type :
RSA
Private key file format :
.pem
6. Click “Create key pair”
7. Save the Name of the key pair you’ve just created together with the Security group ID.
We’ll need it soon too.
Installing Node.js
1. Download Node JS installer from its site and run it.
Just click “Next” a few times.
You can check that Node JS is installed by running in your terminal or command line :
node -v
If Node JS is installed, you will get a current version as a response.
For example, v18.0.0

Installing AWS SDK
Firstly create a project directory, for example ~/server.
Run these commands one by one in your terminal or command line :
mkdir servercd servernpm init
Hints for newbies
(you can skip this section if you are an experienced developer)
So, npm init command should initialize the project. All you need to do is to press enter a few times. In this case you don’t have to modify anything.
It’s going to look something like this :

End of hints.
As the next step install AWS SDK EC2 Client via node packet manager
Run the command :
npm install @aws-sdk/client-ec2
Hints for newbies
(you can skip this section if you are an experienced developer)
The result of running the command is going to look similar to this :

End of hints.
Installing express
Then install express by running
npm install express
As we will include modules to our app, we need to add a field to our package.json file.
"type": "module"
You can open package.json via an IDE or a text editor.
And add this string (“type”: “module”) like in the example below.
{
 "name": "react-node-aws",
 "version": "1.0.0",
 "description": "",
 "main": "server/index.js",
 "type": "module",
 "scripts": {
   "test": "echo \"Error: no test specified\" && exit 1",
 },
 "keywords": [],
 "author": "",
 "license": "ISC",
 "dependencies": {
   "@aws-sdk/client-ec2": "^3.60.0",
   "express": "^4.17.3"
 }
}

Hints for newbies
(you can skip this section if you are an experienced developer)
For MacOS & Linux users
Run these commands one by one in MacOS or Linux terminal:
open package.json
For Windows users
Run these commands one by one in Windows command line :
notepad package.json
End of hints.
Create the index.js file
In the server directory create a file index.js .
Copy and paste the following code into it.
import express from "express";
import {
    EC2Client,
    DescribeInstancesCommand,
    DescribeImagesCommand,
    CreateTagsCommand,
    RunInstancesCommand,
    StopInstancesCommand,
    StartInstancesCommand
} from "@aws-sdk/client-ec2";// SETUP!!!
const SECURITY_GROUP = "sg-008815d0e5188f905"; // REPLACE WITH YOUR SECURITY GROUP ID
const KEY_PAIR_NAME = "instance-test"; // REPLACE WITH YOUR KEY PAIR NAME
const REGION = "us-east-1"; // REPLACE WITH YOUR REGION
const ec2Client = new EC2Client({ region: REGION });// Function that describes all the instances of your AWS account
// Function returns an object
const describeInstance = async () => {
    let data;
    try {
        data = await ec2Client.send(new DescribeInstancesCommand({}));
    } catch (err) {
        console.log("Error", err);
    }
    return data;
};// Function that describes AMI
const describeAMI = async () => {
    const params = {
        Filters: [
            {
                Name: 'product-code',
                Values: [
                    'e4db8sityo6vmgym1ewplwmzj'
                ]
            },
        ]
    };
    const data = await ec2Client.send(new DescribeImagesCommand(params));
    data.Images.forEach(image => {
        if(new Date(image.CreationDate) > new Date(data.Images[0].CreationDate))
            data.Images[0] = image;
    });
    console.log(`\nYour AMI creation date is - ${new Date(data.Images[0].CreationDate).toLocaleDateString()}\n`);
    return(data.Images[0].ImageId);
}// Function that creates a new instance
// Function createInstance requires the instance's name and AMI ID (image ID)
// Function returns the created instance's ID
async function createInstance(name, imageId){
    let instanceId;
    const instanceParams = {
        ImageId: imageId,
        InstanceType: "c4.2xlarge", // CHOOSE FROM c4.2xlarge, c4.4xlarge, c4.8xlarge, c5.4xlarge, c5.9xlarge, c5.12xlarge and c5.18xlarge
        KeyName: KEY_PAIR_NAME,
        SecurityGroupIds: [SECURITY_GROUP],
        MinCount: 1,
        MaxCount: 1,
    };
    try {
        // Creating instance
        const data = await ec2Client.send(new RunInstancesCommand(instanceParams));
        instanceId = data.Instances[0].InstanceId;
        // Adding tags to the created instance
        const tagParams = {
            Resources: [instanceId],
            Tags: [
                {
                    Key: "Name",
                    Value: name,
                },
            ],
        };
        try {
            // Tagging the created instance
            const data = await ec2Client.send(new CreateTagsCommand(tagParams));
        } catch (err) {
            console.log("Error", err);
        }
    } catch (err) {
        console.log("Error", err);
    }
    return instanceId;
}// Function that stops an instance
// Function requires an object "params", which has to contain "instanceIDs" array
const stopInstance = async (params) => {
    try {
        return await ec2Client.send(new StopInstancesCommand(params));
    } catch (err) {
        console.log("Error", err);
    }
};// Function that starts an instance
// Function requires an object "params", which has to contain "instanceIDs" array
const startInstance = async (params) => {
    try {
        return await ec2Client.send(new StartInstancesCommand(params));
    } catch (err) {
        console.log("Error2", err);
    }
};// Server setupconst PORT = process.env.PORT || 3001;
const app = express();// Requests handlers// Object to pass to stopInstance and startInstance functions
let params = {InstanceIds: [], amiID: await describeAMI()}app.get("/start", (req, res) =>{
    startInstance(params)
        .then(() => res.json({message: "Instance is started"}));
});app.get("/stop", (req, res) => {
    stopInstance(params)
        .then(() => res.json({message: "Instance is stopped"}));
});app.get("/create", async (req, res) =>{
    // REPLACE "Test-Instance" WITH ANY NAME YOU WANT
    params.InstanceIds[0] = await createInstance("Test-Instance", params.amiID);
    res.json({message: "Instance is created", instanceId: params.InstanceIds[0]});
})app.get("/describe", async (req, res) => {
    res.json(await describeInstance());
});app.listen(PORT, () => {
    console.log(`Server listening on ${PORT}`);
});
Hints for newbies
(you can skip this section if you are an experienced developer)
For MacOS & Linux users
Run these commands one by one in MacOS or Linux terminal:
touch index.jsopen index.js
For Windows users
Run these commands one by one in Windows command line :
echo > index.jsnotepad index.js
End of hints.
Now that we’ve copied the code, it’s time to put our own parameters in it.
Replace the Security group ID and the Key Pair name with the ones you saved previously.
1. Change values of the constants SECURITY_GROUP and KEY_PAIR_NAME.
const SECURITY_GROUP = "sg-055a74v056322abed"; // REPLACE WITH YOUR SECURITY GROUP ID
const KEY_PAIR_NAME = "instance-test"; // REPLACE WITH YOUR KEY PAIR NAME
2. Put in a Region AWS ID of the region you are going to launch your instance in.
const REGION = "us-east-1"; // REPLACE WITH YOUR REGION ID
You can look up your Region AWS ID here.
3. Put in Instance Type. This would determine the kind of instance our app will launch.
InstanceType: "c4.2xlarge" // CHOOSE FROM c4.2xlarge, c4.4xlarge, c4.8xlarge, c5.4xlarge, c5.9xlarge, c5.12xlarge and c5.18xlarge
4. When it’s done you can run this code.
To run the program run in terminal or command line :
node index.js
If everything is correct you will get this message:
Server listening on 3001

Got that? Awesome!
Client side app
Now we are going to take care about the client-side application.
React installation
Create a client folder near your server folder (both folders should be sharing the same parent folder) and install React in it.
We recommend you to do it in the new terminal / cmd window to avoid stopping the express server we’ve just launched.
So in terminal or cmd run the following commands :
mkdir clientcd clientnpx create-react-app callaba-test-appcd callaba-test-app
Now your react application is created.
Setting up package.json
Now we are going to prepare a react application to interact with the backend.
First, we need to add a field
"proxy": "http://localhost:3001"
to the file named package.json.
To open the file, you can run in Linux/MacOS terminal :
open package.json
or in Windows command line:
notepad package.json
Then paste this string in as in the example below.
{
 "name": "client",
 "version": "0.1.0",
 "private": true,
 "dependencies": {
   "@testing-library/jest-dom": "^5.16.3",
   "@testing-library/react": "^12.1.4",
   "@testing-library/user-event": "^13.5.0",
   "react": "^18.0.0",
   "react-dom": "^18.0.0",
   "react-scripts": "5.0.0",
   "web-vitals": "^2.1.4"
 },
 "scripts": {
   "start": "react-scripts start",
   "build": "react-scripts build",
   "test": "react-scripts test",
   "eject": "react-scripts eject"
 },
 "proxy": "http://localhost:3001",
 "eslintConfig": {
   "extends": [
     "react-app",
     "react-app/jest"
   ]
 },
 "browserslist": {
   "production": [
     ">0.2%",
     "not dead",
     "not op_mini all"
   ],
   "development": [
     "last 1 chrome version",
     "last 1 firefox version",
     "last 1 safari version"
   ]
 }
}

App.jsx
Open the App.js file in the src folder and replace its code with the code below.
Opening in Linux/MacOS terminal:
cd srcopen App.js
Opening in Windows cmd:
notepad App.js
- Replace the code of the Apps.js with the code below :
import React from "react"
class App extends React.Component{
constructor(props) {
super(props);
this.start = this.start.bind(this);
this.stop = this.stop.bind(this);
this.create = this.create.bind(this);
this.describe = this.describe.bind(this);
this.authenticate = this.authenticate.bind(this);
this.createStream = this.createStream.bind(this);
this.stopStream = this.stopStream.bind(this);
this.startStream = this.startStream.bind(this);
this.removeStream = this.removeStream.bind(this);
this.createPlayer = this.createPlayer.bind(this);
this.removePlayer = this.removePlayer.bind(this);
this.createRestream = this.createRestream.bind(this);
this.removeRestream = this.removeRestream.bind(this);
this.state = {
instanceId : "create instance",
instanceData: {
Reservations: [{
Instances: [{
InstanceId: 'create a new instance',
ImageId: 'create a new instance',
State: {Name: 'create a new instance'},
PublicIpAddress: 'create a new instance'
}],
}]},
instanceIndex: 0,
callabaToken: "",
serverId: "no server id",
serverState: "no server",
playerId: "no player id",
playerState: "no player",
youtubeKey: "",
restreamId: "no restream"
};
}
//functions to communicate with express server
start(){
fetch("/start").then(() => this.describe())
}
stop(){
fetch("/stop").then(() => this.describe())
}
create(){
fetch("/create")
.then(res => {return res.json()})
.then((data) => {
this.describe()
this.setState({instanceId: data.instanceId});
sessionStorage.setItem("instanceId", data.instanceId); // Saving the instance ID to a Session storage
})
}
describe(){
fetch("/describe")
.then(res => {return res.json()})
.then(data => data.Reservations.length? this.setState({instanceData: data}):0)
.then(()=>{
this.state.instanceData.Reservations.forEach((Reservation, index) => {
if(Reservation.Instances[0].InstanceId === this.state.instanceId)
this.setState({instanceIndex: index});
})})
}
// Functions to communicate with Callaba API
// Getting access token
authenticate(){
fetch('http://' + this.state.instanceData.Reservations[this.state.instanceIndex].Instances[0].PublicIpAddress + '/api/auth/login',
{
method: 'POST',
headers: {
'Content-Type': 'application/json',
},
body: JSON.stringify(
{
email: "admin",
password: this.state.instanceData.Reservations[this.state.instanceIndex].Instances[0].InstanceId
})
})
.then(response => response.json())
.then(data => {
this.setState({callabaToken: data.token});
console.log(data);
})
}
// Creating a new SRT server
createStream(){
fetch('http://' + this.state.instanceData.Reservations[this.state.instanceIndex].Instances[0].PublicIpAddress + '/api/srt-servers/create',
{
method: 'POST',
headers: {
'x-access-token': this.state.callabaToken,
'Content-Type': 'application/json',
},
body: JSON.stringify(
{
server_name: "Test SRT server", // CHANGE WITH ANY SERVER NAME YOU WANT
server_type: "SERVER_TYPE_SRT",
server_port: 1935,
server_latency: 200,
server_maxbw: -1,
server_timeout: 60,
server_rcvbuf: 48234496,
server_active: true
})
})
.then(response => response.json())
.then(data => {
this.setState({serverId: data._id, serverState: "server running"});
})
}
// Stopping an SRT server
stopStream(){
fetch('http://' + this.state.instanceData.Reservations[this.state.instanceIndex].Instances[0].PublicIpAddress + '/api/srt-servers/stop',
{
method: 'POST',
headers: {
'accept': 'application/json',
'x-access-token': this.state.callabaToken,
'Content-Type': 'application/json'
},
body: JSON.stringify({id: this.state.serverId})
})
.then(response => response.json())
.then(data => {
if(data.ok) this.setState({serverState: "server stopped"});
})
}
// Starting a stopped SRT server
startStream(){
fetch('http://' + this.state.instanceData.Reservations[this.state.instanceIndex].Instances[0].PublicIpAddress + '/api/srt-servers/start',
{
method: 'POST',
headers: {
'accept': 'application/json',
'x-access-token': this.state.callabaToken,
'Content-Type': 'application/json'
},
body: JSON.stringify({id: this.state.serverId})
})
.then(response => response.json())
.then(data => {
if(data.ok) this.setState({serverState: "server running"});
})
}
// Removing an SRT server
removeStream(){
fetch('http://' + this.state.instanceData.Reservations[this.state.instanceIndex].Instances[0].PublicIpAddress + '/api/srt-servers/remove',
{
method: 'DELETE',
headers: {
'accept': 'application/json',
'x-access-token': this.state.callabaToken,
'Content-Type': 'application/json'
},
body: JSON.stringify({id: this.state.serverId})
})
.then(response => response.json())
.then(data => {
if(data.ok) this.setState({serverState: "no server", serverId: "no server id"});
})
}
// Creating a new Web Player of your SRT stream
createPlayer(){
fetch('http://' + this.state.instanceData.Reservations[this.state.instanceIndex].Instances[0].PublicIpAddress + '/api/vod/create',
{
method: 'POST',
headers: {
'accept': 'application/json',
'x-access-token': this.state.callabaToken,
'Content-Type': 'application/json'
},
body: JSON.stringify(
{
active: true,
dash_fragment_length: 60,
dash_fragment_size: 3,
hls_fragment_length: 60,
hls_fragment_size: 3,
initial_live_manifest_size: 3,
input: {
input_module_id: this.state.serverId,
input_stream_id: "",
input_type: "INPUT_TYPE_SRT_SOFTWARE"
},
live_sync_duration_count: 3,
transcoding: {
audio_transcoding: "Disabled",
output_audio_bitrate: 320,
output_video_bitrate: 8000,
video_transcoding: "Disabled"
},
vod_name: "Test SRT player",
vod_port: 10001
})
})
.then(response => response.json())
.then(data => this.setState({playerId: data._id, playerState: "running"}))
}
// Removing a Web player
removePlayer(){
fetch('http://' + this.state.instanceData.Reservations[this.state.instanceIndex].Instances[0].PublicIpAddress + '/api/vod/remove',
{
method: 'DELETE',
headers: {
'accept': 'application/json',
'x-access-token': this.state.callabaToken,
'Content-Type': 'application/json'
},
body: JSON.stringify({id: this.state.playerId})
})
.then(response => response.json())
.then(() => this.setState({playerState: "no player"}))
}
// Creating a restream on YouTube
createRestream(){
fetch('http://'+ this.state.instanceData.Reservations[this.state.instanceIndex].Instances[0].PublicIpAddress +'/api/restream/create',
{
method: 'POST',
headers: {
'accept': 'application/json',
'x-access-token': this.state.callabaToken,
'Content-Type':'application/json'
},
body: JSON.stringify({
restream_name: "Test restream",
restream_type: "RESTREAM_TYPE_SRT_TO_RTMP",
input: {
input_type: "INPUT_TYPE_SRT_SOFTWARE",
input_server_id: this.state.serverId,
input_stream_id: "publisher/test-srt-server/srt-stream-01",
module_name: "test youtube",
module_type: "MODULE_RESTREAM"
},
output: {
output_type: "OUTPUT_TYPE_OTHER_RTMP_URL",
output_stream_url : "rtmp://x.rtmp.youtube.com/live2" ,
output_stream_key: "f9da-dgj8-gq64-mjp2-7d0w"
},
active: true
})
})
.then(response => response.json())
.then(data => this.setState({restreamId: data._id}))
}
// Removing a restream on YouTube
removeRestream(){
fetch('http://'+ this.state.instanceData.Reservations[this.state.instanceIndex].Instances[0].PublicIpAddress +'/api/restream/remove',
{
method: 'DELETE',
headers: {
'accept': 'application/json',
'x-access-token': this.state.callabaToken,
'Content-Type':'application/json'
},
body: JSON.stringify({id: this.state.restreamId})
})
.then(response => response.json())
.then(() => this.setState({restreamId: "no restream"}))
}
render(){
return(
<div className="App">
<header className="App-header">
<div>
<h3>INSTANCE</h3>
<div className={'box'}>
<div className={'box-info'}>
<p className={'field'}>{
this.state.instanceData.Reservations[this.state.instanceIndex].Instances[0].InstanceId}</p>
<p className={'field'}>{
this.state.instanceData.Reservations[this.state.instanceIndex].Instances[0].ImageId}</p>
<p className={'field'}>{
this.state.instanceData.Reservations[this.state.instanceIndex].Instances[0].State.Name}</p></div>
<div className={'box-manage'}>
<button className={'button'} onClick={this.start}>Start</button>
<button className={'button'} onClick={this.stop}>Stop</button>
<button className={'button'} onClick={this.create}>Create</button>
</div>
</div>
<h3>SRT SERVER</h3>
<div className={'box'}>
<div className={'box-info'}>
<p className={'field'}>{
this.state.callabaToken !== "" ? "authorised" : "not authorised"
}</p>
<p className={'field'}>{
this.state.instanceData.Reservations[this.state.instanceIndex].Instances[0].State.Name === 'running' ?
<a target={'_blank'} href={`http://${this.state.instanceData.Reservations[this.state.instanceIndex].Instances[0].PublicIpAddress}`}>Callaba Cloud Interface</a>
: "no interface"
}</p>
<p className={'field'}>{
this.state.serverState
}</p>
<p className={'field'}
style={{cursor: "pointer"}}
onClick={() => navigator.clipboard.writeText("srt://" + this.state.instanceData.Reservations[this.state.instanceIndex].Instances[0].PublicIpAddress + ":1935?streamid=publisher/test-srt-server/srt-stream-01&latency=200000&maxbw=-1")}
>
❏ copy OBS URL
</p>
<p className={'field'}
style={{cursor: "pointer"}}
onClick={() => navigator.clipboard.writeText("srt://" + this.state.instanceData.Reservations[this.state.instanceIndex].Instances[0].PublicIpAddress + ":1935?streamid=publisher/test-srt-server/srt-stream-01")}
>
❏ copy ffmpeg URL
</p>
</div>
<div className={'box-manage'}>
<button className={'button'} onClick={this.authenticate}>Auth</button>
<button className={'button'} onClick={this.createStream}>Create</button>
<button className={'button'} onClick={this.stopStream}>Stop</button>
<button className={'button'} onClick={this.startStream}>Start</button>
<button className={'button'} onClick={this.removeStream}>Remove</button>
</div>
</div>
<h3>WEB PLAYER</h3>
<div className={'box'}>
<div className={'box-info'}>
<p className={'field'}>{this.state.playerState}</p>
<p className={'field'}>{this.state.playerState !== "running" ? "no web player": <a target="_blank" href={'http://' + this.state.instanceData.Reservations[this.state.instanceIndex].Instances[0].PublicIpAddress + "/vod-player/" + this.state.playerId}>Web player</a>}</p>
</div>
<div className={'box-manage'}>
<button className={'button'} onClick={this.createPlayer}>Create</button>
<button className={'button'} onClick={this.removePlayer}>Remove</button>
</div>
</div>
<h3>RESTREAM TO YOUTUBE</h3>
<div className={'box'}>
<div className={'box-info'}>
<p><input className={'input'} type="text" placeholder={'enter youtube stream key'} onClick={(event)=>{this.setState({youtubeKey: event.target.value})}}/></p>
<p className={'field'}>{this.state.restreamId}</p>
</div>
<div className={'box-manage'}>
<button className={'button'} onClick={this.createRestream}>Create</button>
<button className={'button'} onClick={this.removeRestream}>Remove</button>
</div>
</div>
<div className={'gap'}></div>
</div>
</header>
</div>
);
}
componentDidMount(){
this.describe();
setInterval(this.describe, 10000); // Monitoring the instances of your account
if(sessionStorage.getItem("instanceId")){ //Checking for the last created instance in this session
this.setState({instanceId: sessionStorage.getItem("instanceId")})
}
}
}export default App;
2. Next, we have to change the file’s name from App.js to App.jsx
In Linux/MacOS terminal :
mv App.js App.jsx
In Windows command line :
rename App.js App.jsx
Index.css
Now we will tackle with the index.css to make our app look prettier add the styles to it.
In the same src folder open index.css file
Linux/MacOS terminal:
open index.css
Windows command line:
notepad index.css
- Replace index.css code with the code below :
.App {
 text-align: center;
}

.App-header {
 background-color: #282c34;
 min-height: 100vh;
 display: flex;
 flex-direction: column;
 align-items: center;
 justify-content: center;
 font-size: calc(10px + 2vmin);
 color: white;
}

body {
 margin: 0;
 font-family: -apple-system, BlinkMacSystemFont, 'Segoe UI', 'Roboto', 'Oxygen',
   'Ubuntu', 'Cantarell', 'Fira Sans', 'Droid Sans', 'Helvetica Neue',
   sans-serif;
 -webkit-font-smoothing: antialiased;
 -moz-osx-font-smoothing: grayscale;
}

code {
 font-family: source-code-pro, Menlo, Monaco, Consolas, 'Courier New',
   monospace;
}

.box{
 width: 500px;
 border: solid 1px #fff;
 display: flex;
 justify-content: space-between;
}

.field{
 text-align: start;
 margin-left: 30px;
}

.box-info{
 width: 70%;
}

.box-manage{
 width: 20%;
 display: flex;
 flex-direction: column;
 justify-content: space-evenly;
}

.button{
 height: 50%;
}

.input{
 width: 100%;
 margin-left: 30px;
 background: none;
 border: none;
 outline: none;
 font-size: 23px;
 color: #ffffff;
}

.gap{
 height: 50px;
}
Save your changes
2. Next, make sure that the server is already running (node index.js)
Come back to the callaba-test-app folder and run a npm start command
cd client/callaba-test-appnpm start
You should see the message “compiled successfully”

Then our simple app interface will open in the browser.
It’s going to look like this :

How to use the app
When the app starts running React automatically opens it in a browser tab.
- Firstly create a new instance
Click the “Create” button

You’ll see your instance launching

Please wait for 2–3 minutes for your instance to complete launching
For illustrative purposes of this tutorial, we are going to take a peek into our AWS EC2 Console.
In the you will see your newly created instance Running.
Warning :
Please keep in mind, once your instance is Running, it means you are being charged for the software and the hardware usage.
AWS Pay-As-You-Go model charges for the time you are using the resources. The system does not consider whether you are doing anything with the instance or not, whether you are sending any traffic or not.
This means that you need to Stop or Terminate you instance upon completion of your tasks to avoid unnecessary charges.
To see your instance, you can open your AWS EC2 Console and switch to Instances.

Opening Callaba Cloud
For the sake of this tutorial we will also explain how you can get into Callaba Cloud. You can do it either from the AWS EC2 Console or from the React App interface.
AWS EC2 Console
- Open AWS EC2 Console > Instances
- Click onto your active instance
- Copy the Public IPv4 and open it in the browser (without https://)
- You should see the authorization screen
- Log into Callaba Cloud
Login : admin
Password : Instance ID


React App interface
- Once your instance is launched, click the Callaba Cloud Interface link
- Log into Callaba Cloud
Login : admin
Password : Instance ID (you can find it under Instance)


Creating SRT Server and sending a stream to it
Now we are going to create SRT Server to send our stream to.
- Click “Auth”
- Click “Create”

3. Now that authorization is done and the server is created, we will send a stream to our server using OBS Studio
Click “Copy OBS URL”

4. Open OBS Studio and your media source (a videofile, a camera, a scene, etc)
5. Click “Settings”
In the opened window open the Stream tab
Paste your OBS URL into the “Server” field
Click “OK”

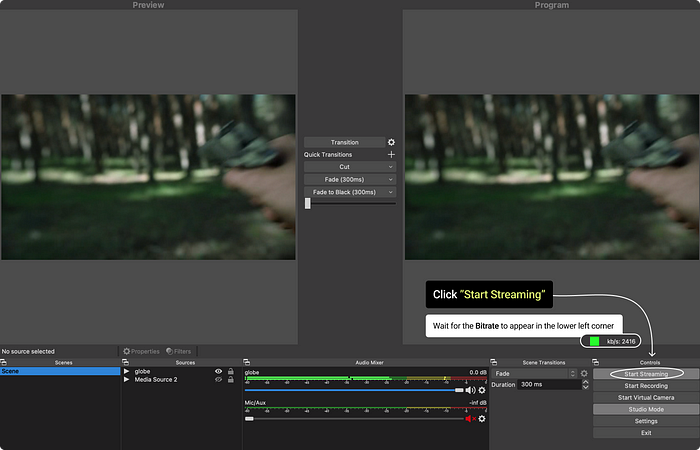
6. Click “Start Streaming”
Wait for the bitrate to appear in the bottom left corner
Creating a Web Player
To see our stream coming to our server, we are now going to create a Web Player.
- Click “Create”

2. Once your player is ready, click Web Player link to view your stream in the browser

3. Wait for the player to load your stream, then click play

4. You can also check your Web Player in Callaba Cloud
Open Callaba Cloud and go to Web Players
You can click “Preview” button to see the preview of your stream

You can also create a re-stream to your Youtube channel using the React application. You will need a Youtube Stream Key.
Finishing your work
It is important to Stop or Terminate your instances upon completion of your stream or your task, as AWS Pay-As-You-Go model charges for the time you are using the resources.
Click “Stop” to stop your instance

To see your instance, you can open your AWS EC2 Console and switch to Instances.

This is the end of our first tutorial about Callaba Engine.
In the future we are going to add more tutorials about working with the engine via an API. Stay tuned.
If you have any questions, please contact us at: [email protected]
We will respond to you within 48 hours.
Happy streaming!
Related articles :
What is Callaba Streaming Engine
Create, edit, start and delete SRT Server or Gateway using Callaba Cloud
How to set up CloudFront on AWS and optimize data transfer
How to set up Elastic IP address on AWS

