Set up User Authorization for your Web Player
More live video workflow notes and product updates.
Controlling access to your video stream is essential when sharing content with a specific audience. In this tutorial, we’ll walk you through setting up user authorization for your web player, ensuring only authorized viewers can access your stream. For production ingest and monitoring, see continuous streaming. For playback integration and analytics, use video api. Recommended product path: Ingest & route, Player & embed, Paywall & access. For this workflow, Player & embed is the most direct fit., and scaling guide. For implementation details, continue with Create a Virtual Events Platform Setup CloudFront CDN for Live Events. Part I and How to set up CloudFront on AWS and optimize data transfer. Before full production rollout, run a Test and QA pass with Generate test videos and streaming quality check and video preview. Before full production rollout, run a Test and QA pass with a test app for end-to-end validation.
We’ll cover two authorization methods:
- Passwords only
- Emails and passwords
By the end of this guide, you’ll know how to create a web player with restricted access, generate passwords, import user credentials, and test the authentication process.
0. Before you begin
For this tutorial, you will need :
▶ Callaba software
⬇️ Callaba on AWS Marketplace (cloud) | 📖 Guide: How to launch
⬇️ Callaba self-hosted license (on-premises) | 📖 Guide: How to install self-hosted
▶ Video stream source
Let’s dive in.
1. Create a Web Player
To begin, you’ll need to have a video stream input.
Once your video stream is ready (coming to your SRT Server, for example) create a Web Player.
Follow these steps:
Open “Web Players” section.
Click “Add New".
Give your player a name.
Set your video source as input.
Once your web player is set up, you’re ready to configure authorization settings.

2. Configure Authorization Settings
Now, open the Authorization settings section. Here, you can choose between two authentication methods:
- Passwords only
- Emails and passwords
Let’s go through each method in detail.

Option 1: Password Only
With this method, users need a password to access the stream. You can either add passwords manually or generate them automatically.
Adding Passwords Manually
Click on “Add Passphrase”.
Type in a password.
Add as many passphrases as you need.
Save the changes.

Generating Passwords Automatically
Set the number of viewers you want to grant access.
Define the length of each password.
Click “Generate”.

Once the passwords are created, you can download the file and distribute the passwords to your viewers.

Testing Password-Only Access
Once passwords are set up, it’s time to test:
Save your Web Player.
In the Web Players section, click Info and copy the Web Player URL.
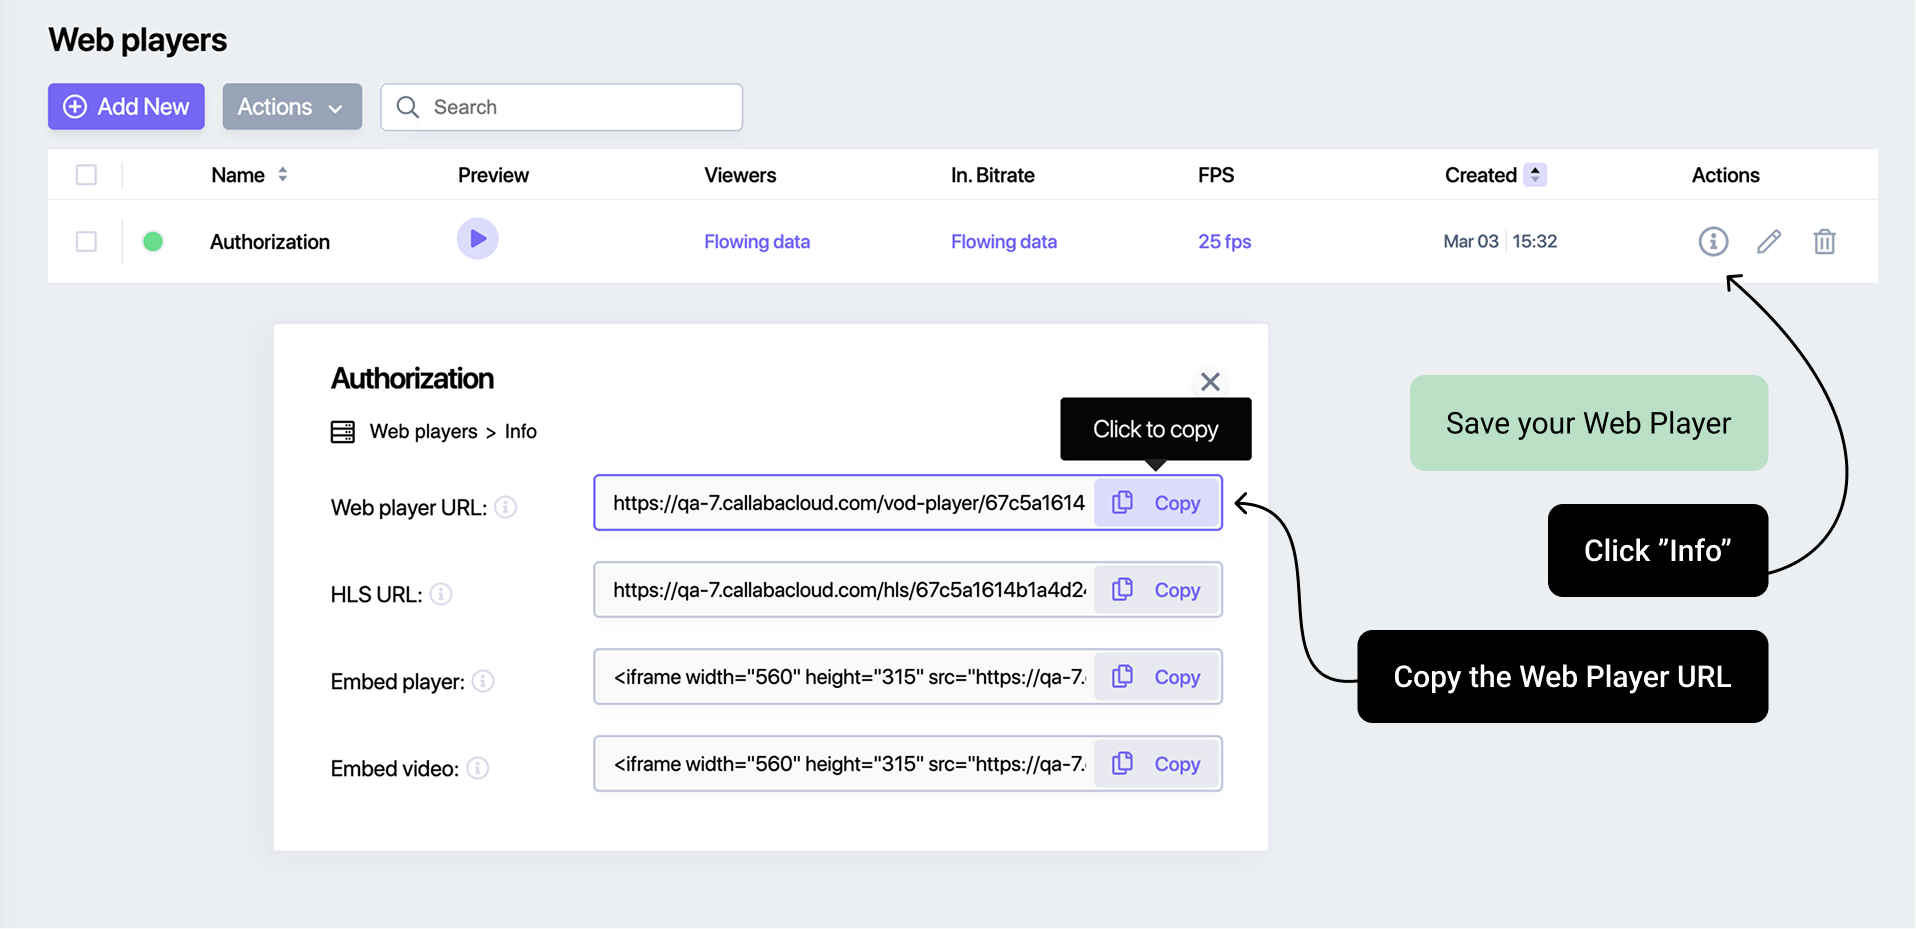
NOTE: Callaba uses cookies to recognize you as an admin. This is why you need to open the link in incognito mode to see what your viewers will experience.
Enter one of the passwords.
If authentication is successful, you’ll see your stream.

And that’s it! Now, only users with a valid password can access your video stream.
Option 2: Emails and Passwords
This method requires users to enter both an email address and a password.
Adding Emails and Passwords Manually
Click “Add Passphrase”.
Enter the user’s email address.
Set a password for them.
Repeat these steps to add as many users as you need.

Save the Web Player.
Importing Email and Passwords via CSV
If you have multiple users, importing a CSV file is the fastest way to set up authentication.

Prepare a .CSV file with two columns:
- email (list of user emails)
- password (corresponding passwords for each user)
Ensure the column headers are labeled exactly as email and password.

Save the file as a CSV.
Click "Import" and upload your file. The system will process the list, and users will be added automatically.

Testing Email and Password Authentication
Once users are added, follow these steps to test:
Save your Web Player.
In the Web Players section, click Info and copy the Web Player URL.
Open the link in incognito mode.

Enter an email and password from the list.
If the credentials are correct, you’ll gain access to the stream.

3. Upload background image
You can make your player more visually appealing, by uploading a logo and a background image.
To do that, unfold "Visual settings" in Web Player settings.

Happy streaming!
Learn more
- How to launch Callaba on Amazon Web Services
- How to create a playlist of videos with Pay Per View monetization
- Multilingual Web Player
- Set up SRT backup stream in case of main stream interruption
Follow us on social media
LinkedIn • Reddit • Instagram • Facebook • Youtube • X (Twitter) • Discord