Webcams For Streaming
More live video workflow notes and product updates.
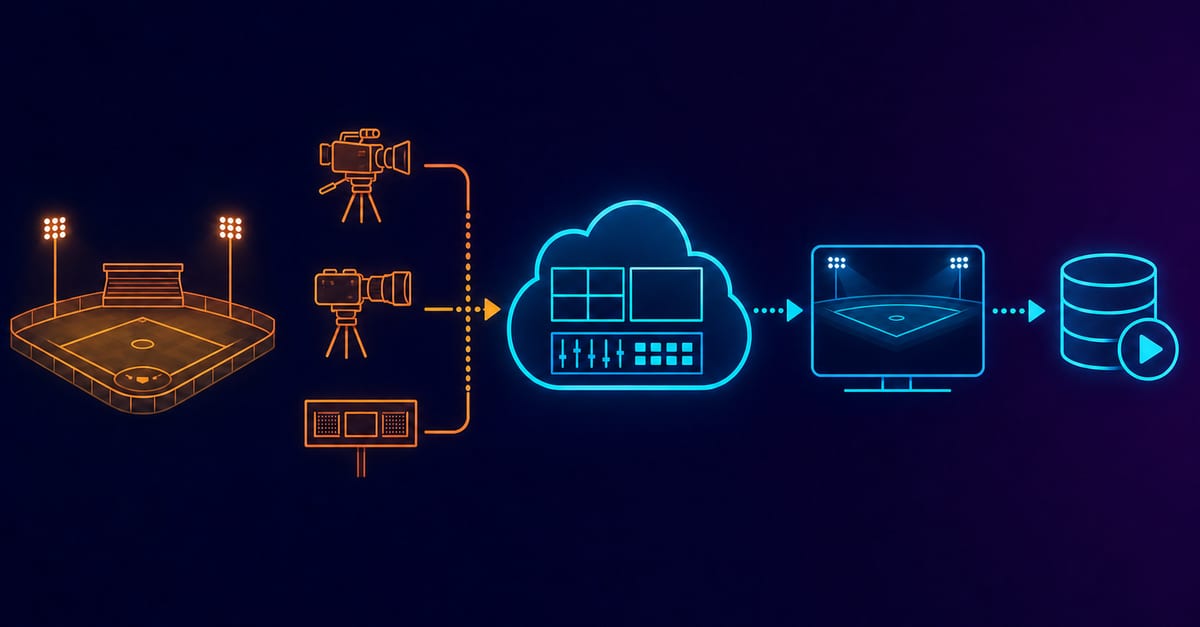
This is a practical, engineer-level guide to using webcams for streaming: how to choose a camera, where it fits in a low-latency chain, exact configuration targets, actionable recipes (OBS/ffmpeg/SRT), limitations, and step-by-step rollout checks. If you need reliable contribution into cloud encoders, real-time interviews, or multi-destination streaming, this document gives concrete numbers and next steps. If this is your main use case, this practical walkthrough helps: Webcam For Streaming. Before full production rollout, run a Test and QA pass with Generate test videos and streaming quality check and video preview. For this workflow, teams usually combine Player & embed, Ingest & route, and Video platform API. Before full production rollout, run a Test and QA pass with a test app for end-to-end validation.
Use the bitrate calculator to size the workload, or build your own licence with Callaba Self-Hosted if the workflow needs more flexibility and infrastructure control. Managed launch is also available through AWS Marketplace.
- Glass-to-glass latency: time from sensor exposure to viewer display. Targets commonly used:
- Interactive: <250 ms (WebRTC class)
- Very low-latency live: 250–500 ms (SRT with aggressive buffers, LAN/low-loss WAN)
- Low-latency live: 500 ms–2 s (SRT contribution to cloud + low-latency delivery such as LL-HLS)
- Typical streaming: 3–30 s (traditional HLS/standard HLS segments)
- Webcam capture modes:
- UVC raw formats (YUY2, NV12): CPU-side encoding required or hardware accelerated encoding on the PC.
- MJPEG: camera sends JPEG frames. Low CPU decoding cost but higher bandwidth; not optimal for WAN delivery.
- H.264 hardware-encoded webcam: some webcams or capture devices output H.264 directly. Useful to reduce host CPU and encode latency.
- USB transport boundaries:
- USB 2.0 theoretical 480 Mbps (practical throughput lower). Adequate for 720p30 / 1080p30 MJPEG in single-camera scenarios.
- USB 3.x (5 Gbps and up) required for 1080p60 or 4K streams from a webcam or capture card.
Decision guide
Pick based on use case, latency target, and scale. Use the checklist below to map requirements to decisions. If you need a deeper operational checklist, use Obs Labs.
- Define target glass-to-glass latency (choose one): <250 ms, 250–500 ms, 500 ms–2 s, >2 s.
- If <250 ms: prefer WebRTC for contribution; webcams are ok but must be captured locally and sent via a WebRTC stack or low-latency relay.
- If 250–500 ms: use SRT with latency 100–500 ms on good networks. Webcams are fine if host encoding latency is small.
- If >500 ms: standard SRT or RTMP to ingest and low-latency delivery (LL-HLS/CMAF) are practical.
- Single host vs distributed production:
- Single host (laptop/PC): use USB 3.x webcam, hardware encoder (NVENC/Quick Sync), OBS or ffmpeg. Map to /products/video-api or /products/multi-streaming when sending to multiple destinations.
- Distributed guests: prefer per-guest webcam + local encoder sending via SRT to your central mixer/bridge. See /docs/srt-setup for SRT parameters and examples.
- Output requirements and post-processing:
- If you need recordings and VOD, route the cleaned master to storage and VOD workflows: /products/video-on-demand.
- If you need multi-destination streaming to socials, use /products/multi-streaming to replicate and map outputs.
- Automation and APIs:
- For programmatic control (start/stop, thumbnails, ingest mapping), integrate with /products/video-api and consult /docs/encoding-best-practices for codecs and profiles.
Latency budget / architecture budget
Allocate latency across capture, encode, transport, processing, CDN, and player. Below are example budgets to meet specific glass-to-glass goals. A related implementation reference is Low Latency.
Target: <250 ms (interactive)
- Capture: 10–33 ms (webcam at 30–60 fps; frame time = 33.3 ms at 30 fps, 16.7 ms at 60 fps)
- Encode: 20–80 ms (hardware encoders like NVENC/Quick Sync tuned for zerolatency)
- Network/Transport: 50–100 ms (peer-to-peer / WebRTC; minimal jitter buffer)
- Processing/mixing: 10–30 ms (local mixing or MCU)
- Decode/render: 10–30 ms
- Total budget: ~100–250 ms
Target: 250–500 ms (very low-latency SRT)
- Capture: 20–40 ms
- Encode: 40–120 ms (hardware or tuned x264 with -tune zerolatency)
- SRT transport: 100–250 ms (SRT 'latency' parameter defines the ARQ/window in ms — use 100–500 ms on stable networks)
- Mixing & packaging: 50–100 ms
- Player decode/render: 20–30 ms
- Total budget: ~250–500 ms
Target: 500 ms–2 s (practical low-latency)
- Capture: 20–60 ms
- Encode: 60–200 ms
- Transport and retransmit buffer: 200–1000 ms
- CDN packaging & delivery (LL-HLS/CMAF): 200–400 ms
- Total budget: 500 ms–2 s
Notes on SRT parameterization: the SRT 'latency' value is expressed in milliseconds. Lower values reduce recovery time for lost packets and increase the chance of visible artifacting; higher values improve reliability at the cost of latency. For production over the public internet, start with latency=500 and adjust down if packet loss & jitter are low. See /docs/latency-budget for deeper examples.
Practical recipes
Each recipe below is actionable. Where applicable, I include exact encoder flags and example network parameters.
Recipe A — Solo streamer (laptop + single USB webcam) -> CDN
- Hardware: USB 3.0 webcam (1080p60 capable if you want 60 fps), laptop with dedicated GPU (NVENC) or Intel Quick Sync.
- OBS settings:
- Base (canvas) resolution: native sensor (e.g., 1920x1080).
- Output (scaled) resolution: 1920x1080 for high quality or 1280x720 to reduce bandwidth/CPU.
- FPS: 30 or 60 depending on camera and audience.
- Encoder: NVENC (if available) — Rate control: CBR — Bitrate:
- 720p30: 1.5–3.5 Mbps
- 1080p30: 3–6 Mbps
- 1080p60: 6–10 Mbps
- Keyframe interval: 2 s (set in seconds; OBS 'Keyframe Interval' = 2).
- Profile: main (compatible) — if you need widest compatibility use baseline/main.
- Network: wired Ethernet preferred; test upload capacity and reserve 20% headroom for bursts.
- Ingest: RTMP to CDN. For lower-latency contribution to your cloud, send SRT to your ingest endpoint. Example ffmpeg SRT command (Linux):
Command
ffmpeg -f v4l2 -framerate 30 -video_size 1280x720 -i /dev/video0 -f alsa -i hw:0 -c:v h264_nvenc -preset llhq -rc cbr -b:v 3500k -g 60 -bf 0 -c:a aac -b:a 128k -f mpegts 'srt://ingest.example.com:4201?mode=caller&latency=200'Notes:
- -g 60 sets GOP to 2 seconds at 30 fps. For low-latency use keyframe interval = 1 second (g = 30) if you need faster recovery.
- -bf 0 disables B-frames; this reduces decode latency and improves error resilience in some workflows.
Recipe B — Remote interview (each guest uses webcam -> SRT -> central mixer)
- Goal: Maintain 500–1000 ms glass-to-glass while preserving quality and sync across participants.
- Guest settings (recommend to guests):
- Resolution: 1280x720 at 30 fps.
- Bitrate: 2.5–4 Mbps per guest stream (CBR).
- Audio: AAC 48 kHz, 64–128 kbps mono/stereo.
- SRT: mode=caller for guests calling the studio, latency=500 (start here) and tune down to 300 if network is stable.
- Central mixer/machine:
- Accept SRT inputs and perform switching/clean feed at low latency (mix & forward). Use hardware acceleration to re-encode where necessary.
- Record multitrack to disk for VOD and send a program feed to /products/video-on-demand and live outputs via /products/multi-streaming.
- Operational tips: ensure symmetric NAT traversal if guests are behind NAT — SRT helps with NAT issues but confirm ports and firewall rules. Consult /docs/srt-setup for port and mode guidance.
Recipe C — Multi-webcam studio on one PC (conference, multi-angle)
- Hardware:
- Use a powered USB 3.0 hub to connect multiple webcams. For reliability, prefer dedicated capture devices (HDMI/SDI) for more than 2 cameras.
- Verify host CPU/GPU headroom: each webcam captured as UVC stream requires CPU or GPU encode resources.
- OS tips:
- Windows: use dshow or OBS. Use exclusive camera configuration to avoid driver conflicts.
- Linux: v4l2 devices; check formats with
v4l2-ctl --list-formats-ext -d /dev/video0.
- OBS or vMix: use hardware encoder (NVENC) and route program output to SRT with latency=250–500 for contribution to the cloud.
Practical configuration targets
Concrete encoder and transport targets you can apply directly.
- General RTMP/SRT contribution settings:
- Codec: H.264 (libx264 or hardware). If using HEVC, ensure target platforms support it.
- Rate control: CBR for consistent CDN delivery.
- Keyframe interval (GOP): 1–2 seconds.
- B-frames: 0 for lowest latency; 1–2 acceptable if latency budget allows.
- AV sync: keep audio at 48 kHz, mono/stereo at 64–128 kbps.
- Resolution -> bitrate -> GOP examples:
- 720p30: bitrate 1.5–3.5 Mbps; keyframe 30 (1 s) – good for constrained networks.
- 1080p30: bitrate 3–6 Mbps; keyframe 30–60 (1–2 s).
- 1080p60: bitrate 6–10 Mbps; keyframe 60 (1 s at 60 fps uses g=60).
- 4K30: bitrate 15–25 Mbps (webcams rarely used at 4K in low-latency situations due to CPU/network cost).
- SRT tuning:
- LAN: latency=50–200 ms; small buffer gives best responsiveness.
- Public internet (good): latency=200–600 ms.
- Long haul/high jitter: latency=800–3000 ms (increase recovery window).
- LL-HLS / CMAF packaging if you need sub-3s delivery:
- Part size: 200–500 ms (LL-HLS parts or CMAF chunk duration).
- Segment target duration: 1–2 s when using parts. Full playlist latency target: 1–3 s achievable with careful pipeline tuning.
Limitations and trade-offs
- Webcam sensor size and optics: webcams have smaller sensors than camcorders; expect weaker low-light performance and dynamic range.
- USB bus contention: multiple cameras on one host can saturate USB 3.x lanes. If you plan 3+ webcams, prefer capture cards or distributed capture devices.
- Hardware encoding vs software: hardware encoders (NVENC/Quick Sync) reduce latency and CPU usage but may have different bitrate/quality characteristics compared to x264. Test visually for your content type.
- Latency vs reliability: lower SRT latency increases likelihood of visible artifacts when packet loss exists. Choose your latency based on network stability.
- Browser compatibility: some players/web platforms have limitations on profiles and B-frames. Test target devices and set conservative profile if necessary (main/profile-level appropriate for 1080p).
Common mistakes and fixes
- Mistake: Using USB 2.0 for 1080p60 streams — leads to dropped frames. Fix: move camera to USB 3.0 port or reduce resolution/fps.
- Mistake: Auto exposure / autofocus enabled causing visible flicker. Fix: lock exposure/white balance in camera software or use a webcam that exposes manual controls.
- Mistake: Large keyframe intervals (GOP > 4 s) causing slow recovery after packet loss. Fix: set GOP to 1–2 s.
- Mistake: Using default SRT latency=2000 for all flows. Fix: start with conservative values (500–1000 ms) then lower for stable links; avoid unnecessarily high latency for interactive formats.
- Mistake: Sending MJPEG from webcam into WAN — bandwidth inefficient. Fix: transcode MJPEG to H.264 at the source or use webcam that outputs H.264/MJPEG to a local encoder using hardware acceleration.
Rollout checklist
Use this preflight before a live event.
- Test capture: verify camera at chosen resolution/fps. On Linux run
v4l2-ctl --list-formats-ext -d /dev/video0. On Windows, use ffmpeg dshow device listing. - Verify USB topology: ensure each camera is on separate USB controller where possible; use a powered hub if needed.
- Network check: run sustained upload test with 2x planned bitrate per stream. Measure jitter and packet loss.
- Transport test: perform SRT ingest with the planned latency and measure packet loss/jitter. See /docs/srt-setup.
- Encoding test: capture 10-minute test recording and inspect keyframe spacing, CPU usage, and bitrate stability. Confirm audio/video sync.
- End-to-end test: from camera through your cloud ingest, processing, CDN, and final player. Measure glass-to-glass latency and quality. Adjust SRT latency or encode quality accordingly.
- Failover: test fallback ingest (RTMP) or lower-resolution streams for constrained networks. Document SOP for switching during stream.
Example architectures
Simple diagrams described in text — choose the one that matches your scale.
Architecture 1 — Solo streamer -> CDN
- Webcam (USB 3.0) -> OBS (NVENC) -> SRT to cloud ingest endpoint -> cloud packager -> CDN/livestreams.
- Use this when you want a low-latency primary feed and plan to use /products/multi-streaming to reach social destinations and /products/video-on-demand for archiving.
Architecture 2 — Remote guests -> Central studio
- Each guest: webcam -> local encoder (OBS/ffmpeg) -> SRT (mode=caller, latency=500) -> central mixer.
- Central mixer: switch/mix -> cloud recorder -> distribute via /products/multi-streaming and /products/video-api to automate thumbnails and metadata.
Architecture 3 — Studio multi-camera -> self-hosted edge -> cloud
- Multiple webcams/capture cards -> local switcher/encoder -> SRT to an edge instance (self-hosted) for transcoding -> CDN.
- Consider /self-hosted-streaming-solution for detailed deployment patterns. For marketplace deployment automation see the AWS appliance: https://aws.amazon.com/marketplace/pp/prodview-npubds4oydmku.
Troubleshooting quick wins
If you see dropped frames, high latency, or sync problems, try these steps in order. All are quick to test during a preflight.
- Check USB bandwidth & cables:
- Move camera to a different USB controller or use a powered USB 3.0 hub. Replace the cable; prefer short, high-quality cables.
- Reduce resolution / framerate to reduce CPU/network load (e.g., 1080p30 -> 720p30). Measure improvement.
- Enable hardware encoder (NVENC/Quick Sync) — observe CPU drop and latency improvements.
- Increase SRT latency if you see artifacting under packet loss. Example change: latency=200 -> latency=500.
- Disable camera auto features (auto exposure/AF/auto white balance) to stop jitter/flicker.
- Inspect encoder keyframes: ensure keyframes at expected interval (use ffprobe on recorded file to confirm GOP length).
- If audio drift occurs: set all audio devices to 48 kHz; resample otherwise. Use audio-only test files to isolate the issue.
Next step
If you want to evaluate production-ready options that map to the recipes above, take one of these next steps:
- Try multi-destination live streaming workflows and replication with /products/multi-streaming (great for simultaneous social distribution).
- Automate recording, trimming, and on-demand workflows with /products/video-on-demand after you capture your master feed.
- Integrate programmatic control, ingest mapping, and analytics using /products/video-api and consult /docs/encoding-best-practices for precise profiles and codec parameters.
- Read the SRT setup guide at /docs/srt-setup and the latency budgeting examples at /docs/latency-budget to match SRT latency to network reality.
- For a self-hosted edge or appliance deployment, review /self-hosted-streaming-solution and the automated AMI/marketplace offering at https://aws.amazon.com/marketplace/pp/prodview-npubds4oydmku.
If you want help mapping a specific webcam model, network, and target latency to a working configuration and a cloud ingest plan, contact our product team via the /products/video-api or /products/multi-streaming pages and we can provide a prescriptive plan and templates you can run as a test. Also consult /docs/obs-setup for OBS-specific configuration examples and wiring diagrams.