Twitch bitrate guide, RTMP URL and streaming requirements
More live video workflow notes and product updates.
Twitch streaming requirements are mostly about bitrate, encoder settings, RTMP ingest, stream key, upload stability, and stream health. If these settings are wrong, Twitch may still receive your stream, but viewers can see buffering, quality drops, unstable bitrate warnings, or no video at all.
This guide explains the practical Twitch setup: recommended bitrate, RTMP URL format, ingest server choice, OBS encoder settings, CPU usage, upload bandwidth, stream health checks, and when to use Callaba for multistreaming or a more controlled ingest workflow.
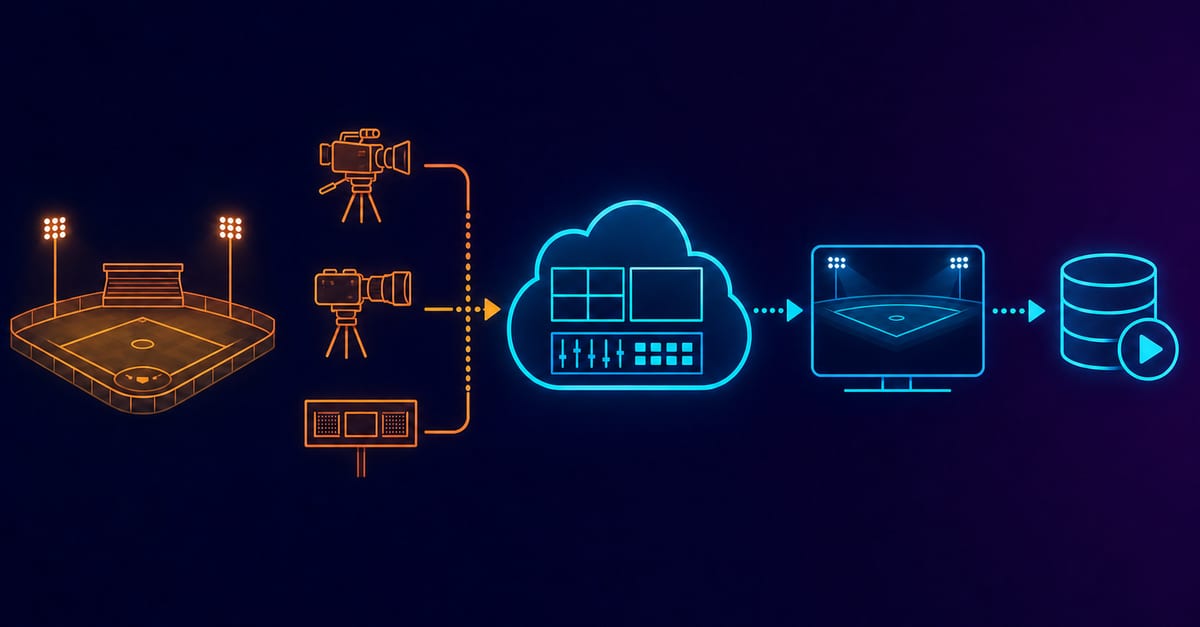
The basic Twitch workflow is:
camera / game / source → OBS or encoder → Twitch RTMP ingest server → Twitch viewers
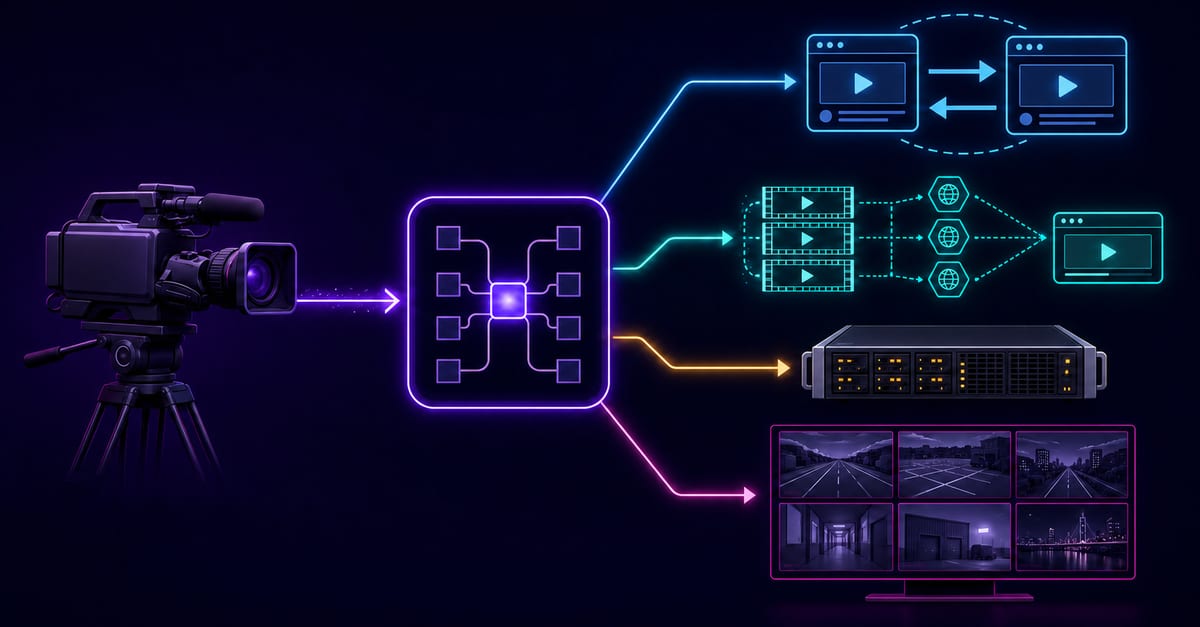
A more controlled workflow can look like this:
OBS / encoder → Callaba → Twitch + other destinations + recording + monitoring
Quick Twitch streaming requirements
For most Twitch streams, start with these safe settings:
- Video codec: H.264
- Audio codec: AAC
- Rate control: CBR
- Maximum video bitrate: up to 6000 kbps
- Keyframe interval: 2 seconds
- Audio sample rate: 48 kHz
- Audio bitrate: 128–160 kbps
- Connection: wired Ethernet when possible
- Upload headroom: keep at least 25–30% free above the stream bitrate
These are good baseline values. The right bitrate still depends on your resolution, frame rate, upload stability, encoder, and whether your viewers will get transcoding options.
Twitch bitrate guide
Bitrate controls how much video data your encoder sends to Twitch every second. Higher bitrate can improve detail, but only if your upload connection and Twitch ingest path can hold it steadily.
Do not choose the highest bitrate only because the picture looks better in a short local test. Twitch streaming needs stable bitrate over time.
Recommended Twitch bitrate targets
- 1080p60: 6000 kbps
- 1080p30: 4500–6000 kbps
- 720p60: 4500–6000 kbps
- 720p30: 3000–4500 kbps
- 480p30: 1500–2500 kbps
For many streamers, 720p60 at 4500–6000 kbps or 1080p30 at 4500–6000 kbps is safer than forcing 1080p60 on an unstable uplink.
Upload bandwidth rule
Your upload speed should be higher than your stream bitrate. A practical rule is to reserve 25–30% headroom.
Example:
- 4500 kbps video + audio + overhead usually needs at least 6 Mbps stable upload.
- 6000 kbps video + audio + overhead usually needs at least 8 Mbps stable upload.
Upload stability matters more than the highest speed test number. A connection that tests at 20 Mbps but drops every few minutes can be worse than a stable 10 Mbps wired connection.
Twitch RTMP URL and stream key
Twitch uses RTMP ingest for live broadcasting. Your encoder sends the stream to a Twitch ingest server using an RTMP URL and your private stream key.
The practical Twitch RTMP format is:
rtmp://TWITCH_INGEST_SERVER/app/STREAM_KEYIn OBS, you usually do not need to build this manually. You can choose Twitch as the service, select Auto or a specific server, and paste your stream key.
Where to find your Twitch stream key
- Open the Twitch Creator Dashboard.
- Go to Settings.
- Open Stream.
- Copy your Primary Stream Key.
- Paste it into OBS or your encoder.
Your stream key is private. Do not share it, publish it, or save it in public docs. Anyone with your stream key can potentially broadcast to your channel.
Twitch ingest server
A Twitch ingest server is the server that receives your live stream before Twitch prepares it for viewers.
In most cases, use Auto in OBS. If Auto performs badly, choose the nearest stable ingest region manually.
Good ingest selection depends on:
- your physical location
- your ISP route to Twitch
- network congestion
- packet loss
- RTMP connection stability
- stream health in Twitch Inspector
The nearest region is not always the best if the route is unstable. Test before an important stream.
Twitch encoding settings for OBS
OBS settings depend on your computer, GPU, upload speed, and stream format. These baseline values are safe for most Twitch workflows.
Video settings
- Rate control: CBR
- Keyframe interval: 2 seconds
- Profile: High
- Resolution: 720p or 1080p depending on upload and CPU/GPU headroom
- FPS: 30 or 60 depending on content and system capacity
Audio settings
- Codec: AAC
- Sample rate: 48 kHz
- Bitrate: 128–160 kbps
- Channels: Stereo for most streams
NVENC settings
If you have a supported NVIDIA GPU, NVENC is often the safest choice because it reduces CPU pressure.
- Encoder: NVIDIA NVENC H.264
- Rate control: CBR
- Bitrate: based on your target resolution
- Keyframe interval: 2 seconds
- Preset: Quality or Performance depending on GPU headroom
- Profile: High
x264 settings
If you use CPU encoding, watch CPU usage carefully.
- Encoder: x264
- Rate control: CBR
- Keyframe interval: 2 seconds
- CPU usage preset: veryfast as a safe starting point
- Profile: High
If CPU usage is too high, do not simply push through it. Lower resolution, lower FPS, use a faster x264 preset, or switch to hardware encoding.
Twitch CPU usage: what is normal?
Twitch itself does not consume your CPU. OBS, your encoder, game, browser sources, capture devices, overlays, and plugins consume CPU or GPU on your machine.
High CPU usage can cause:
- dropped frames
- encoding lag
- audio desync
- stuttering video
- OBS becoming unresponsive
- unstable stream output
How to reduce CPU usage while streaming to Twitch
- Use NVENC, Quick Sync, or another hardware encoder if available.
- Lower output resolution from 1080p to 720p.
- Lower FPS from 60 to 30.
- Use the x264 veryfast preset instead of slower presets.
- Remove heavy browser sources and animated overlays.
- Close background apps, cloud sync, and unnecessary browser tabs.
- Avoid local recording at very high quality on the same machine if the system is already loaded.
If OBS reports encoding overload, fix the local machine first. Changing Twitch ingest servers will not solve CPU overload.
Twitch stream health
Twitch stream health tells you whether Twitch is receiving a stable broadcast from your encoder.
Watch these signals:
- Bitrate stability: the stream should stay close to your configured bitrate.
- Dropped frames: usually a network or upload issue.
- Encoding lag: usually local CPU or GPU pressure.
- Keyframe interval: should be 2 seconds.
- Frame rate: should match your configured output.
- Audio presence: viewers should not receive silent or missing audio.
- Ingest connection: Twitch should receive the stream continuously.
Use Twitch Inspector or the Twitch dashboard to verify stream health before important broadcasts.
How to test a Twitch stream before going live
Run a test before any important stream. A short test can prevent most common failures.
- Set your OBS bitrate, keyframe interval, audio, resolution, and FPS.
- Choose Twitch as the service or use the correct RTMP URL and stream key.
- Start a private or test stream workflow if available for your account.
- Open Twitch Inspector or the dashboard stream health view.
- Watch bitrate stability for at least several minutes.
- Check audio, video, sync, and dropped frames.
- Watch from another device if possible.
Do not trust only the OBS “Start Streaming” button. Confirm that Twitch receives a stable stream.
Basic Twitch setup in OBS
1. Copy your Twitch stream key
Open Twitch Creator Dashboard, go to Settings → Stream, and copy your stream key.
2. Open OBS stream settings
In OBS, open Settings → Stream.
- Service: Twitch
- Server: Auto or nearest stable ingest server
- Stream key: paste your Twitch stream key
3. Configure OBS output
Open Settings → Output.
- Rate control: CBR
- Bitrate: choose based on your resolution and upload capacity
- Keyframe interval: 2 seconds
- Encoder: NVENC, Quick Sync, Apple VT, or x264 depending on your machine
4. Start streaming and check health
Click Start Streaming in OBS and check Twitch stream health. Watch dropped frames, bitrate stability, and audio/video preview.
Recommended Twitch settings by workflow
Entry-level stream
- Resolution: 720p
- FPS: 30
- Bitrate: 3000–4500 kbps
- Encoder: hardware encoder if available
- Use when: upload is limited or the computer is not very powerful
Gaming stream
- Resolution: 720p60 or 1080p30
- Bitrate: 4500–6000 kbps
- Encoder: NVENC or strong x264 setup
- Use when: motion is high and you need smoother output
High-quality Twitch stream
- Resolution: 1080p60
- Bitrate: 6000 kbps
- Encoder: strong hardware encoder or powerful CPU
- Use when: upload and system performance are stable
Talk show, podcast, or low-motion stream
- Resolution: 1080p30 or 720p30
- Bitrate: 3000–4500 kbps
- Encoder: hardware or x264
- Use when: content has less motion and audio clarity matters more than maximum FPS
Multistreaming to Twitch and other platforms
If you stream only to Twitch, OBS can send directly to Twitch. If you want to stream to Twitch, YouTube, Facebook, LinkedIn, or other platforms at the same time, do not automatically add several local outputs from the same computer.
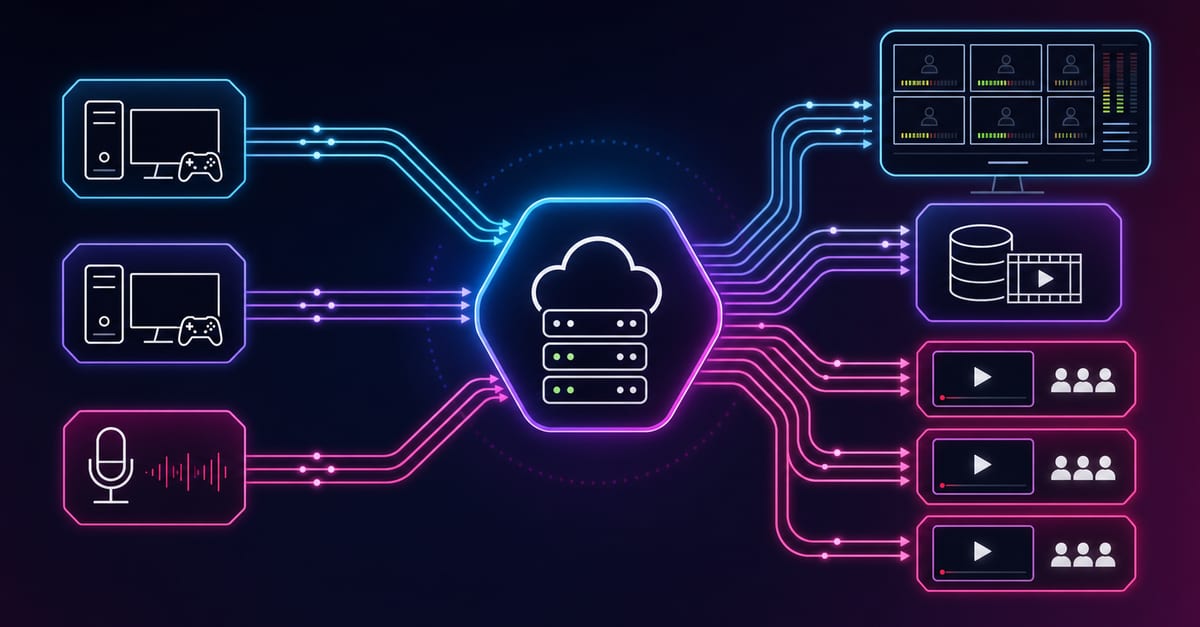
A safer workflow is:
OBS → Callaba → Twitch + YouTube + Facebook + recording
This gives you:
- one upload from OBS
- separate destination control
- cloud recording
- stream monitoring
- less local upload pressure
- easier recovery if one platform fails
Before simulcasting to Twitch and other services, check the current Twitch simulcasting rules and make sure your Twitch viewer experience is not worse than the experience on other platforms.
When to use Callaba with Twitch
Use Callaba when your Twitch workflow needs more than one direct stream from OBS to Twitch.
Callaba is useful when you need to:
- stream to Twitch and other platforms at the same time
- record the master stream in the cloud
- route one input to many outputs
- monitor bitrate and stream state outside OBS
- use SRT contribution before sending RTMP to Twitch
- use a self-hosted or cloud-controlled streaming workflow
- automate workflows over API
For example:
OBS → SRT to Callaba → RTMP/RTMPS to Twitch
This can be useful when SRT is better for contribution from the production location, while Twitch still receives the final stream through its RTMP ingest workflow.
Common Twitch streaming problems and fixes
Twitch says bitrate is unstable
Use CBR, lower bitrate, stop background uploads, switch to wired internet, and check whether your upload has enough headroom.
Twitch stream keeps buffering
Lower bitrate or resolution. Viewers may buffer if your stream bitrate is too high for stable delivery or if Twitch does not provide transcoding options for all viewers.
OBS drops frames while streaming to Twitch
If OBS reports dropped frames, the issue is usually network or upload-related. Lower bitrate, use wired Ethernet, stop background traffic, and check Twitch Inspector.
OBS shows encoding overload
This is a local machine problem. Use hardware encoding, reduce resolution, reduce FPS, simplify scenes, or use a faster x264 preset.
Twitch receives no video
Check stream key, ingest server, RTMP URL, firewall rules, and whether OBS is actually sending data.
Audio is missing on Twitch
Check OBS audio mixer, muted sources, selected audio devices, sample rate, and output audio track.
The stream works for a few minutes, then fails
Check upload stability over time, overheating, ISP issues, Wi-Fi drops, CPU/GPU load, and whether background apps start uploading during the stream.
Rollout checklist before a Twitch stream
- Copy the correct Twitch stream key.
- Use the correct Twitch ingest server or Auto.
- Set CBR rate control.
- Set keyframe interval to 2 seconds.
- Choose bitrate based on upload stability, not only image quality.
- Use 48 kHz audio and AAC.
- Check OBS CPU/GPU usage.
- Use wired internet if possible.
- Run a test stream.
- Check Twitch stream health.
- Watch from another device before the real stream.
- Keep a backup plan for important broadcasts.
FAQ
What bitrate should I use for Twitch?
For Twitch, use a bitrate that matches your resolution and upload stability. Common targets are 3000–4500 kbps for 720p, 4500–6000 kbps for 1080p30, and up to 6000 kbps for 1080p60.
What is the maximum Twitch bitrate?
A practical maximum for standard Twitch live streams is 6000 kbps. Higher values may cause unstable bitrate warnings or viewer buffering, especially when transcoding is not available.
What is the Twitch RTMP URL?
The Twitch RTMP URL uses this format: rtmp://TWITCH_INGEST_SERVER/app/STREAM_KEY. In OBS, you can usually select Twitch as the service and paste your stream key instead of writing the full URL manually.
Where do I find my Twitch stream key?
Open Twitch Creator Dashboard, go to Settings, then Stream, and copy your Primary Stream Key. Keep it private because it allows broadcasting to your channel.
What is a Twitch ingest server?
A Twitch ingest server receives your live stream from OBS or another encoder. You can use Auto in OBS or manually choose a stable ingest region.
What encoder settings should I use for Twitch?
Use H.264 video, AAC audio, CBR rate control, 2-second keyframe interval, 48 kHz audio, and a bitrate that your upload can hold steadily.
Why is Twitch saying my stream health is bad?
Common causes include unstable bitrate, dropped frames, wrong keyframe interval, upload saturation, high CPU usage, wrong ingest server, or encoder overload.
How do I reduce Twitch CPU usage?
Use a hardware encoder if available, lower resolution or FPS, use a faster x264 preset, remove heavy browser sources, close background apps, and avoid unnecessary local recording during the stream.
Can I stream to Twitch and YouTube at the same time?
Yes, but check Twitch simulcasting rules first. A practical workflow is to send one stream to Callaba and let Callaba restream to Twitch, YouTube, Facebook, and other destinations.
Can I use SRT for Twitch?
Twitch ingest is based on RTMP-style broadcasting. You can use SRT for the contribution path into Callaba, then have Callaba send the final stream to Twitch over RTMP or RTMPS.